
Angles of Incidence and Reflection
Learn how to position your lights right every time.
If you’ve ever struggled to position a light correctly, or wondered how to avoid glaring reflections in an image, this class will answer all of your questions.
Here, Karl breaks down some simple laws of physics to help you get to grips with how reflections work and how you can optimise them in your photography.
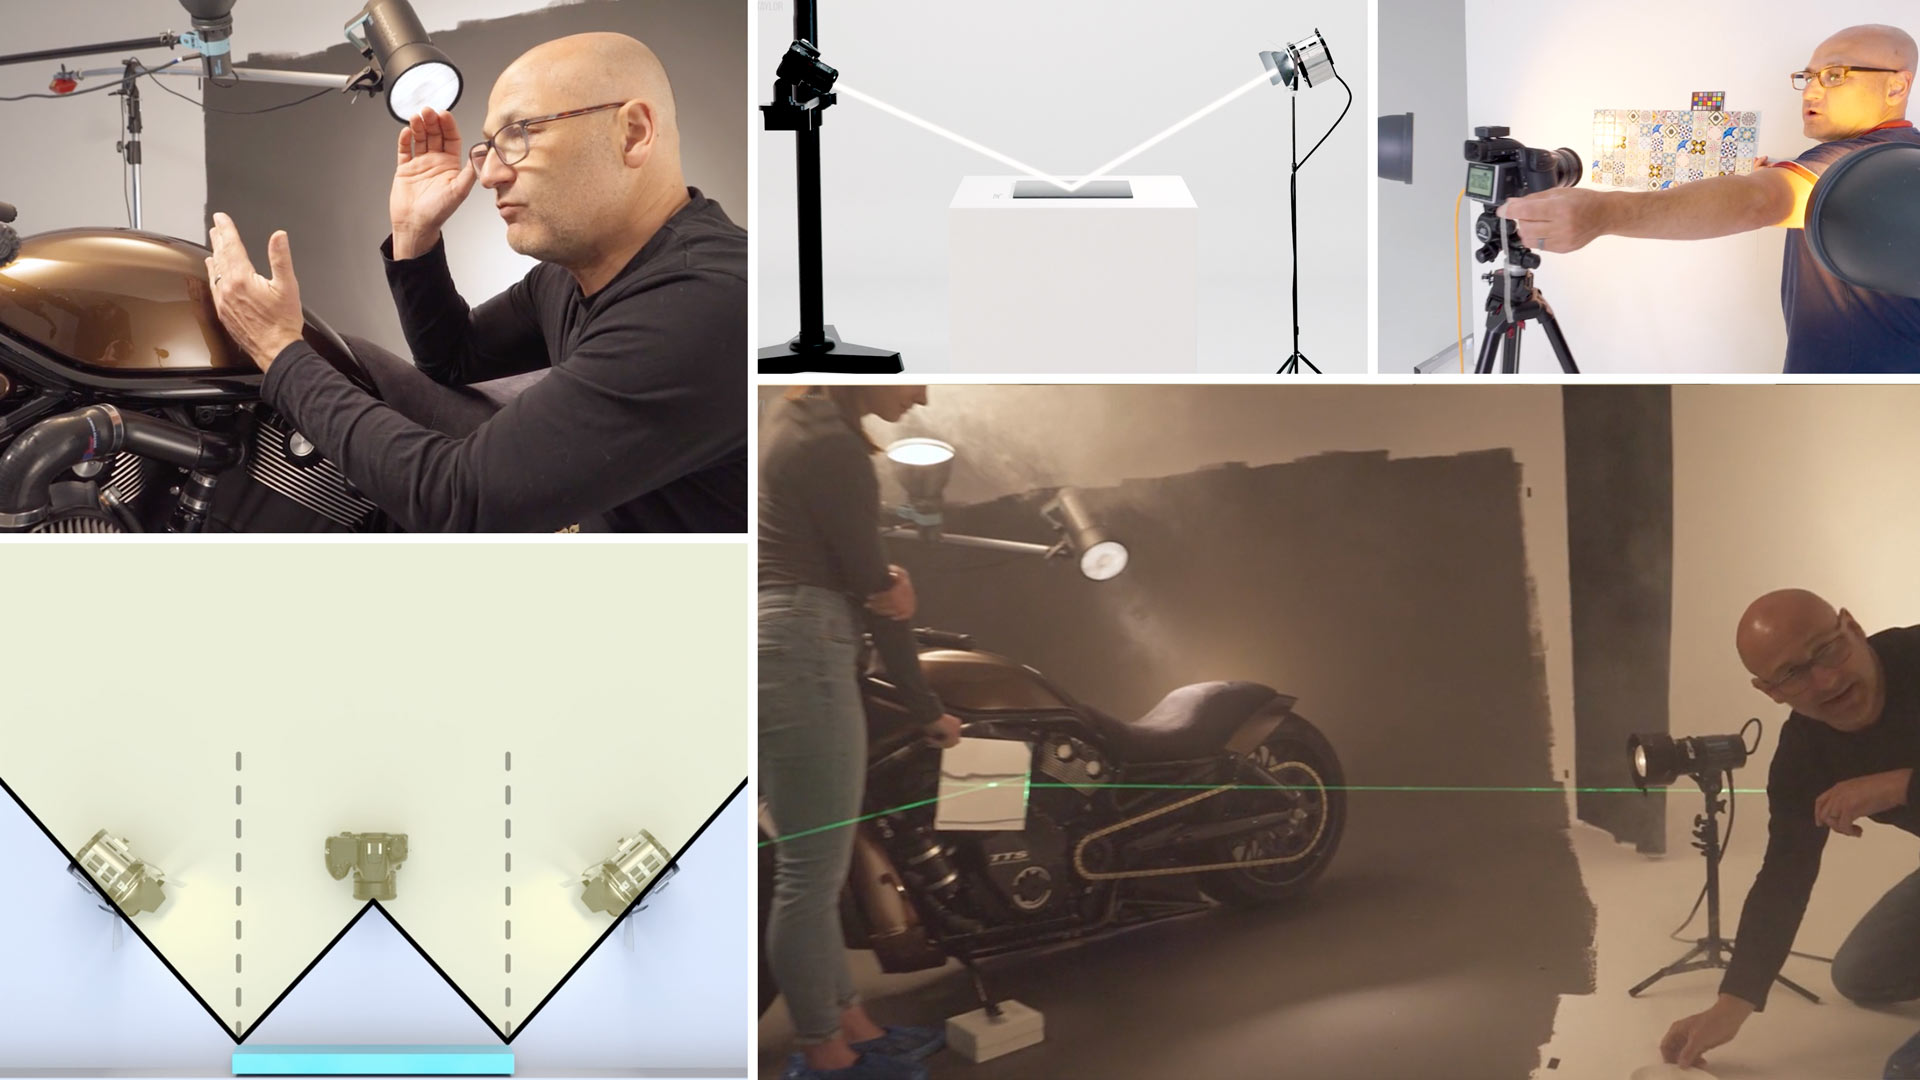
After describing the four different types of reflection, Karl goes on to explain the angle of incidence and the angle of reflection. (In the video, the latter is sometimes referred to as the ‘angle of reflectance’.)
Understanding how these angles relate to one another is crucial to capturing successful photographs. Using graphical examples, mirrors, laser pointers, smoke pellets and even a Harley Davidson motorcycle, Karl demonstrates how to put this key aspect of lighting theory into practice.
To wrap up the class, he shares a handy technique for removing glaring reflections from a shot – without having to move your lights.
By the end of the video, you’ll have a deeper understanding of how light works and how to harness and manipulate it for stronger images.
In this photography class:
- The four types of reflection
- The angle of incidence
- The angle of reflection
- Using polarising filters in photography
- How to use a laser pointer to position studio lights
- Adjusting focal length to alter reflections
If you enjoyed this class, check out Understanding Light or Harley Davidson Night Rod Photoshoot.
You may also like to watch How and Why to Polarise Light in Studio Photography, which Karl mentions in the conclusion to this class.
Questions? Please post them in the comments below.
Comments
Hi Karl, This was an AHA moment for me and has solved a lot of my issues, so thank you so much! I do a lot of domed highly reflective jewelry so being able to pinpoint where to bounce the light in for my desired effect really helps. I’d get the piece lit and had trouble figuring out how to softly light the bottom of the domed piece that fell into shadow. I can’t believe with all the classes I’ve seen and courses I’ve taken, no one else has explained this!
Thank you, I’m going to go out on a limb here and say that’s because most people who teach photography don’t really know what they are doing.
Best class ever! Thank you
Thank you 🙂
Hello karl! amazing info in layman’s terms. I have got a question regarding photographing the tiles as the surface is shiny the camera should also reflect in the tiles as per angles of reflection but how come it is not showing? Is it the camera slightly placed below the tiles level and looking upward if that so then how you overcame the edge distortion in camera?
Thank you
Hi Rik, thank you. The camera doesn’t show as it isn’t bright enough to stand out. Essentially a reflection in a mirror will show everything but if everything is black then the mirror will only show black, so a common trick we use where reflections are a real problem, such as internal glass partitions on interior photography, is to create a black wall of fabric and shoot through a hole or slit in the curtain. In this instance it wasn’t necessary as the subject was not a mirror and forming perfect reflections and the area of my camera etc was darker than the lighting exposure.
Another great tutorial, thank you very much Karl
Thanks John, this is a favourite of mine as it is fundamental knowledge that is often overlooked.
Great lesson but I believe you have inverted the angle of incidence and reflection in your explanation with the motorcycle. The angle of incidence is the angle from the light source (continuous light) and the angle captured by the camera is the angle of reflection.
Light source = transmitter = creating angle of incident light
Camera = receiver = capturing angle of reflected light
This was so well explained and visually demonstrated. One question, what laser did you use?
Thanks, I don’t know the brand but any decent laser pointer will work.
Many many thanks, Karl, for this fantastic presentation. I am not a photographer. I have just opened my online store for crochet products that my sister is making. And I was struggling to make good pictures of the products. Bought my first photo camera one month ago and joined your online courses. I can say that it helps me a lot, and by watching all your lessons I am learning to be a good product photographer. Thank you again, for explaining everything for people like me whom doesn’t know anything about the photography 🙂
Thank you Ramashke that is very kind of you to say. All the best Karl.
this is great! I’ve assumed lighting physics is involved and drew paper before, but this is much more clear than my imagination. thank you
Thank you.
Terrific lesson! Thank you!
Thank you.
Great lesson. I am assuming this physics works for overhead lights on grid as well, and not just floor lights horizontal to camera, but also vertical?
Hi Ty, the formula works for any and every lightsource.
Such a beautiful demonstration! This is a physics class, love it 🥰
Great job!! i really enjoy how you make it easy to understand, I am extremely green to photography and you are really making it fun and enjoyable
Great to hear thank you!
Great class, I read the magic of light a year ago and got bogged down with some of the physics, this explained it in practical and useful terms, thanks Karl.
Nice one Karl. This should be a companion video to the book: Light – science and magic.
You broke the mold on this video. Very complicated subject explained well and easy to understand. The string and the laser made the angles easy to visualize. Now I know where to place the lights on most subjects. I took 6 pages of notes on this one. I’m just a beginner but this opened up a world of possibilities. The graphics at the end where superb. Thanks Karl.
Thank you for your feedback much appreciated.
That was great! So clearly presented! I’m really learning so much from these lighting videos. It’s so useful to see the set ups and how you actually use all of your equipment, in addition to the teaching itself being pretty amazing. Thanks a lot, Karl.
Thank you very much 🙂
Hugely appreciate this tutorial! I can see why I struggled to find the proper angle of reflection–I don’t have my composition 100% locked down and but forget that even a slight movement of camera height or placement changes the angle of incident! I also struggled with the lens focal length issue and did not understand why the shot would work when I switched to a longer focal length. Many thanks for putting the laws of physics into layman’s terms!
Thank you, glad you enjoyed it.