


Electric Guitar Product Photography
Ready to rock? Turn your product photography skills up to 11 with this step-by-step tutorial.
Black-on-black product photography is already tricky. Throw in a variety of textures and shapes, and things become even more complex. In this class, you’ll learn how to overcome the many challenges of photographing a glossy black product against a black background.
You’ll discover how to use a tilt-shift adapter to achieve sufficient depth of field, how to create gradient lighting to highlight the shape of the guitar, and how to control precise patches of light to accentuate key areas of the instrument.
By the end of the class, you’ll feel equipped and inspired to try your own black-on-black photography.
In this class:
- How to photograph black-on-black product shots
- Lighting techniques for photographing gloss surfaces
- How to light products with mixed surface textures and shapes
- Using wide-angle lenses for product photography
- Using tilt-shift lenses for product photography
- Creating & controlling gradient lighting
If you enjoy this class, check out Gradient Lighting for Product Photography.
Questions? Please post them in the comments section below.
A highly complex shape to shoot, this electric guitar presented a number of challenges when it came to getting the light in the right position.
Working with the product set against a black background, the first stage of the lighting was to create a gradient lighting. This I did using a scrim, testing the positioning of my lights to see where worked best. I then worked to introduce patches of light to highlight details like the pickup switch, tone and volume dials, and tuners.
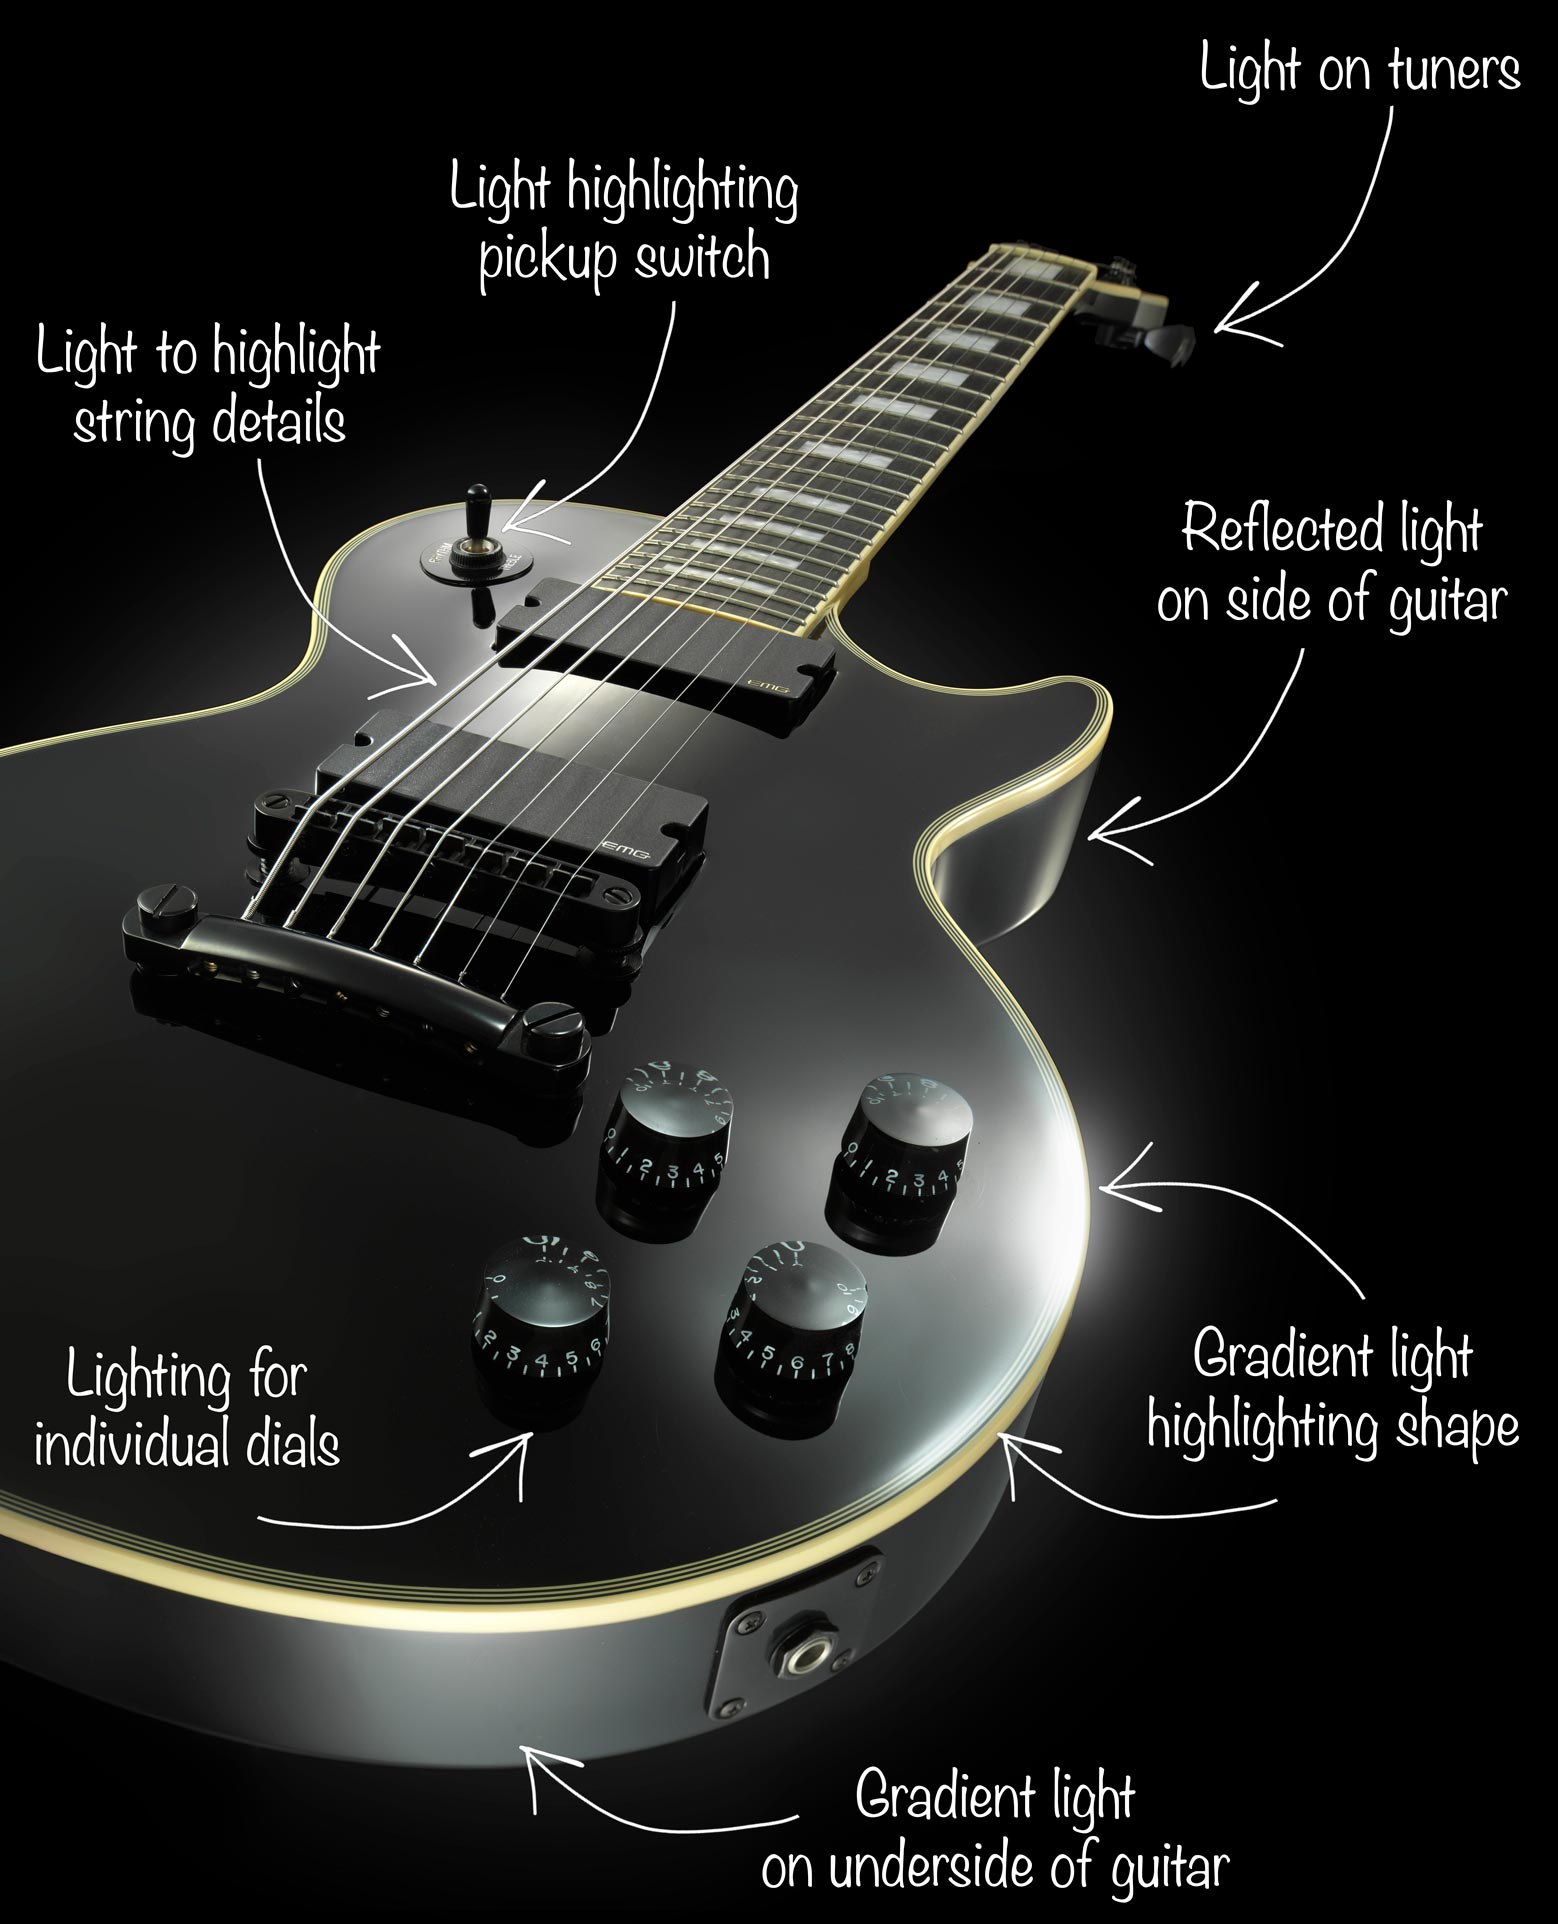
A breakdown of the lighting used for the guitar shot.
Using a combination of lights, I also used mirrors to bring light to areas along the side of the guitar. This reflected the gradient light and helped separate the guitar from the black background.
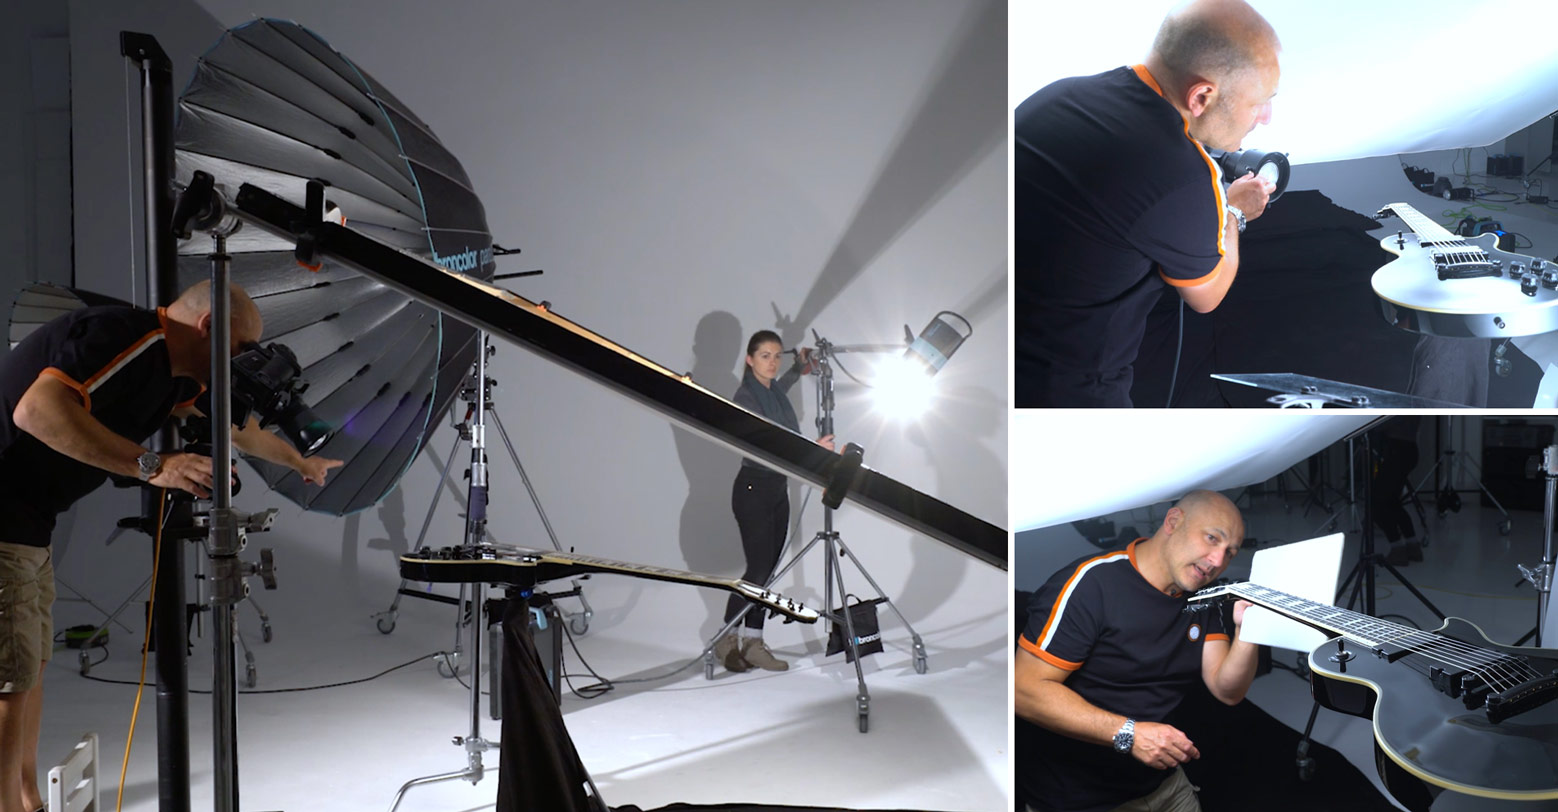
The lighting for this shoot included multiple lights.
As you’ll see in the video, the final image was captured largely in one shot, with separate images shot for lighting down the right-side of the guitar and on the tone and volume dials.

The final guitar image.
Comments
Hi Karl,
This is fantastic, I learned a lot watching you craft lighting on such a complex subject! The results are beautiful.
I love the gradients and the softness of light is sublime, but I am curious if you possibly gave it a thought to try hard-edged lighting to show the surface is more glossy? I’m not saying the soft gradients are wrong at all, I love the look, I’m just curious since I understood softer light portrays surfaces as more of a matte finish, Yes? No? or “Ivan – shut up, just do what feels right…” 🙂
I used used a strip box directly reflecting off a gloss surface of paint work on a car to show that it’s glossy, Here’s an example:
https://www.ivanbodenphotography.com/Machines/n-Z267t/Transformers-Bumblebee-Camaro/i-WNsTn6z/A
This was practice on a friends car and I’m far from expertise here. This example could be terrible for all I know, but I’m trying to learn and figure out how to show a surface is glossy, or, should I have gone with softer gradients. They always seem to look amazing.
I would love to hear your thoughts on this!
Ivan
Hi Ivan, that’s a great result and what you were saying about gloss or matt look is relevant but what I do if I want to get a ‘gloss’ look with gradient lighting is obscure one edge of the gradient light with black card so that one side is a hard edge which then gives the feeling of the ‘gloss’ look. You can see that in this class https://visualeducation.com/class/live-photography-workshop-cosmetics-swirls-sweeps/ watch from 1 hour 25mins.
Hi Karl,
Oh! The example of the makeup with a gradient highlight with one side hard-edged is brilliant. It shows the gloss surface perfectly well. I greatly appreciate your time explaining. I had not seen that class yet and now I’ll watch it in full.
I’ve been spending a lot of time on here, including the courses for certification and I passed :-), and thoroughly enjoying learning from you and your team. You are an excellent instructor.
Thank you,
Ivan
👍
Inspired by your class, I wanted to give this a go so I could get a hands-on feel as practice. I ordered a new guitar (never learned to play!), an Ebony Epiphone Les Paul on Amazon (reasonable, $179 US) and it arrived in two days! Took me all day to setup the set.
Here’s the finished file:
https://www.ivanbodenphotography.com/Food/Product/i-t7c29qP/A
I don’t have a tilt-shift lens, so I used focus stacking. Took 34 frames, tethered to Capture One, round-tripped to Helicon Focus. I wanted all the gradients and lighting to work for the stack so compositing separate lit elements would’ve required a lot more stacks and revised lighting setups. I would have liked to add gradients on top of the knobs, but I decided to let them go as shot. My workspace is extremely small, so getting it done in one setup was my main goal.
Instead of mirrors or white cards, I used two strip boxes with scrims in front to create the gradients on the sides (front and right side). The top was lit with two bare bulb lamps, through a large hand-made scrim (per your DYI class), and that shows up as a gradient on top-left and on the right side edge-as a specular highlight.
I wanted the gloss surface to look glossy, but rather than mask off an edge so it reflects one sharp edge, I think the specular highlight on the edge was enough information to portray the high gloss finish. If there’s more I should’ve done, suggestions are welcome.
Finishing off, I took out the dust and did some minimal dodge and burn. I did the cut out, added the black background and painted the colored-gradient using color sampled from the neck of the guitar.
Specs: Four Paul Buff Einstein strobes, two bare bulb, two with strip boxes.
Medium Format – Phase One XF IQ3100, 80mm @f/16, and a bunch of c-stands and Lee 216 scrims.
To hold the guitar, instead of a suction cup, I used a flat plate mounted to the top of mini c-stand.I used some padded, double-sided tape to hold the guitar to the plate. The tape pads held tight, no issues and left no marks on the guitar. I have a manfrotto suction cup, same as in your class, but didn’t use it because I find it can leave marks on painted surfaces and I didn’t want to mar the finish.
I continue to learn a lot and much thanks to Karl and the team for providing such great lessons.
Ivan
Thanks Ivan, it looks like a really good result.
52min10s
I don’t understand you take hundreds pictures but i don’t see you color marking the ones you might want to use on different layers, how do you remember which layers are in the multitude of shots you do??
Hi, I usually mark them up as I’m shooting them but sometimes I’ll just wait until the shoot is over and then spend an hour going through them and marking them up at the end. Sometimes I also write nots on the filename and what it was going to be used for if it was something obscure like ‘lighting on end of guitar’.
Karl, generally speaking for product photography how many pictures do you shoot?
What’s the average because I see sometimes you shot about 130pictures like this shot but another shot you did it was maybe 800.
Hi, good question but largely dependent on the subject material, my own aspirations and depth of field requirements or specific areas having to be lit separately. I’ve shot some products where it’s taken a whole day but I only shoot 3 images, mostly cars. Other products that need 4 products in one shot and each shot requires 20 images for a focus stack then it soon ads up. The motto though is only shoot as much as you need to, if I can get a shot in one shot then I will.
Hello Karl, the photo looks absolutely gorgeous, very classy!
What if instead of softening the lights, you wanted to emphasise on the highly glossy surface?
For example have a thin strip of harder light running down the guitar body, sculpting its convex shape?
Would a strip soft box and a lot of black velvet behind it do the trick, or would the reflections be so messy that this is next to impossible to achieve a good-looking result?
Thank you and all the best,
Remi
Hi Remi, thank you. If you wanted a solid white highlight down the surface of the guitar then a strip box or a 120×30 softbox with a stripbox window mask would give you that. I don’t think there would be any need for black velvet behind the softbox though as the contrast would already be great enough.
AWESOME!❤ THANK YOU VERY MUCH 😁
I love the solving of problems in this session. My wife has a couple different hurdy-gurdy instruments, a modern and a traditional. Actually we have many different stringed instruments, guitars of various types as well. This tutorial opened a completely new door for possibilities I am going to explore soon. So many great learnings in here. Great show Karl.
Hello Karl, apologies for a long comment but I’m having trouble overcoming a problem while shooting pack shots of guitars. A short explanation – I’m shooting guitars on white backgrounds and I’m restricted by my company from doing any post processing – we have to move quickly. Also, I’m shooting too quickly to move the lights between shots. The problem I’m having is not being able to illuminate chrome hardware on glossy black guitars without a light or white bounce card being visible in the body of the guitar. I think my solution is to bounce the light onto the hardware with a 50% gray card but I’m not sure if the card would still show up on the body of the guitar – your thoughts please? And, thanks for all your amazing advice!
Hi Castlesoundco, this sounds like an unfortunate situation. A bit like your company asking you to make a pizza but you’re not allowed to use any cheese and they must be cooked in a microwave. These sort of instructions are never conducive to the best outcomes, it sounds as if they are looking more for a ‘packshot’ result. There are of course many problems you will face based on the different aesthetics, materials and shape of each guitar but yes we do use grey panels occasionally to reduce highlights, interestingly I was talking to Tim Wallace the other day he’s a top car photographer and he recommends an off white (10% grey) for the studios rather than pure white as it helps to control the reflections better. I can’t say exactly what will work as I can’t see what your setup is or what the product is exactly but I’d recommend you look at some of our packshot courses for ideas:
https://visualeducation.com/class/pack-shots-product-photography/