
Electric Guitar Product Photography
Ready to rock? Turn your product photography skills up to 11 with this step-by-step tutorial.
Black-on-black product photography is already tricky. Throw in a variety of textures and shapes, and things become even more complex. In this class, you’ll learn how to overcome the many challenges of photographing a glossy black product against a black background.
You’ll discover how to use a tilt-shift adapter to achieve sufficient depth of field, how to create gradient lighting to highlight the shape of the guitar, and how to control precise patches of light to accentuate key areas of the instrument.
By the end of the class, you’ll feel equipped and inspired to try your own black-on-black photography.
In this class:
- How to photograph black-on-black product shots
- Lighting techniques for photographing gloss surfaces
- How to light products with mixed surface textures and shapes
- Using wide-angle lenses for product photography
- Using tilt-shift lenses for product photography
- Creating & controlling gradient lighting
If you enjoy this class, check out Gradient Lighting for Product Photography.
Questions? Please post them in the comments section below.
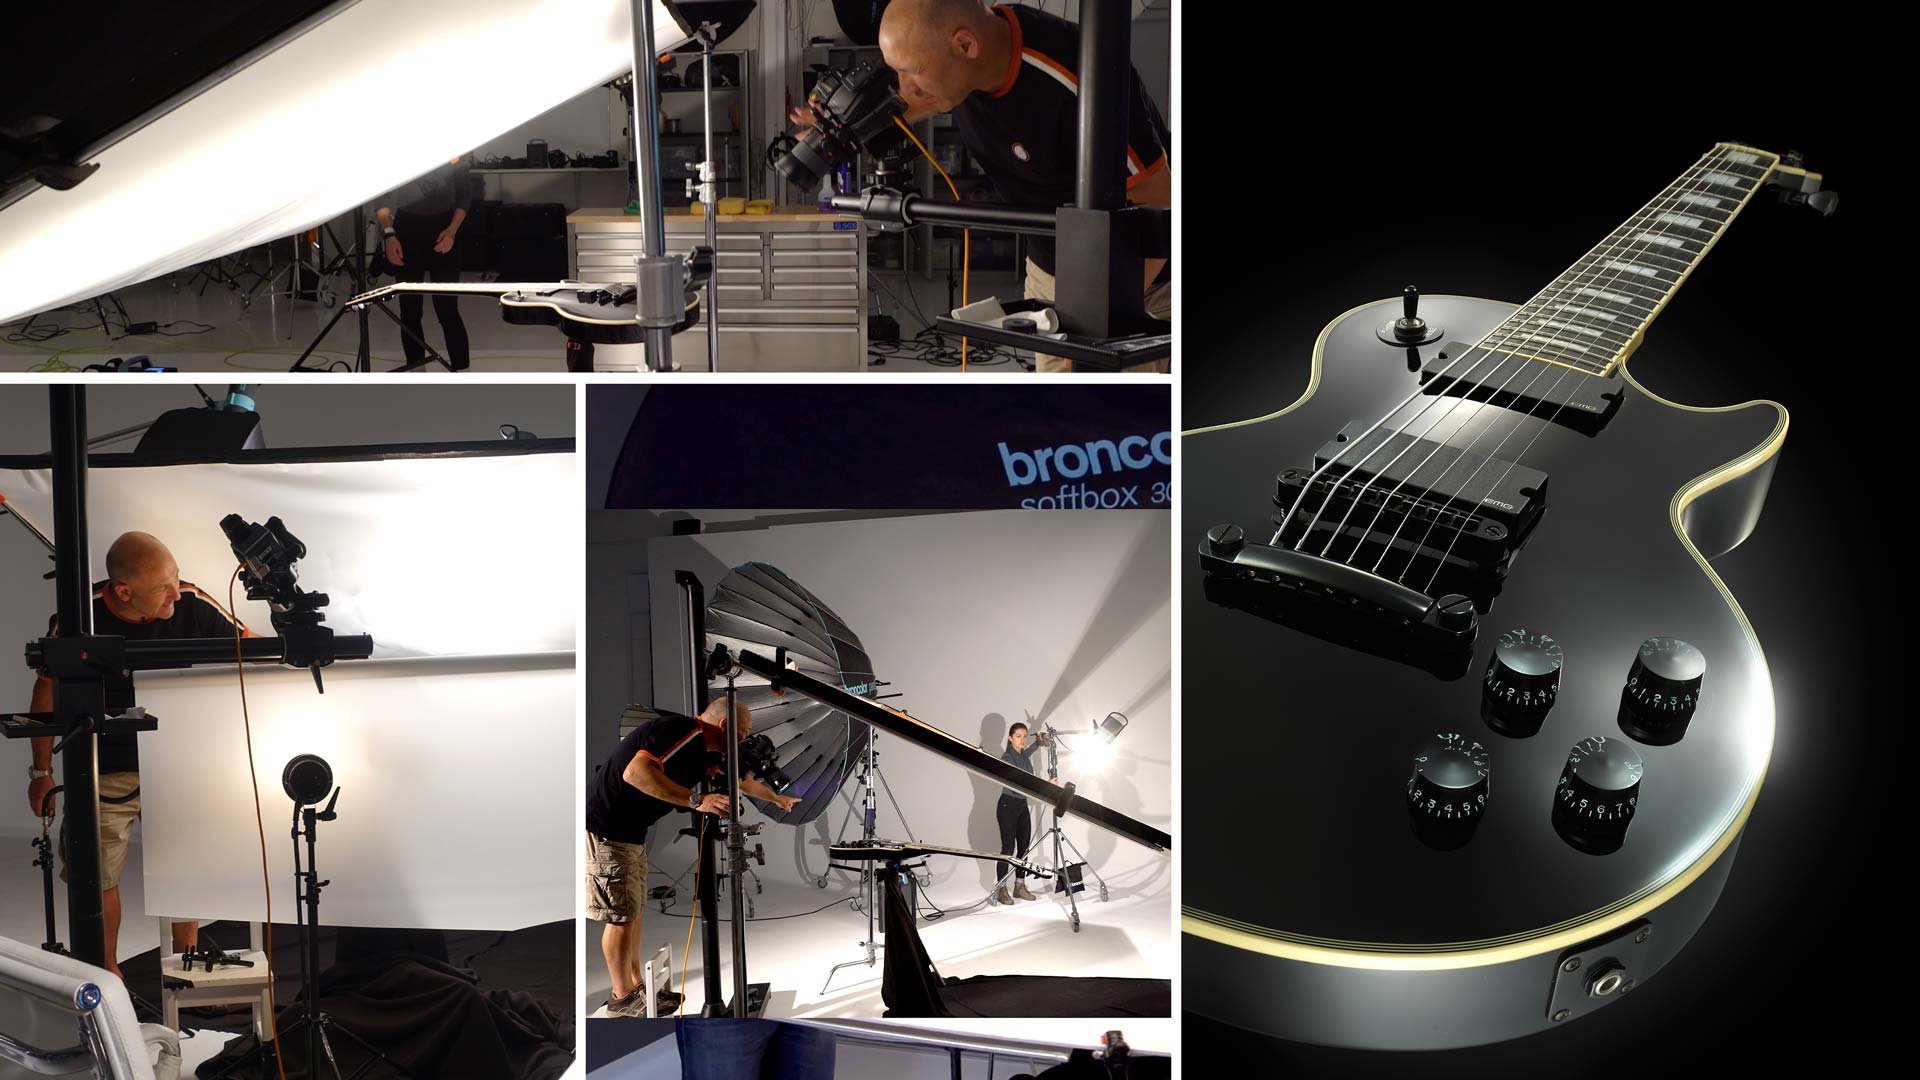
A highly complex shape to shoot, this electric guitar presented a number of challenges when it came to getting the light in the right position.
Working with the product set against a black background, the first stage of the lighting was to create a gradient lighting. This I did using a scrim, testing the positioning of my lights to see where worked best. I then worked to introduce patches of light to highlight details like the pickup switch, tone and volume dials, and tuners.
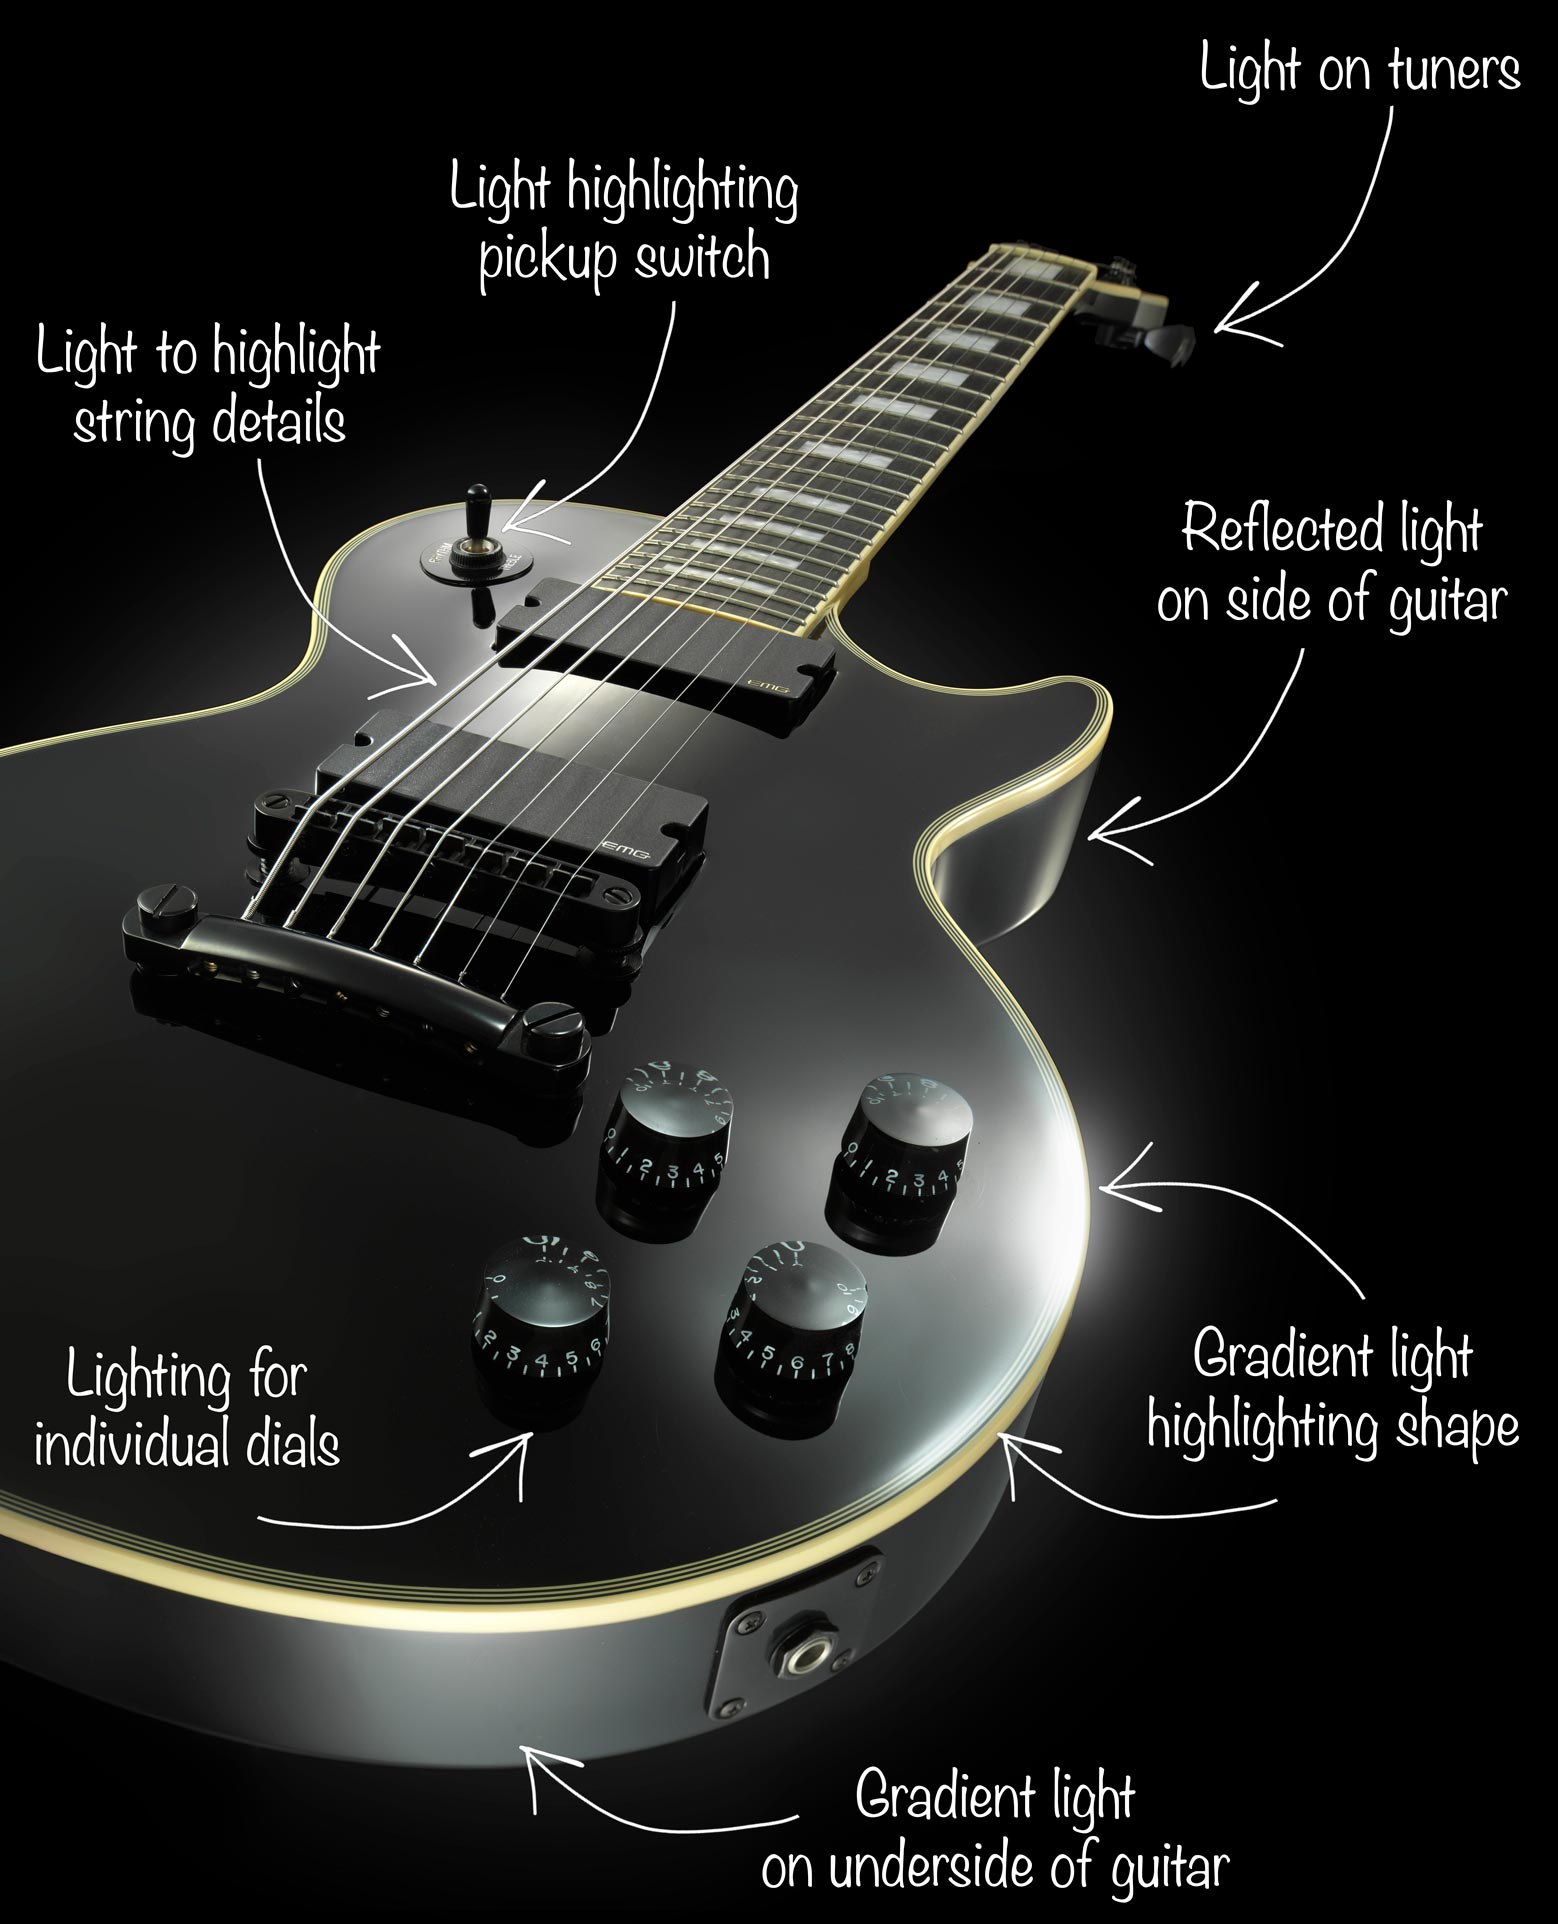
A breakdown of the lighting used for the guitar shot.
Using a combination of lights, I also used mirrors to bring light to areas along the side of the guitar. This reflected the gradient light and helped separate the guitar from the black background.
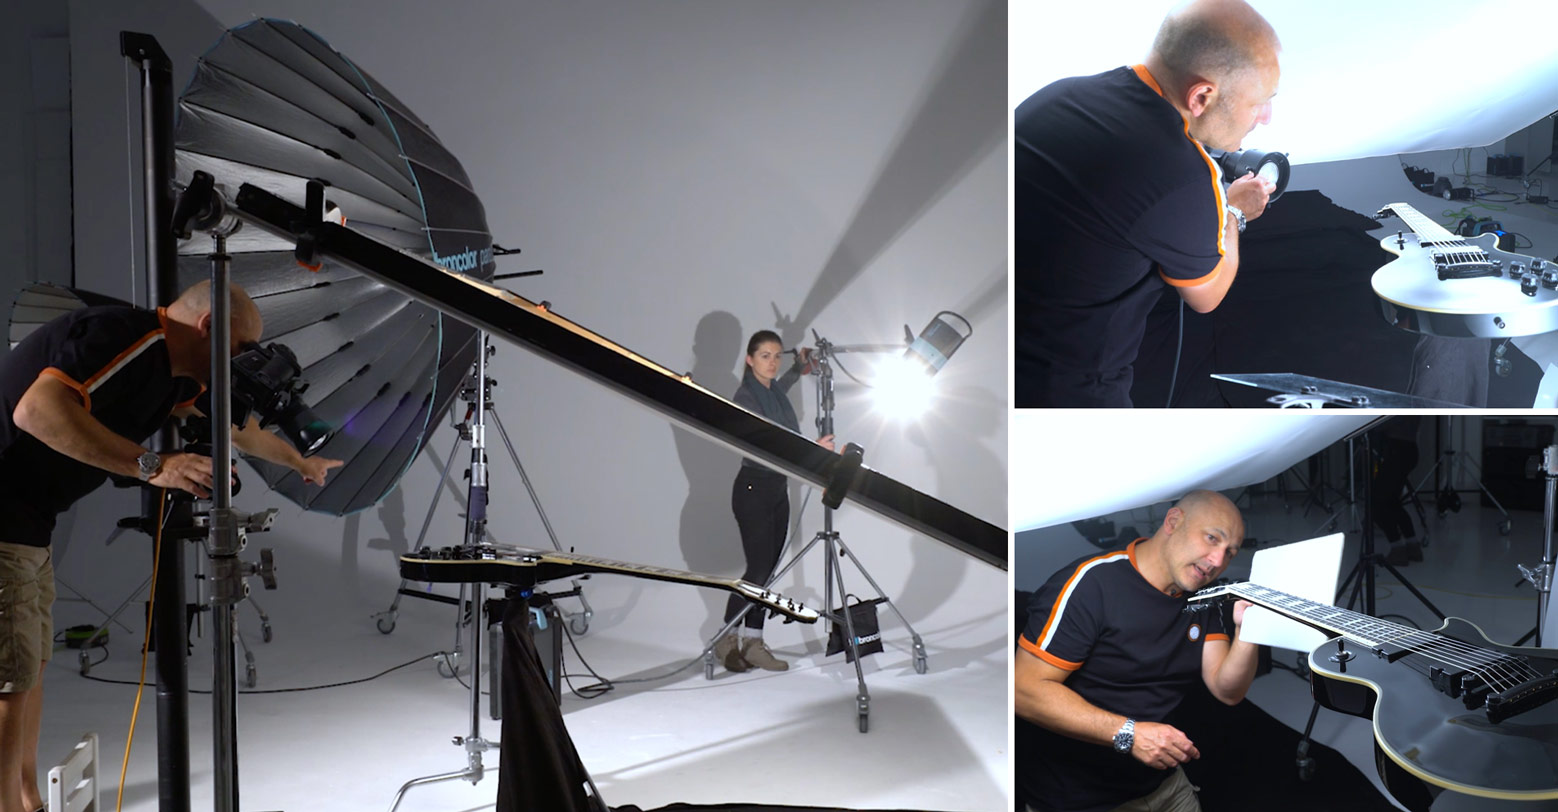
The lighting for this shoot included multiple lights.
As you’ll see in the video, the final image was captured largely in one shot, with separate images shot for lighting down the right-side of the guitar and on the tone and volume dials.

The final guitar image.
Comments
Hello Karl sir
this is Gaurav from India just joined your education channel its a great platform to learn.
I do wedding photography but i want to start product photography and what lights would you recommend me for the start
Hi Gaurav, thank you for joining us and welcome aboard. Please may I ask that you watch the Lighting Theory section from class 1 to 7 first, then ask me the question again and I will be happy to offer advice based on your new knowledge – https://visualeducation.com/section/lighting-theory-and-equipment/
I loved this very much. If you ever get the notion to photograph a baby grand piano I will watch with rapt attention. Lol I tried to shoot one several years ago but couldn’t get the lighting right.
That sounds like fun. Now where can I find one that could come to my studio!
Brilliant build up walkthrough Karl.
Really informative and it is great to have the understanding of each action described and demonstrated & shared with us.
Excellent work and I wish you all well.
Thank you Dave, much appreciated.
Did you need to take multiple exposures using the fresnel due to having a tilt-shift lens, or did you only need it tilted into focus for the one bridge part of the guitar?
Hi Joe, no I only took a couple of extra exposures for the lighting on the tone and volume knobs as there was no way to light the tops of them at the same time. The rest of the lighting and focus was in one shot.
Hi Karl.
This is by far my favourite of your classes so far. You see so much of your thought process and problem solving around the lighting problems as you solve them one at a time. It is just so insightful.
Thanks Adam, I enjoyed the challenges but I prefer the racing bicycle one more myself and the final result.
Hi Karl.
I’ve not got to the bicycle video yet. Looking forward to it if it is one of your favourites! That is tomorrows lesson taken care of!
Hi Karl, Loved the class and the subject matter. The image you created is amazing to say the least. I can tell it was a challenge to get everything just right. I think I’m going to do a similar shoot on a guitar I own. As a guitarist I would like to recommend using a guitar polish to remove any smudges from the instrument. Some instruments have nitrocellulose-based or even lacquer coatings and using any form of mineral spirits is taking a risk in ruining an instrument. You stated in your opening statements that you are not a guitarist and I respect your honesty. Just thought I share my little bit of experience with you regarding the care of the instrument! I really enjoy your product photography!
Hi, thanks and that’s a good tip. I asked Ben our video editior (his guitar) and he just got me to test a tiny bit on the back of the guitar and it seemed ok so we proceeded. However I once cleaned a pair of glasses I was about to shoot for a client with meths and they melted!
I agree that this show was particularly good. Nice work sticking with achieving all the light and reflector applications, simultaneously. And the concave ‘spoon effect’ is a tough one.
Thank you.
Hi Karl,
We’re working on a product shot of what looks like a large box, we’re struggling with lighting it because there are ridges, grooves and a 7in LCD screen on the top. Our idea is shooting it black on black, we’re using primarily speed lights and two constant lights. Any suggestions that could help us out with accomplishing this? The product is not as shiny as the guitar, but a bit more dull black.
I’m afraid it’s completely impossible to evaluate from your description.
Literally one of my favourite tutorials so far.
Karl, I would like to do this shot with my pistols versus the guitar. There are curves and glossy metal, and shapes. I am trying to figure out how to mount them. If you were going to photograph a pistol and mount is, instead of just photographing it on a table, how would you recommend mounting it. That is my biggest concern in certain shots, is how to suspend or mount them and what with. Thank you, Tamarah Ellen
Hi Tamarah, first thing make sure they’re not loaded! We use something called a glue gun for a lot of stuff, it’s good for plastics and metals and then it sets hard but peels of stuff relatively easily without leaving a mark. So for example we’d use C stands with a grip rod or acrylic rods and use the glue gun – see this video to see what I mean as an example – https://visualeducation.com/class/floating-cosmetics-splash-shot/
Thank you Karl for responding. And yes, the gun won’t be loaded. 😉 This helps! Enjoy all your teachings!
Thank you,
Tamarah
where do you pick up the bendi metal sheets ?
Hi Yechiel, it’s polished stainless steel sheeting, our local hardware store sells them but you can also order from your local metal workshop.
Thanks Karl
Guitars are a lighting challenge! A while back, with far fewer lights, I had a crack at a Fender steel guitar, with gels. An interesting lesson in lighting to say the least!
where do you pick up these pump grips ?
Hi Yechiel, Manfrotto – https://www.manfrotto.com/us-en/pump-cup-with-swivel-5-8-socket-241/ good for sticking lights on glass, cameras on cars and even holding guitars!
Killer show, I will be watching this one numerous times!
Thanks Doug.