


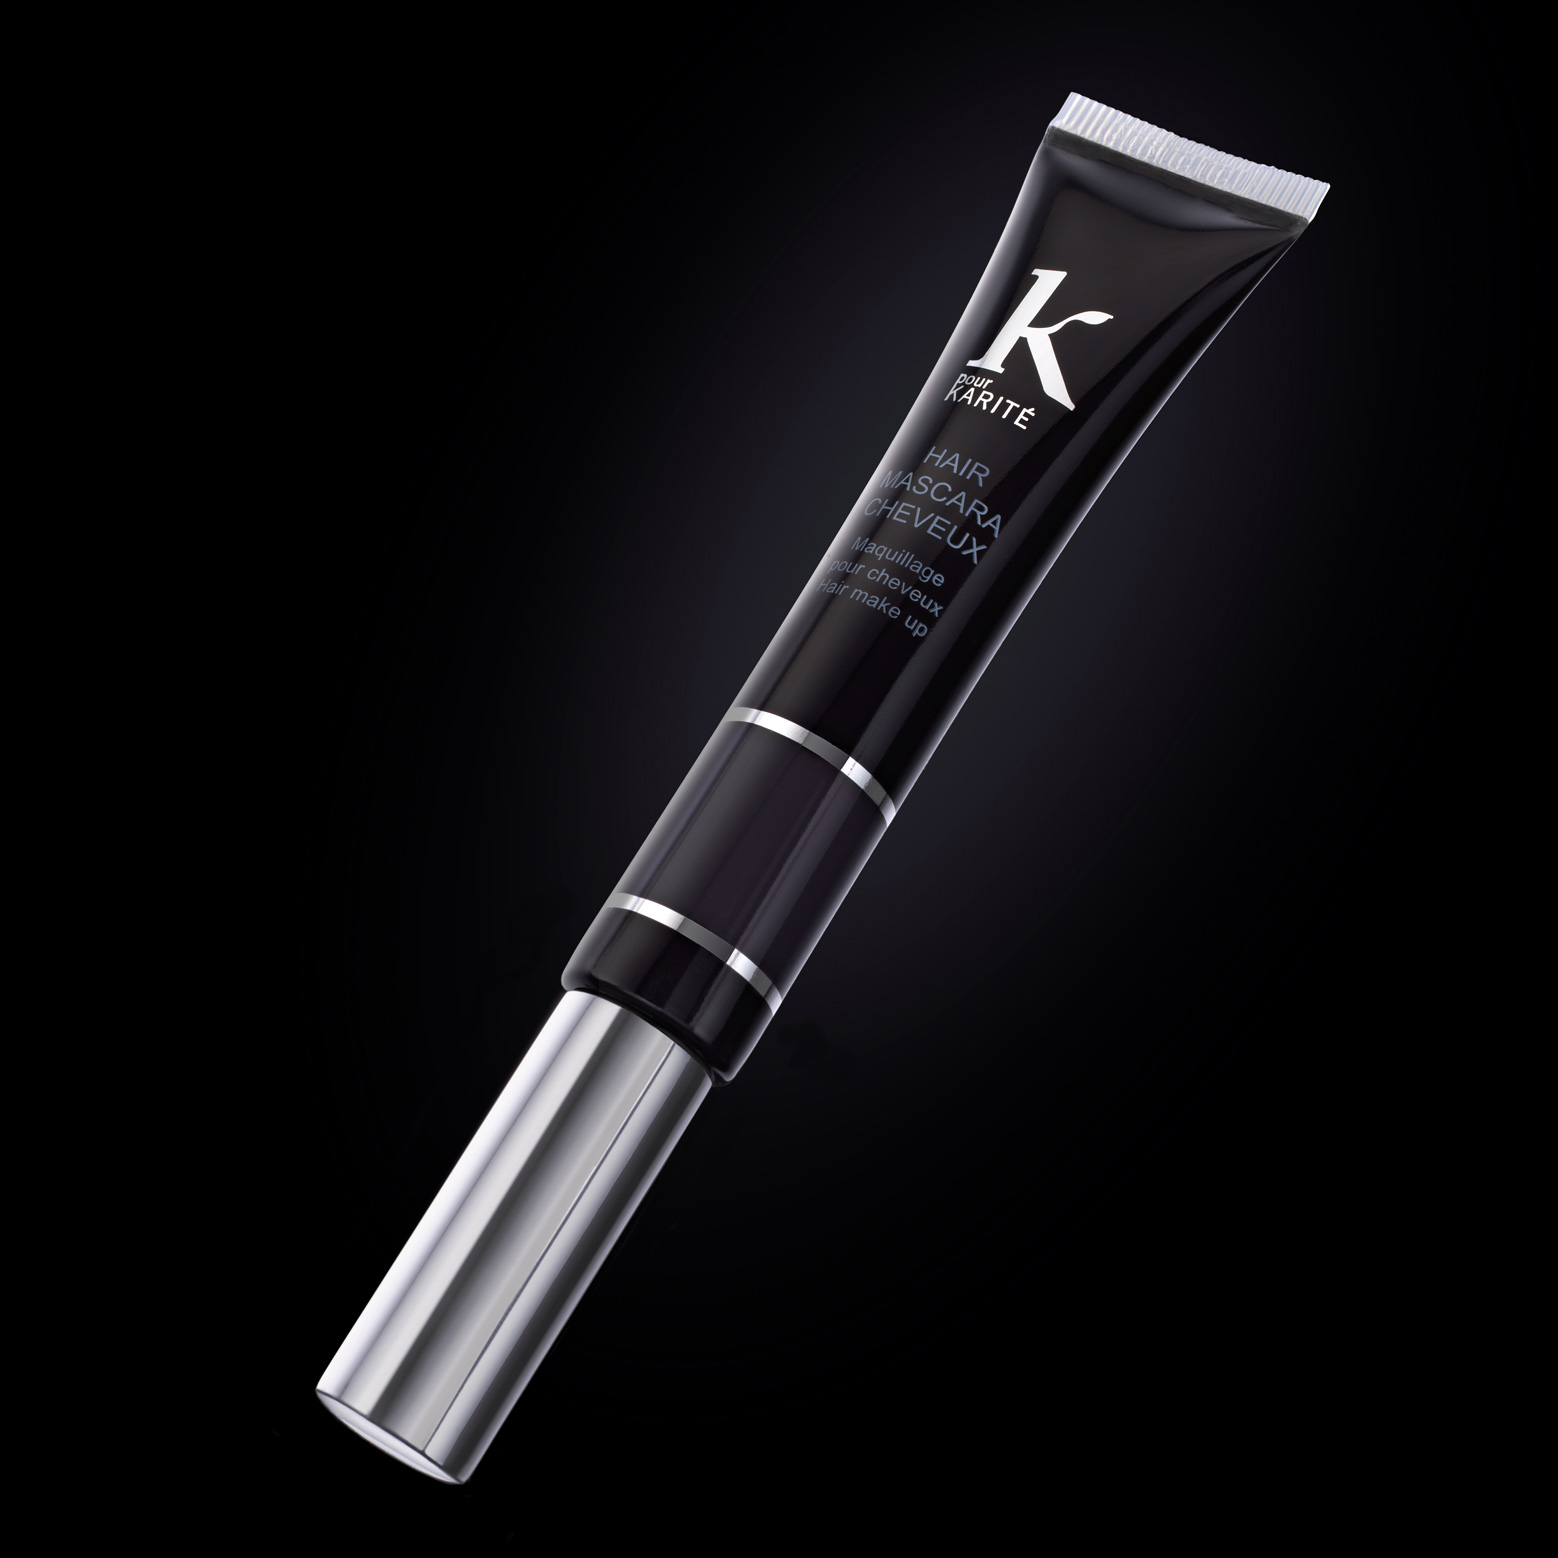
Black-on-Black Product Photography Using Two Lights
In this video, Karl works with broncolor’s Urs Recher to demonstrate a simple rim lighting technique for cosmetic product photography.
Together, the pair demonstrate how to use a single backlight to create beautiful rim lighting around a black product on a black background. Using two of the simplest, and most affordable modifiers — softboxes — Karl and Urs clearly show the importance of each individual light, as well as reveal the key to achieving gradient lighting.
Topics covered in this class:
- Black-on-black product photography
- How to rim light products
- Creating gradient lighting for product photography
- Techniques for reducing flare
- Using softboxes for product photography
- How to photograph small products
Further product photography classes you may enjoy include:
If you have any questions about this class please post in the comment section below.
Comments
How can you extend the black in camera, around the product instead of Photoshop? Double exposure black card in place and switch off top soft box?
Hi, in some instances it would be possible to bring black masks just in front of the camera lens and that would join up with the black card behind the subject but this would be very fiddly.
Hello Karl,
Although your process is crystal clear as it shows to be consistent when rim-lighting products in many of your how-tos videos, could you elaborate more on the size of the black background card that you cut out for different products? Are there some criteria that we could extrapolate to create the right size card for each product? My understanding is that there are two main guidelines: 1) the cutout should follow the shape of the product, 2) the larger the edge of the cutout around the product the further the product will need to be positioned away from its background card so that light can reach its rims. In general, however, what guidelines do you suggest to create a background card based on so many variables (background card edges width, distance of the product from the cutout, distance of the background light from the cutout)? Thank you!
Sorry, Karl I actually meant the larger the edge of the cutout around the product the closer the product will need to be positioned to its background card so that light can reach its rims.
Hi Myles, those are good questions that are also hard to answer as you have to think of it visually as it all has to do with angles of incidence / angles of reflection (see that class if you haven’t already). Yes it’s better if the black card is the same shape as the product. The distance of the card from the subject though is variable depending on circumstances, for example you may need to increase the distance simply because your product lights put too much light on your black card making it grey. However the key thing to consider is angles of reflection and to do this you have to visualise your set up in plan view and calculate the straight lines of light to the product from the extremities of the light and then their angle of reflectance as this will dictate how far the card can be, how far the light can be, how big the light needs to be etc etc. As you will see in the class mentioned above you can use a laser to understand where things need to be in relation to each other.
Hi. did you tape two pieces of scrim paper together? If so, would that not show up in say a glass/wine bottle shot? or is this (if in fact you did tape or connect 2 pieces of scrim together) only be used for none reflective surfaces?
Hi, This was Urs’s scrim and he had taped two sheets of diff together with selotape but i don’t recommend this as the join can show up in the product reflection.
Easy to set up and learn something new if working in a studio. Thanks for the tips and suggestions for lighting.
How was the glow behind the product added in post? any tutorials on how to do that in photoshop?
Hi Blueline, this class will show you how – https://visualeducation.com/class/luxury-watch-retouching/
AWESOME! ❤ BEAUTIFUL! ❤ Thank YOU very much 😁
That’s a great ‘bite-size’ chunk of education. Would be interesting, too, to see the effect of altering the distance between the scrim and the product, so I’ll give that a go myself. Really like your work with Urs.
Hello Karl, happy new year.
I was wondering if I use a frosted acrylic instead of the scrim, the results change?
Regards and say hello to the team.
Hi Frosted acrylic works well but can be heavy and cumbersome in bigger sizes.
Amazing!
I would never have guessed that you don’t need a whole black background.
Hi Karl. It looks like you tweked the lighting a bit to achieve fine tuning for the final image. What were the most relevant changes?
Hi Victor, where have I tweaked the lighting or what can you see so that I can look at that an explain. I’m afraid this shoot was a while ago so.
what is the accessory you clipped the small black background behind this product?
Hi, I’m not quite sure what you mean, we used a piece of black card with black velvet clipped behind the subject. It was clipped with a manfrotto clamp onto a manfrotto flex arm.
Simple but nice
Thank you.