
Diamond Rings Jewellery Photography
Reflections ruining your ring shots? Discover this tried-and-tested technique.
Whether you’re looking to photograph a $50 dollar pair of handcrafted earrings or a $15,000 diamond ring for an advertising campaign, knowing how to photograph jewellery is a valuable skill for any photographer. And in this class, you can learn how to do it like a pro!
You’ll find solutions to some of the most common challenges associated with jewellery photography, including controlling reflections on shiny surfaces and working at close magnification.
Challenges:
- Controlling reflection on shiny surfaces
- How to light small objects on a white background
- Getting sufficient depth of field at high magnification
- Best camera settings for product photography
Solutions:
- Create a light cone to remove reflections
- Gradient light with pockets of light to highlight key areas
- Use focus stacking to get the whole image sharp
- Select a small aperture for maximum depth of field, low ISO and highest sync speed
To watch the retouching and focus stacking process, check out Diamond Rings | Post-Production (Focus Stacking).
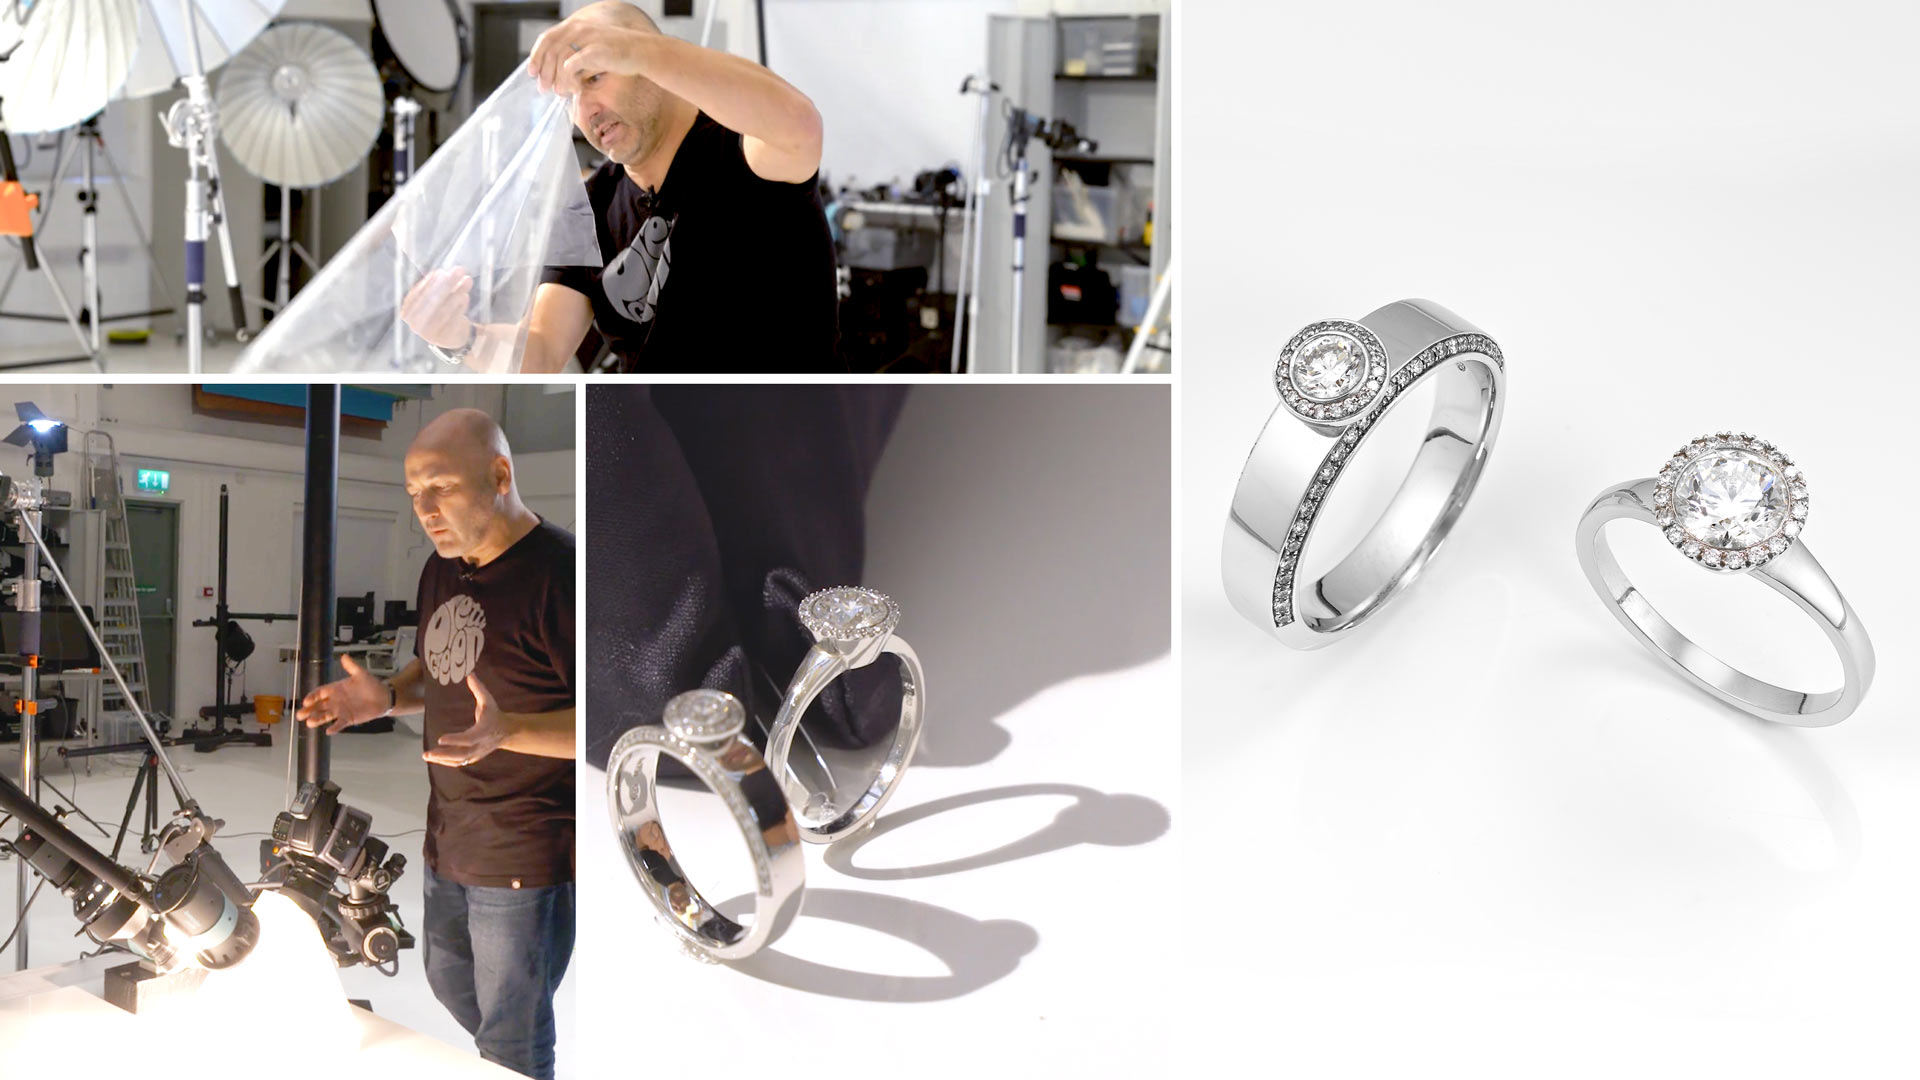
To overcome the problem of unwanted reflections, I created a light cone, which I placed over the rings. This blocked out any reflections and allowed me to create that graduated lighting that is so great for jewellery photography.
Need to use a light cone on a regular basis? We’ve partnered up with V-Flats and developed a significantly more durable heat-resistant Light Cone modifier. Learn more about Light Cone here.

Creating a light cone to reduce reflections on the rings.
The next step was to light the rings. I started with my fill light (a bare bulb point light source), before gradually adding a few more to highlight key elements and add some extra sparkle. Although I used picolites with projection attachments for this shoot, you could achieve the same effect with a tight snoot.
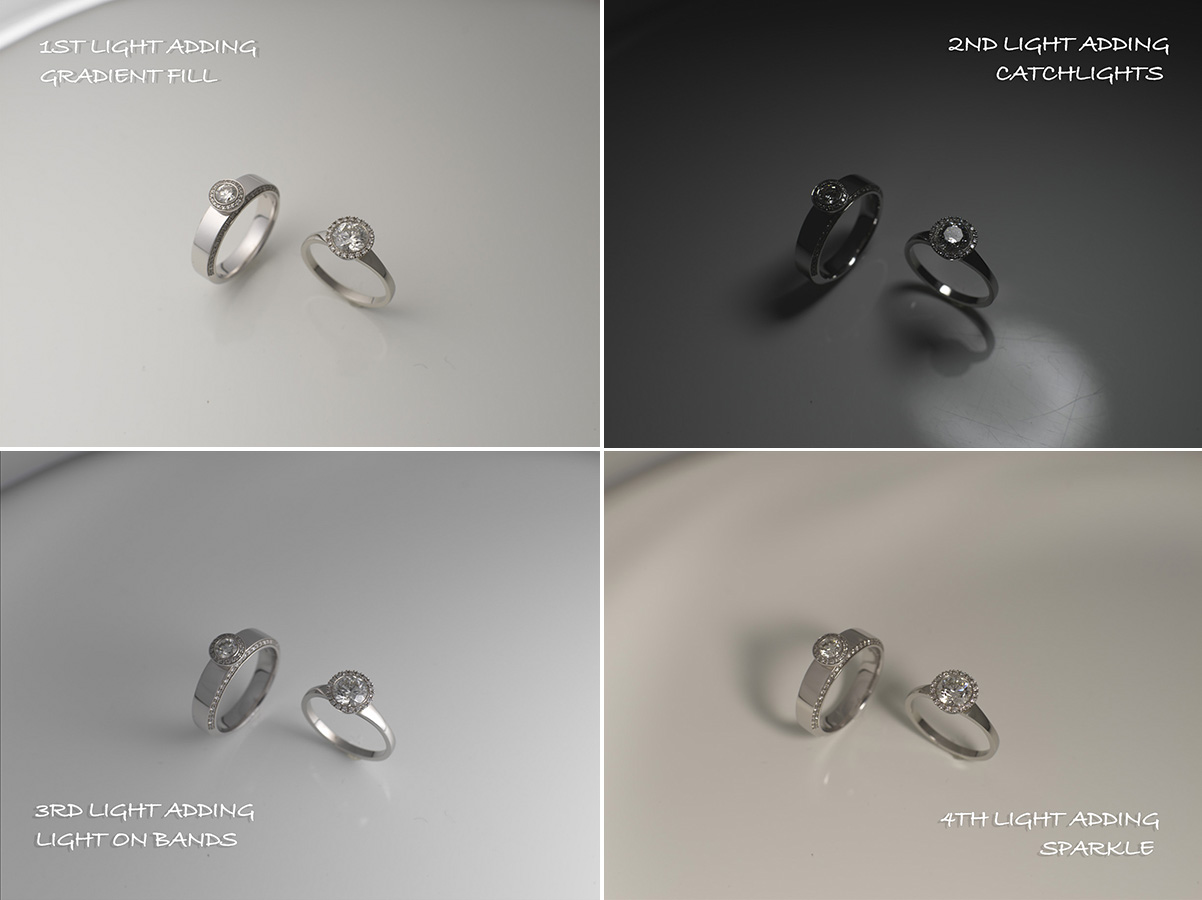
The effect of each individual light.
The final stage of the shoot was the focus stack. Even though I was shooting at a small aperture, I couldn’t get sufficient depth of field due to the high magnification. Before I could start my focus stack, I had to finalise my lighting and ensure my camera was locked down (I use my Manfrotto Super Salon, but any sturdy tripod will work). Working in manual focus, I then took a series of images shifting the focus from the front (the diamond) to the back (my background surface).
Here you can see the first image of the focus stack, with the focus on the front of the diamond ring:
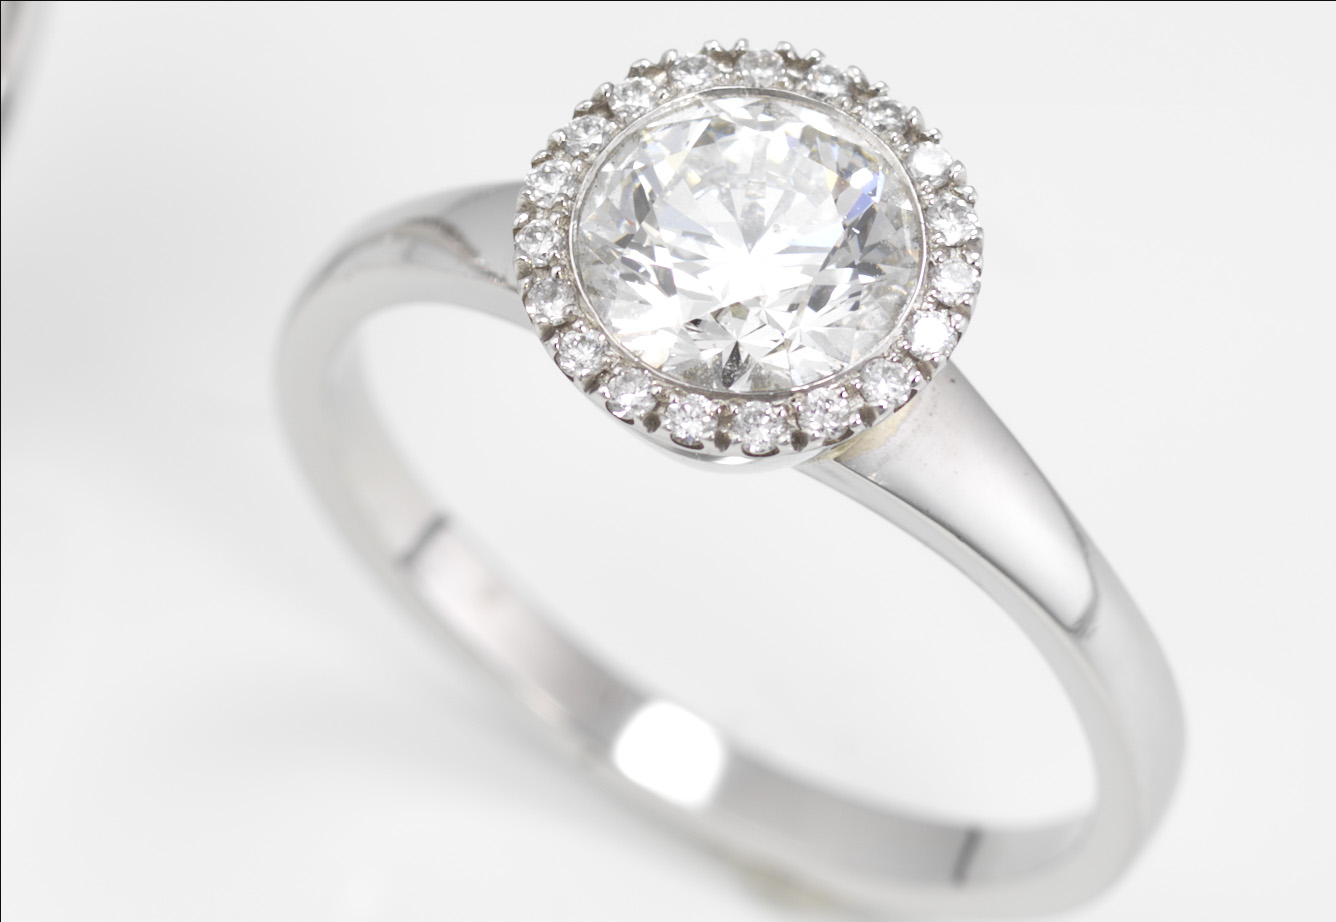
The first image in the rings focus stack.
And here is the final image of the focus stack:
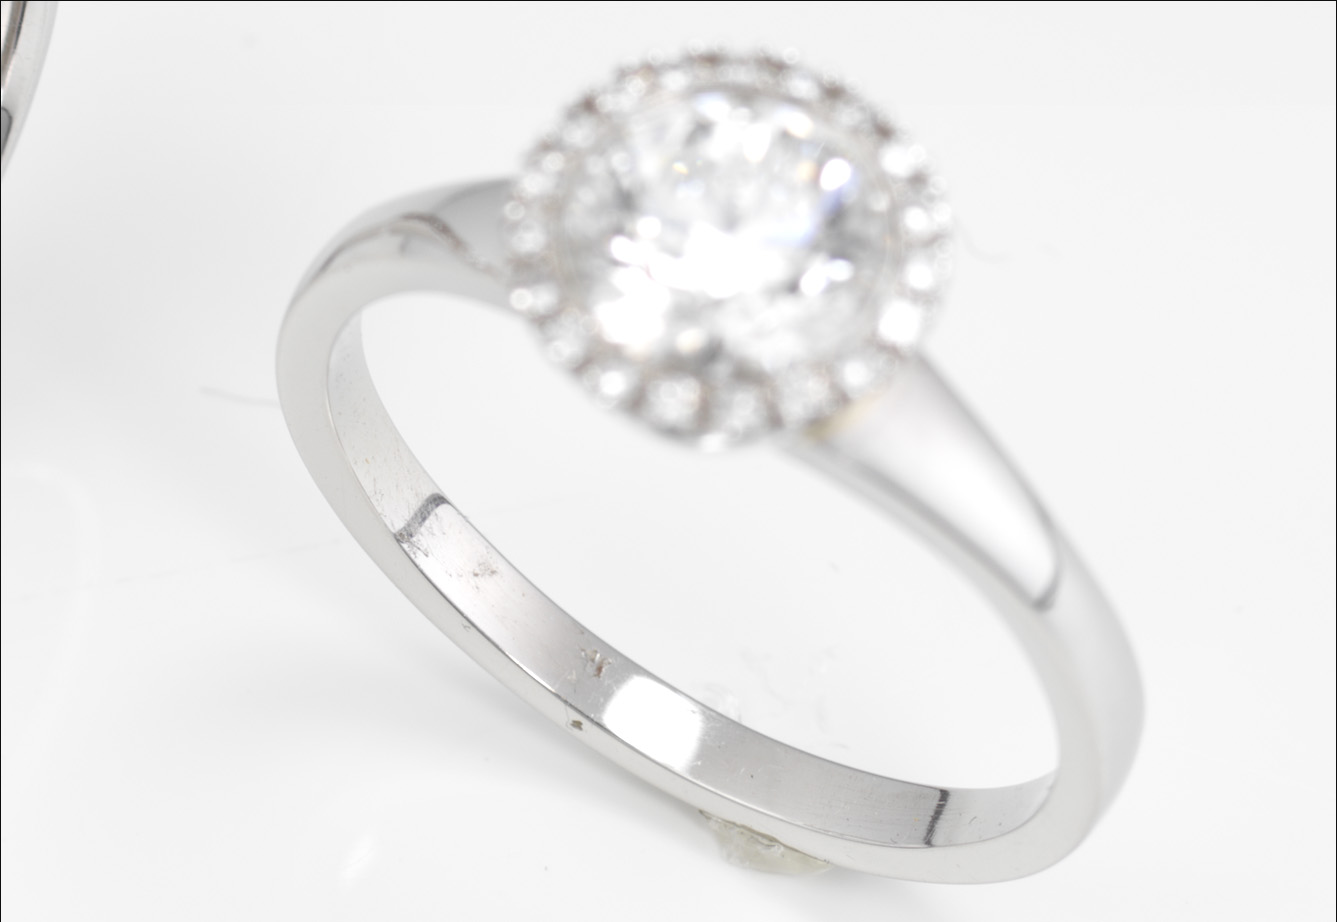
The last image in the rings focus stack.
In the above image, the last of the focus stack, the focus point is at the base of the ring. I took a total of 12 images to ensure my whole image would be sharp.
Once I’d completed the focus stack, the next step was to put it all together in Photoshop. You can learn how I did that here.
The final image:
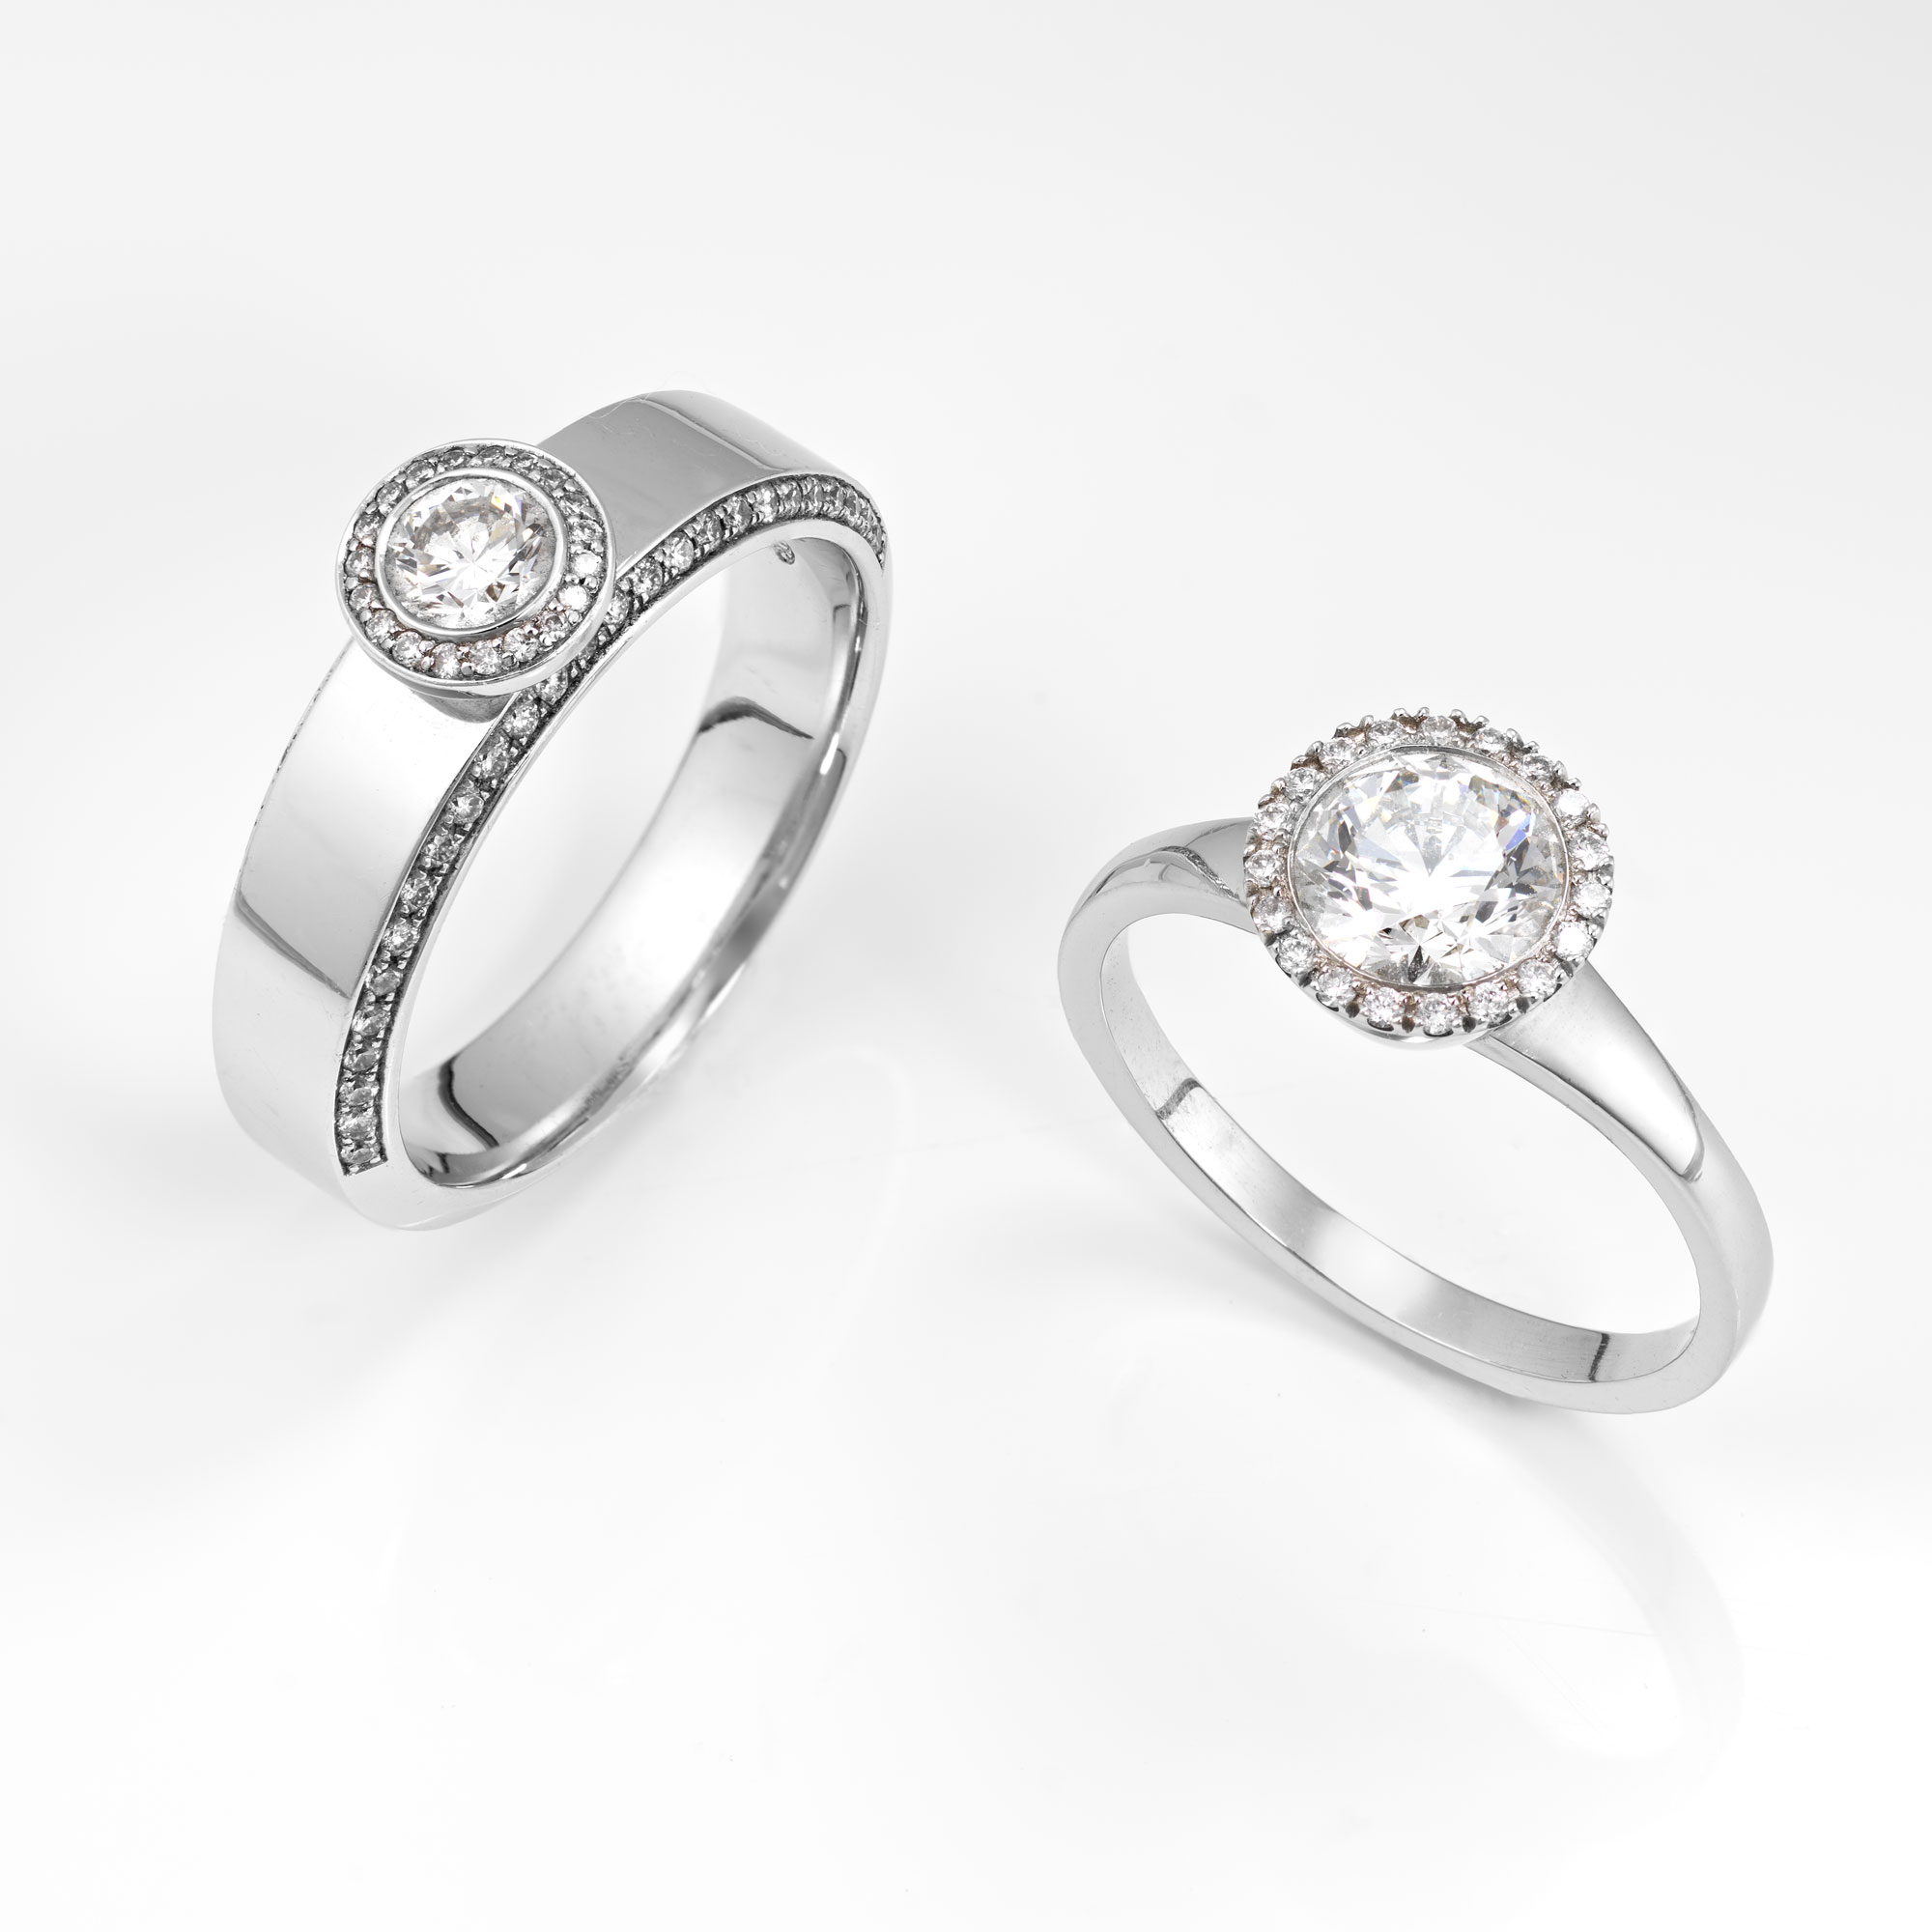
The final image of the rings jewellery shoot.
If you enjoy this class, check out Gemstone Necklace Photoshoot, Diamond Necklace Photoshoot, and Zenith Watch Product Shoot.
Questions? Please post them in the comments section below.
Comments
I’ve asked on another video but I’m afraid it might have gotten lost. Why is it that when I use a Standard 7″ Reflector on my strobe head my shadows seem to be less contrasty and when I don’t put anything on my strobe head my shadows are sharper? Seems counter intuitive.
Hi Charles, because the 7inch reflector makes the light source bigger and based on the physics the larger the light source the softer the shadow edges will be. The hardest edge shadows come from a point light source. Of course in a small white room a bare bulb lamp is a smaller light source but the shadows will also be affected by bouncing light from around the studio so although the edges of the shadow will be sharper they may not be as dense – this is all covered in our ‘Lighting Theory’ section.
Hi is there by any chance a video of the post production clean up of the ring?
Hi Daniel, there is only the focus stack work for these rings but this type of clean up work is covered in our Photoshop for Photographers course which is best to watch from beginning to end.
sushi rice could be handy to stick the ring.
https://www.ikea.com/us/en/p/melodi-pendant-lamp-white-60386532/
Can be modified (cut) to have an angled camera port and is durable and consistent.
Cheap. $10 buy several
Works great – thank you!
Hi Karl,
Would love to try this but I’m struggling to find acetate large enough, any recommendations? Or is there an alternative to use?
Many thanks and Happy New Year!
Rachel
Hi Rachel, Acrylic sheets are readily available in sizes up to 3m x 3m and sometimes bigger. Common sizes that I purchase are 1m x 1.2m and 50cm x 50cm but they can be cut to any size – One of the quickest places to purchase is from any sign service company. I’d recommend the 5mm thick sheets for stiffness but 3mm thick can also work it just bends a bit. If you are placing a bigger order then https://www.theplasticpeople.co.uk/ are a good supplier.
Hi Karl,
You shift the focus in the software. How to shoot stack images on a 35mm camera without having the ability to change the focus in the software?
Hi, you can use Helicon Software and their lens adaptors that allow you to shift focus in the software. Some proprietary software also allows you to shift focus on some 35mm cameras as does Capture One.
Thx. I’ll give it a try.
i learnt so much but at the same time i few questions that new to me.
1) is there a specific video how to calculate the ratio of light or the explanation of it?
2) is there any other option or ways to shoot rings other than using this cone method?
3) is there a method to shoot ring for catalog with all white background without cropping the ring?
Hi,
1. Lighting ratios don’t need to be calculated all you need to understand is the value of a one stop change in light. For example changing from power 9 to power 8 is 50% less light, and from 8 to 7 is 50% less light again and so on. You then adjust your light up and down in increments of 1/10th of an fstop if necessary until you arrive at the desired exposure. With metallic objects you also have the physics of direct reflection exposure which is covered in many of our live shows.
2. Yes any method that wraps the light and surrounds the subject can be used such as the technique with the Kettle in the product section.
3. When you understand lighting by working through all of the Lighting Theory and Equipment section and then through many of our product courses you will realise that there are many methods such as our pack shots course but which method is best will depend on which angle you want to shoot the ring. The cone method is probably the easiest in many ways but it depends on how you want them to look.
An easy way to create a diffusion cone is to use this online tool:
https://craig-russell.co.uk/demos/cone_calculator/
Hi Karl. Thank you for your amazing content. I have learnt so much in just a few days!
What is your opinion on light tents? I currently own two lights, one continuous Godox light and one Neewer flash light. I make jewellery and would like to improve my photography but I am unsure whether to buy the EZ light tent seeing as I noticed you do not use standard light tents for product photography – rather you create your own setups every time. Unfortunately I cannot afford to replicate the setups like this one with so many special lights! Do you have any advice?
I find jewellery tricky to photograph, particularly silver jewellery as it is difficult to control reflections and often, once I have achieved a pure white background, half of the piece has disappeared because some reflections are also white! Maybe a pure white background is not ideal for photos of white metal? For example in this tutorial the background is a light grey. Is this because pure white backgrounds are not recommended?
I’m sorry if you already answered these questions in a tutorial I might have missed! Thank you for your time and again, for the fantastic lessons.
Hi Lilie, it’s not the lights that are special in this setup, it’s the method of diffusion. I could have put three desk lamps through this setup or speedlites in this and many of my other setups. It’s how you modify the light. I’m not a fan of the look of the light from the box shaped tents. Please watch this tutorial https://visualeducation.com/class/introduction-and-understanding-light/
Hi Karl,
do you usually prefer using close space as cone for shoot metal ring or do you think is better to use open space with some scrim to have more control, achieve gradients on metal and use empty space between them to create hards edges?
Thanks in advance
Hi CM80, for jewellery I’m afraid it would all depend on the object as everything has different shapes/angles etc. I’d study the object before I decided on how I was going to light it based on the angles. I’m afraid in photography there’s no one best thing for everything, there’s just what’s best for a given scenario.
Hi Karl. Can I recreate this shot with led lights? I would need to slow down the shutter to about 1/20th.Let me know if its doable.Thanks
Hi, Yes if the rings don’t move, the LED lights are a good CRI and you reduce the shutter speed and make sure there is no other light pollution.
Hi Karl Anish From India can you shoot more of white metal jawellery
Hi Karl,
Nice video! Just wanted to know if you can show us your editing process on editing silver jewellery and if you could, can you please do more jewellery tutorials, please.
Regards,
Mustafa
Hi Mustafa, the focus stacking post production is covered here https://visualeducation.com/class/jewellery-photography-rings-focus-stack/ we also have many other jewellery courses including watches with post production. The post production work on jewellery is similar to most other post production work which is covered in our post production section.
Hi Karl, maybe you can explain me why you use the acrylic sheet? English is not my native language and I watched the video 3 times but I don’t understand why you used the acrylic sheet, thanks for all your videos that are amazing, good stuff to learn!
By the way could I use a Non macro lenses for this type of photography? Could it be a tele? Sorry if it’s a silly question!
Hi, many people find the white surface with a reflection attractive which is why we use the acrylic sheet. A macro lens is better, extension tubes will also work with the correct lens, a telephoto may work if it has a close focus / macro mode.
Thanks!!!
Hi Karl,
We are following you since we’ve started our photography business.
Within’ these days our photography job turns to product photography especially
jewels.
We need more of your experience about these kinds of shoots.
Gold is a very hard material for shooting.
There are a lot of kinds for these gold rings, bracelets etc.
Can you make a video for people sayin’ “yellow gold” with diamonds?
Thanks for everything.
Regards fromTurkey ANTALYA…
Ayhan, thank you for joining us. I can tell from your comments that what you are hoping for is a quick and easy solution to photograph this item. You must stop and think a minute and ask yourself a few questions. Do you think you could give me any product and I would know how to photograph it or work out a way to do it? The answer is yes I would but I’d have to work it out. The reason I can work it out is because I understand about how light works and how we modify light and control it for each type of subject. Whether it is gold is only one thing, shape is another, angle is another, choice of background is another – there are many factors to creating a great photo and I cover them all on this platform but it is never just one thing. The most important thing is this and really understanding it – https://visualeducation.com/class/introduction-and-understanding-light/ When you really know this and I mean really know this then you will be able to answer most of your own questions. In photography and specifically lighting it is all based on physics, angles, intensity, size etc. when you know these things it is possible to know how to photograph a ring, a car or a horse.
Hi Karl, I was wondering what would be the approach if we want hard shadows instead of soft (shadowless) and without overexposing the rings and still to be able to control the reflections. I saw that trend recently from different companies like Tiffany and Bulgari. Thank for your time.
Hi, I often put hard light on my jewellery shots to add sparkle to stones but it’s in combination with soft light to give nice gradients in the metal. If you see a shot with nice gradient in the metal and a strong shadow from a dominant hard key light then the soft gradients in the metal were done as a separate shot and they were combined in post production.