
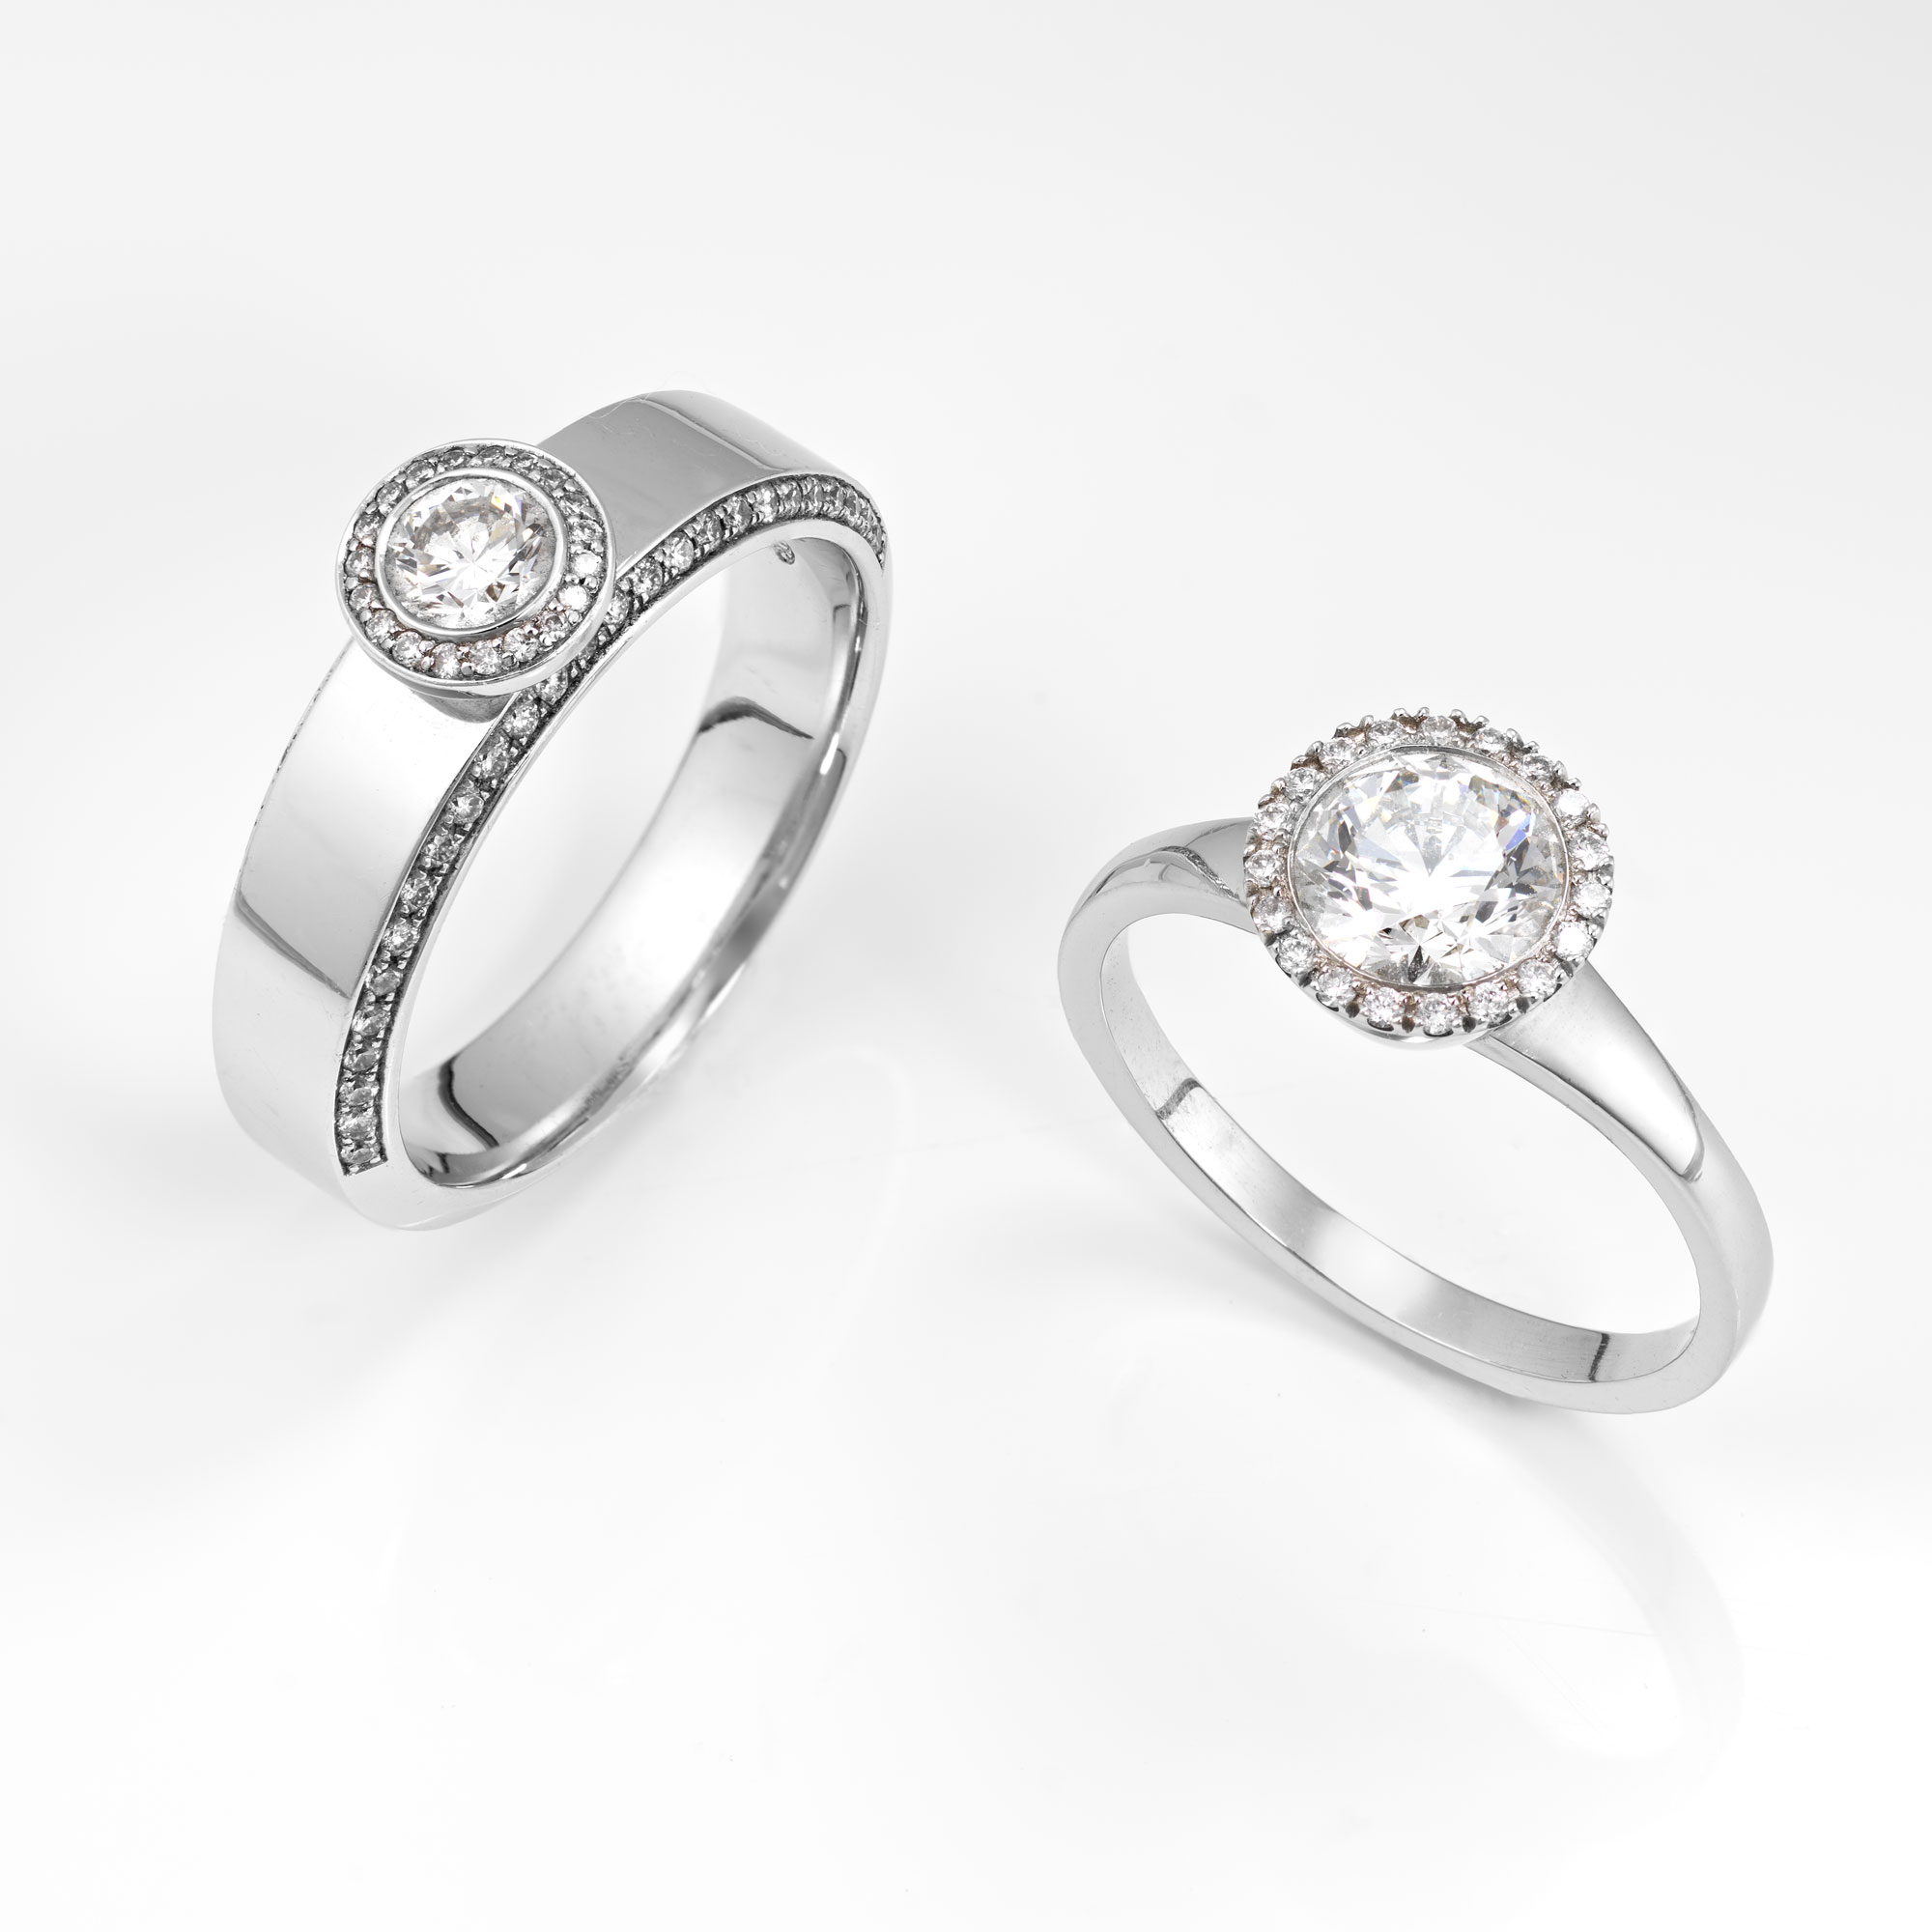
Diamond Rings Jewellery Photography
Reflections ruining your ring shots? Discover this tried-and-tested technique.
Whether you’re looking to photograph a $50 dollar pair of handcrafted earrings or a $15,000 diamond ring for an advertising campaign, knowing how to photograph jewellery is a valuable skill for any photographer. And in this class, you can learn how to do it like a pro!
You’ll find solutions to some of the most common challenges associated with jewellery photography, including controlling reflections on shiny surfaces and working at close magnification.
Challenges:
- Controlling reflection on shiny surfaces
- How to light small objects on a white background
- Getting sufficient depth of field at high magnification
- Best camera settings for product photography
Solutions:
- Create a light cone to remove reflections
- Gradient light with pockets of light to highlight key areas
- Use focus stacking to get the whole image sharp
- Select a small aperture for maximum depth of field, low ISO and highest sync speed
To watch the retouching and focus stacking process, check out Diamond Rings | Post-Production (Focus Stacking).
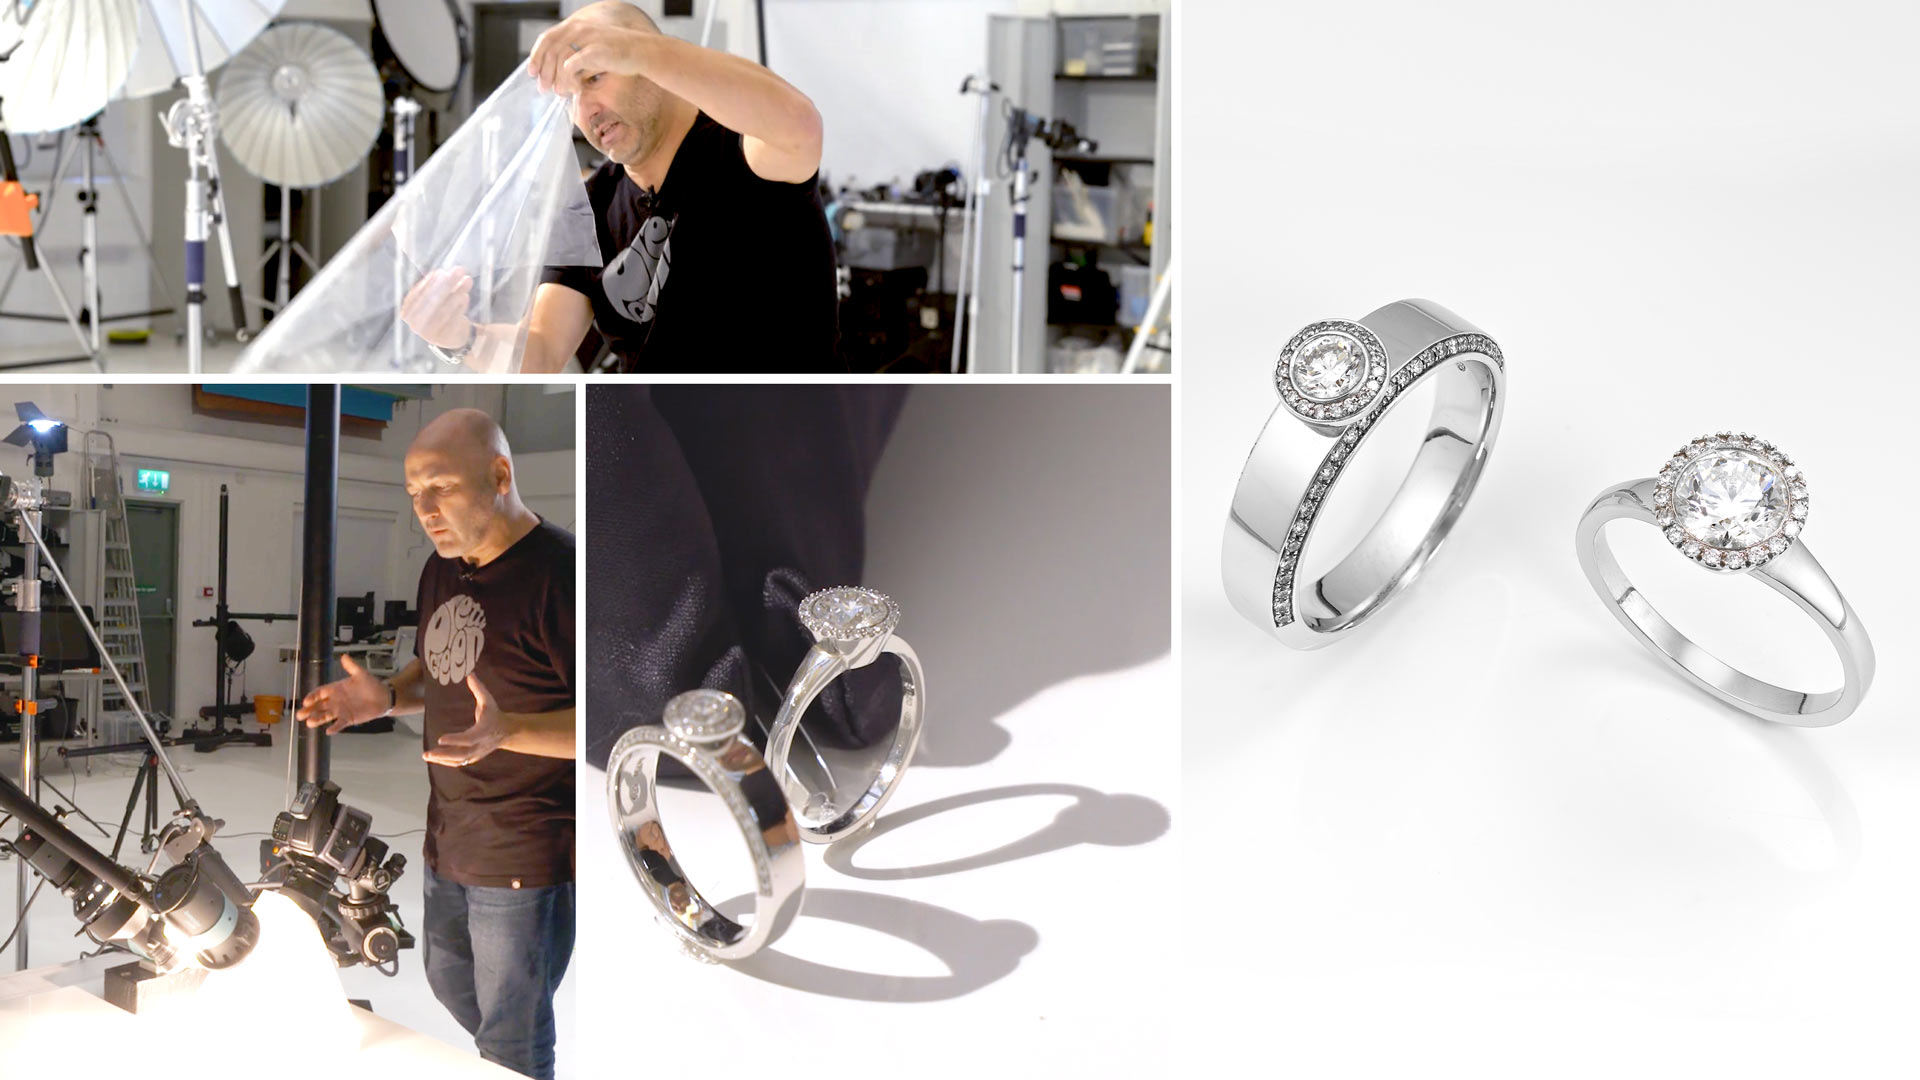
To overcome the problem of unwanted reflections, I created a light cone, which I placed over the rings. This blocked out any reflections and allowed me to create that graduated lighting that is so great for jewellery photography.
Need to use a light cone on a regular basis? We’ve partnered up with V-Flats and developed a significantly more durable heat-resistant Light Cone modifier. Learn more about Light Cone here.

Creating a light cone to reduce reflections on the rings.
The next step was to light the rings. I started with my fill light (a bare bulb point light source), before gradually adding a few more to highlight key elements and add some extra sparkle. Although I used picolites with projection attachments for this shoot, you could achieve the same effect with a tight snoot.
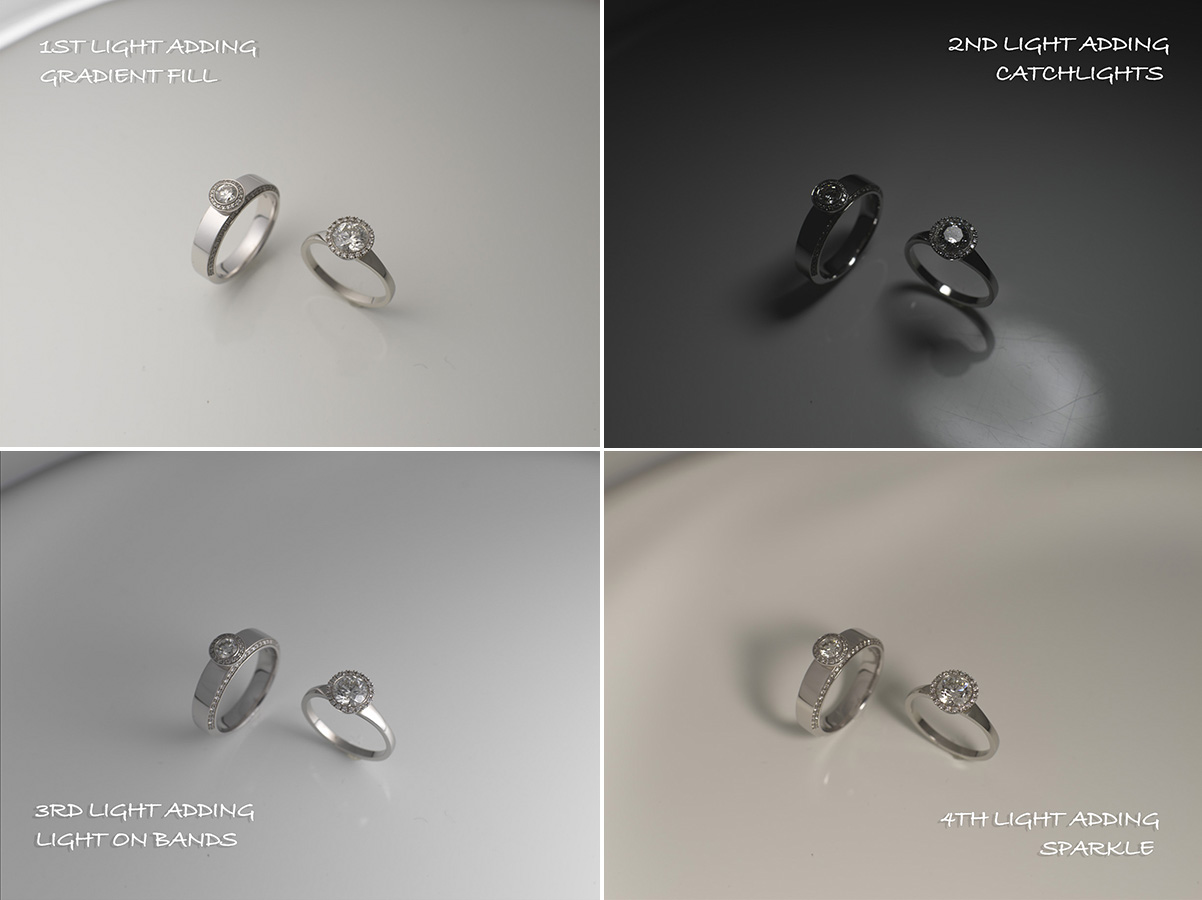
The effect of each individual light.
The final stage of the shoot was the focus stack. Even though I was shooting at a small aperture, I couldn’t get sufficient depth of field due to the high magnification. Before I could start my focus stack, I had to finalise my lighting and ensure my camera was locked down (I use my Manfrotto Super Salon, but any sturdy tripod will work). Working in manual focus, I then took a series of images shifting the focus from the front (the diamond) to the back (my background surface).
Here you can see the first image of the focus stack, with the focus on the front of the diamond ring:
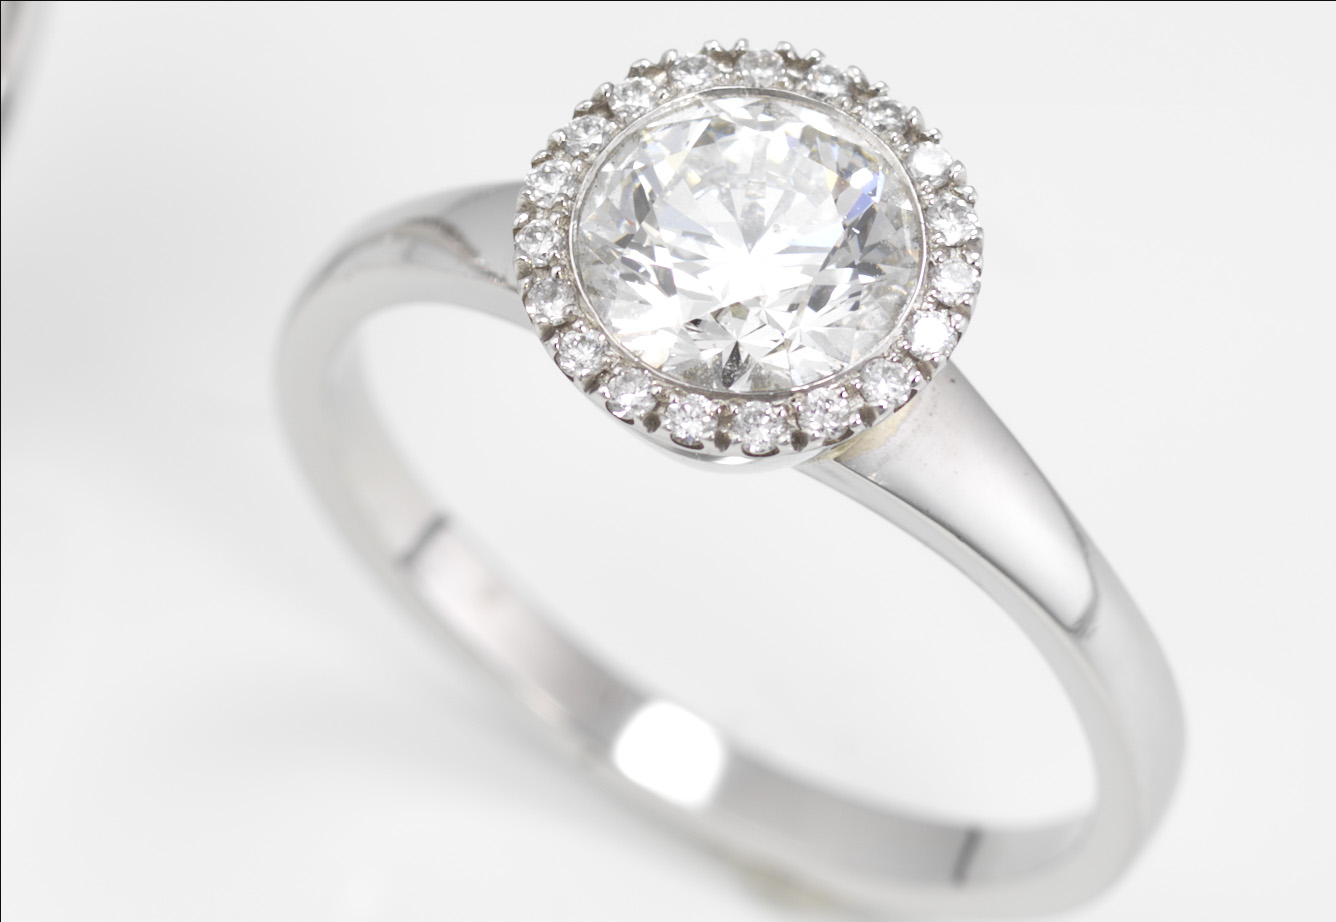
The first image in the rings focus stack.
And here is the final image of the focus stack:
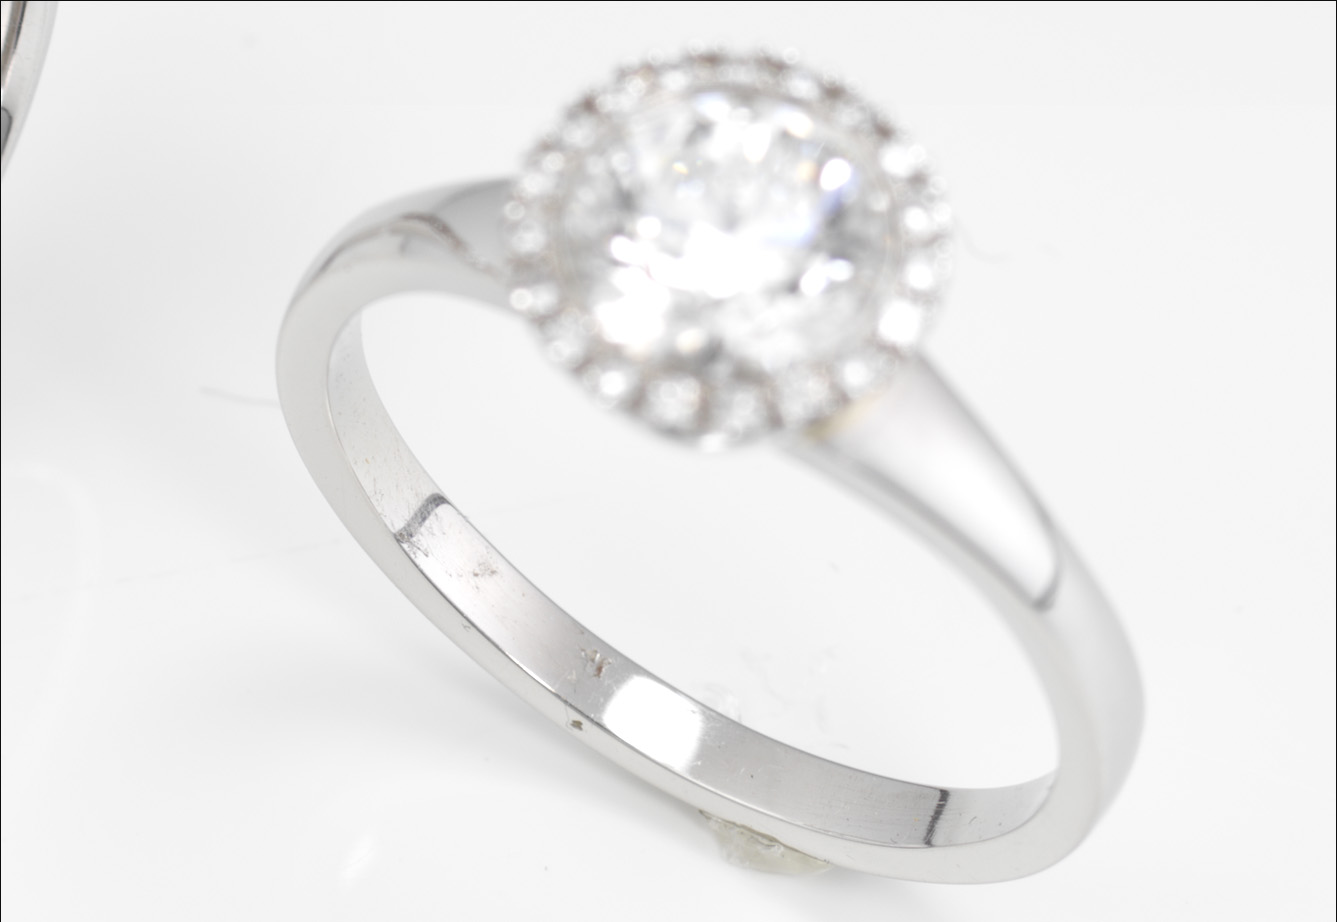
The last image in the rings focus stack.
In the above image, the last of the focus stack, the focus point is at the base of the ring. I took a total of 12 images to ensure my whole image would be sharp.
Once I’d completed the focus stack, the next step was to put it all together in Photoshop. You can learn how I did that here.
The final image:
The final image of the rings jewellery shoot.
If you enjoy this class, check out Gemstone Necklace Photoshoot, Diamond Necklace Photoshoot, and Zenith Watch Product Shoot.
Questions? Please post them in the comments section below.
Comments
Thank you so much for these classes. I now think I will be well armed to take all new photos of the jewelry I make. I do have a question as it relates to my studio. I am in the process of converting a spare room in my house to a dedicated photography set up and am wondering if I should paint my studio white or go with neutral grey. It’s my understanding that a matte neutral gray would give more lighting control, is that correct?
Hi, thank you. It depends on the size of your room. If it’s a small room then black gives the ultimate lighting control as the only light will be the one you create however you have to think how you intend to use light as many photographers including myself use the white walls and ceiling as a bounce but this only works if you have empty walls with no clutter so they can make a clean reflection on glossy subjects.
Karl, Thank you! It’s a small room, 10’x12′ and there will be nothing on the walls, we’ve even removed the ceiling light fixture to eliminate the reflection in some of my pieces more easily. Your classes are so helpful, thank you for all you do.
I’d go white then if it’s a clean empty room and then you can use the walls as lighting. In instances where you want no bounce then fix up points where you can attach black cloth to cover the walls temporarily.
Karl.. I’m looking to purchase a medium format camera. The two I’m looking into are the new Hasselblad X2D and the Fuji GFX.. Along with a 120mm macro which looks to be the go to for product work.. what other lenses, extension tubes, tilt-shift adapters do you consider to be essential for a proper kit? Unlike 35mm.. I’m using a Nikon full frame currently, which has many lenses of all manner of focal lengths, medium format has a little less choice, but the cost to add another lens can be significant. Making the right choice is important. Jumping up to medium format will certainly level up the quality of my work, from a technical output aspect. Generally, I work on anything from jewelry to liquid splashes to bottles and football sized products. One thing I saw the Fuji camera highlight is an adapter that attached the camera body to a view camera & lens set up. I’ve been holding onto my 4×5 and all the lenses.. so I’m looking forward to rope that technology back into my work flow as well. What are your kit recommendations?
Hi Gary, in due course I’m going to be switching most of my workflow over to the X2D and using the 120mm macro too but I’m waiting for the new 90mm lens and hopefully to be released extension tubes so that it converts the 90mm into a macro allowing be a different perspective on my product shots. The X2D would be my choice because for fashion on location I need the higher sync speeds that the GFX can’t do, but if you’re only using it in the studio then that wouldn’t be as much of a problem. All my medium format product work is in the 80mm, 100mm and up to 150mm focal length but mostly around 100mm. The X1D I believe could fit on Arca view cameras so I guess the X2D can too but you’d have to check.
Hi Karl –
Great video! Can you provide specific information on the lights you used in the video (manufacturer and model number)? I am assuming the lights are in the the thousands of dollars range. If yes, can you also provide lower cost alternatives (manufacturer and model number)?
Thank you!
Leah
Hi, yes these were top studio lights but for what I did here which was very simple from a lighting point of view you could have used any basic studio flash – Godox are a good cheap brand and the 400J power lights would have been adequate.
Hi Karl
Thanks for this video and I found it very useful. Can you please give the dimensions of the cone and or the acetate material size to get to the cone size?
Good Day Karl,
I am enjoying your classes and it is helping me to improve my Live model shoots and still life work quite nicely. I do mostly product photography on jewelry brands in bulk. I am an accomplished in focus stacking and my customers seems pleased with my work. Currently I do all of my work with a continuous light source. Is there any advantage to using strobe flash verses my method? Reason I ask is I shoot about 100 to 150 stacks per day ( 50 step stacks ) . I use lowers f stops and shutter speeds but control the ambient light in the studio carefully. I use a Lumix G9 4/3 20 megapixel / 60mm Olympus macro 1:1, Helicon to process the stacks. If the strobe is better, is there anything on the market that has a high refresh rate that can keep up with my stacking?
Hi, using studio flash would be my preferred choice as you saw in this video I can see what I’m doing via the modelling lamps and then I have all the power of light I need from the flash burst. The studio flash burst also means you don’t have to worry about slow shutter speeds with continuous light as you can shoot at your sync speed so no chance of camera shake on an exposure. All studio flashes recycle in about one second or less so I don’t think you’d have any trouble keeping up with your stacking. Finally with studio flash you don’t need to worry about shooting in a completely dark environment because the ambient light isn’t going to pollute your exposure. So those are all the main reasons, brands like Broncolor, Elinchrom and Godox are worth looking at. I’d say you need 600W per lamp or more.
Spot on, I’ve been asked by 2 friends who make silver jewelry how to photograph silver jewelry, you’ve answered that beautifully thank you
Hi Karl thank for the amazing video …if we need to do an eye level(front,side ) shot of the Jewellery is the set up is different or the same
Thanks
Hi, it would probably be a combination of this one and this one: https://visualeducation.com/class/jewellery-photography-gemstone-necklace/
Hello Team!
Thank you for your amazing content; these videos have been extremely helpful! I do have some questions though…
1. When focus stacking, is it better to mount the camera on a rail and move it forward incrementally between each photo, or better to rotate the the focus ring on the lens? Sony a7rIII w/ 90mm Macro.
2. I have more of a an “on-the-go” setup since my clients like me to photograph their products at their location. Do you have any lighting, light box, tripod recommendations for me? My tripod is especially sensitive when I touch my camera to rotate the focus ring and I’m afraid this is resulting in lower quality photos. (By the way, I have access to a 3D printer, so I can essentially print attachments that can direct light for any small light sources you might recommend).
As a side note, while I don’t want to spend too much money on my whole setup, I am willing to push my budget up to $8,000 – $10,000 (including the camera & lens which already ran about $4,400).
Thank you for the amazing work you all do!
Regards,
Admon
Hi Admon, thank you for your kind words. Answers to your questions below:
1. That is a method that some people employ for focus stacking and it can be useful as it reduces the change in magnification that occurs when changing focus. However it is not a technique I have found necessary as Helicon does such a good job of adjusting and merging the images when they are taken with focus adjustments only.
2. For location work I use the very heavy Manfrotto 058B tripod with a junior geared head or a good ball head. Other similar tripods from Manfrotto or their sister brand may exist although alot of them now have gone towards lighter weight carbon fibre. But generally you should be aiming for tripods that are designed to take heavier loads as these are the most stable.
3. For the lighting and good brand of lights from Godox, Elinchrom to Broncolor should be good it comes down often to the modifiers that you are going to use and which ones you need comes down to the type of photography you need to do. As you will see in many of our product tutorials often bare bulb with scrims are used, stripbox and grids are common and the Octabox 150 is a good allrounder but not great to dismantle and setup each time so you may want to consider a good diffusing umbrella might be easier for you.
Kind regards
Karl.
Hey Karl,
I’ve just subscribed to your education. I’m a fan.
I wish to make the CONE, and I can not find all items. Paper + Plastic
Do you have any links for buying these?
Big thanks
Hi thank you, it’s just LEE216 diffusion paper (or you can use architects tracing paper) and it is sitting on top of a clear acetate sheet that you can usually buy from art stores.
Hello Karl,
I’ve just subscribed to your education. I’m a big fan.
I was wondering if you can help me in order to find these items on a webstore. Can not find in France …
I would like to make the CONE, and I can not find any of these items in a store. Paper + Plastic
Do you have any recommendations? or links to provide for buying these?
Big thanks
Hi Karl,
Thanks for the great video! Quick question regarding the set up: I assume it’s glue you used to hold the rings in place. How did you get it off the table top and rings? Any special care or product you had to use?
Thanks in advance!
Hi Francky, yes a hot glue gun and I’ve not had any tarnishing problems. I suppose you could wait for the glue to cool slightly before fixing. You can see us applying the glue with a stick from the glue gun at the start of the video instead of directly.
Hi! What kind of lights should I use? I don’t have all the materials you have for lighting, but I don’t know what lights I should use?
Hi, what sort of lights options do you have? Speedlites, studio lights maybe even more economic ones such as Godox or Elinchrom or continuous LED lights?
Hoi karl
What you use for a perfect natural reflection like the shampoos videos? for the objects to stand on.
Hi, which shampoo videos do you mean please?
Hey karl great videos , what can i do to get 1 jewelry to focus stack with less images to stack? i shoot closly to the “ring” so the image will be as sharp as i can , and the camera is standing in front of it , at a straight and surface level . not like you did in the video , it can turn up to 100 photos if i am not increase th f stop , but when i increase it the sharpness decreases aswell .
Hi Hilelkashi, Why do you need to shoot ‘less images’ for the photo stack? If you have set the shot up and you have your camera on a tripod it is very easy to shoot 4, 6, 10 or however many images are necessary for the focus stack. Software such as Helicon puts the stack together for you in a matter of seconds?
The problem is that even with a tripod it turns out around 100 photos to put on helicon focus.
Hi, that doesn’t seem correct. I usually conduct Jewellery focus stacks with between 6 to 15 images.
The jewelry i shoot takes most of my 77D frame so it will be as sharp , and im with a 100m lens , i use around f8 and 1/200 shutter speed since its the limit when im with the flash probes, and the minimum of photos i take is 60.
Thanks for answering if you have any tips ill be glad , i saw a proffesional shooting jewelry he was shooting from way higher and tilted camera downwards , i shoot with the camera straight at the jewelry’a hight.
Dear karl,
thats a very helpful video , i have an important question and im urged to get an answer , why didnt you consider using a product box ? the one thats lit with white led from inside , . also know as photo studio box . im about to work in jewlery photography and i need to finalize whether if its more convenient for me to use a photo box or a cone just like you did(which might be a little bit of a hassle ) as i need to save time and produce a rather consistent group of images
Thanks in advance ,
Hi, I don’t find they have enough level of control for me to adjust my lighting. Also generally speaking some LED’s don’t reproduce the full range of colour in objects unless they have a very high CRI. There are some expensive jewellery only photography box solutions that I’ve seen that do work well though but I think they were about $2000.