

Creative Portrait Lighting 1.0
Science, lighting and narrative come together in this illuminating workshop.
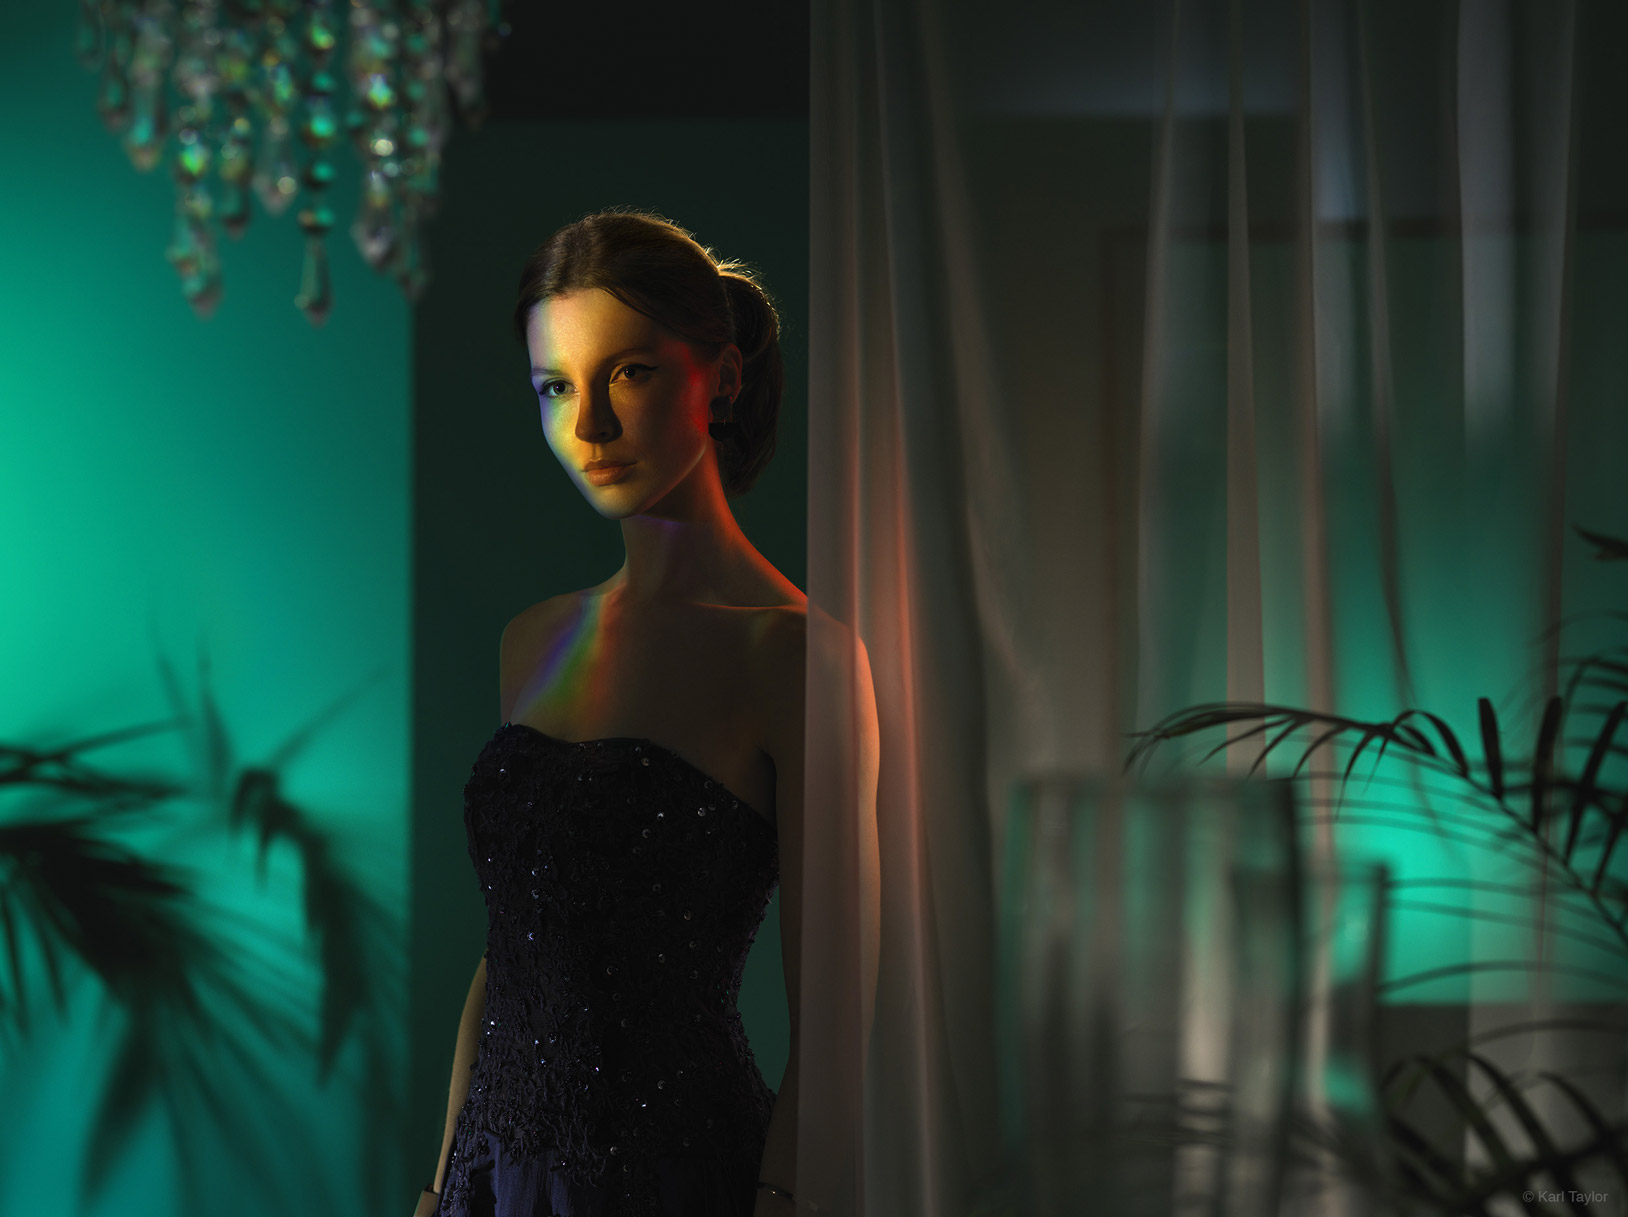
You’ll learn how to creatively control light and use simple everyday props to build impressively layered sets for portrait photography.
For a slightly more technical setup, Karl demonstrates how to incorporate a prismatic lighting effect and shows how this can be combined with carefully controlled pockets of light to create a moody and dramatic feel.
Photographing his model Brittany, Karl explains his concept for the shot and how he used items such as sheets of acrylic, offcuts of material and basic items from around the studio to create an interesting set. Working through his lighting setup, he then shares a number of tips for achieving a specific lighting look and advises on how to balance multiple lights.
In this class:
- Portrait lighting setup ideas
- How to create prism lighting effects
- Techniques for creating small pockets of light
- How to create a set for photography
- Using flags to control light
This is the first of three creative portrait lighting live shows. You can watch the second part of this series here or take a look at our live show schedule to see the dates for the next one.
Other portrait photography classes you might enjoy include:
- Live Workshop – Creative Portrait Lighting Techniques (Part 1)
- Live Workshop – broncolor ‘How-To’ with Urs Recher
- How To Full Version – Coloured Gels Fashion Shoot
If you have any questions about this show, please post them in the comment section below.
Comments
i enjoyed it 2nd dress love it see you next week thanks
Thank you Karl, my comment comes a bit late but I hope it is still possible to ask you a question. Apart from using gels with flashes, that is mandatory, is there a reason why you don’t choose RGB led panels to dynamically find “on the fly” the color to create the right atmosphere? We are talking about ambience lights that, it seems to me, don’t need so much power. Is there a technical reason to prefer gels for this specific purpose? Could this be done with these panels and continuous light? Just because RGB led panels are flexible and they can transform into whatever color you need, creating an easily repeatable solution, especially the ones maneage with an app where you can save multiple color profiles that you create. TIA
Hi Widevisions, I’ll do my best to answer each of your points below:
1. LED light panels are not anywhere bright enough for much of the work that I do compared to a high powered burst of flash that can freeze the movement of liquids, fashion movement etc. Where LEDs are very bright such as some we have for video or HMIs they are then to awkward to work with on models as it causes them fatigue. For still life with LEDs you need to work in a completely darkened studio but with studio flash you don’t as you can use the shutter speed to cut out any ambient light.
2. See this video – https://visualeducation.com/class/flash-lighting-vs-continuous-led-lighting/
3. Most people don’t want to work with flash because they think they can’t ‘see it’ and that scares them but you can see what you’re going to get from the modelling lights but then the flash is much more powerful, cleaner and faster so you can easily work at f16 on fashion and product images and still have plenty of light.
btw.. I loved the complexity of the shot. You tried many things and demonstrated loads of ideas with options. We found out you mistreat your office plants.. lol, yet managed a very cool composition. I’m curious if the colours chosen came from a position of colour theory. I trying to keep much of that in mind, although I’m not choosing colours specifically yet to create a desired vision. I know when it is working and I know when it blows. I actually liked the blue thrown off by the Broncolor powerpack lights, but not in the end result of course. Was colour choice very intentional, or a bit of a gut feeling?
Hi Gary, I’m actually fascinated by this cyan/green colour, I experience it a lot when diving in UK waters and find it very atmospheric. For this I selected those gels combinations to arrive at this colour that was preplanned knowing there were going to be warm/red tones in the image too and the cyan being opposite of red should give me a good juxtaposition.
Hey Karl.. this seemed like a good place to make an ask that is related to casting an affected light onto a subject. I have a product which has a brand persona which suggests an ominous, monstrous feel and I have seen 3D enhanced images which add a background with blue green backlit graveyard type mists or fog that give loads of atmosphere. I would like to try something in studio without the 3D enhancements. I ran a few test shots, but I realized the lighting is more complex than just simple back lighting. Obviously, some kind of set with appropriate props would need to be created to enable the affect, plus perhaps some level of smoke or fog or particles floating in the correct place would be needed, but there is also some experimentation concerning the lighting that must be considered. I was wondering if you have any recommendations or would consider one of your experimental sessions that may play with any version of this kind of idea. The broader or more global an application of the concept the better.
Hi Gary, I’m afraid there are a lot of hypothetical variables there. If it was me I’d have the background set, the fog machine and I’d be firing a P70 from the reverse at 45 degrees towards camera through the fog and then try grids.
The best learning platform thanks Karl
Thank you.
Wow, wonderful tutorial!
Thanks Doug
Great show! I love it.
Thank you.
Hi Karl, this is an interesting set up, thank you very much..
Just wish to ask you about the prism that you used, can I have a link to it please.?
Also, was the light aiming at the edge of the prism or was is flat onto the centre?
Thanks again
Hi Aby, it was actually a glass trophy that I won many years ago so it’s not something you can buy but you can purchase acrylic or glass prisms in large sizes online.
Great show. Really enjoyed it. Would you recommend the Lee 129 2-stop diffusion paper in addition to the 1.5-stop 216?
Hi Thanks. Not really I don’t use it to reduce light only to diffuse it so for me it’s how the diffusion looks for creating gradient light on glossy products.
This was a great show. Loved seeing the image being built up a section at a time. Really intetesting and such a great result!!
Thanks Adam, I’m looking forward to putting a final image togther in post once I’ve had a chance to properly go through them.
Thank you
57:50 (into the video)
Ha-ha! I also always want to say about Malevich’ Black Square that “it is a bit too simplistic and perhaps a bit too…boring to look at” but, hey, Giovanni, I also always know that if Kazimir Malevich was here with us he would undoubtedly say something like: “Bug off! That’s the way I envision things” and…he would be right to say so, wouldn’t he? Perhaps he wouldn’t. Or he would be a bit more…diplomatic, let’s put it this way, in expressing his opinion. Just like Karl.
A great example and this is the problem when you watch a photo ‘being built’ in such as this step by step in a live show. Should the viewer happen upon the photo with fresh eyes never having seen it’s construction, they wouldn’t make any assumption other than it is something else ambiguous in the overall atmosphere of the final shot some subliminal feature of the room or apartment. In fact people probably wouldn’t notice it at all as their initial gaze would immediately go to the model, then the lighting circulate and go back to the model whilst they try to apply their own narrative to the mood.
Well, yeah, Karl. But to your credit…I will dare to insult the hallowed dedication with which some folks stare devotedly at Black Square and other samples of modernism with “deep meaning” attached to them.
I will say this shot of yours is “slightly” more interesting to look at. Only in my view it would greatly help if one looks at it either in the form of a very big, high-quality print with carefully calibrated colour or on 60 inch plasma screen. Plasma screen perhaps is the best, I think. Anyway, it’s my humble opinion.
Best regards
Thank you and yes I think a screen would be best, that particular green/cyan is harder to reproduce in print. I’m looking forward to going through the shots and putting together the post production work and see where it takes me. Maybe in a month or so it might appear on my site.
Fantastic shoot! Thank you, Karl and the team!
Thank you.
Thank you Karl and the whole team. I enjoyed this one. Building your set and making layers look really cool. Nice choice of colors and all.
Thanks Karen, I’ve got to choose a few of the best frames to put it together in post and see if I can ‘build’ the atmosphere a little further.
Great results… the moral is “invest in fake plants”!