


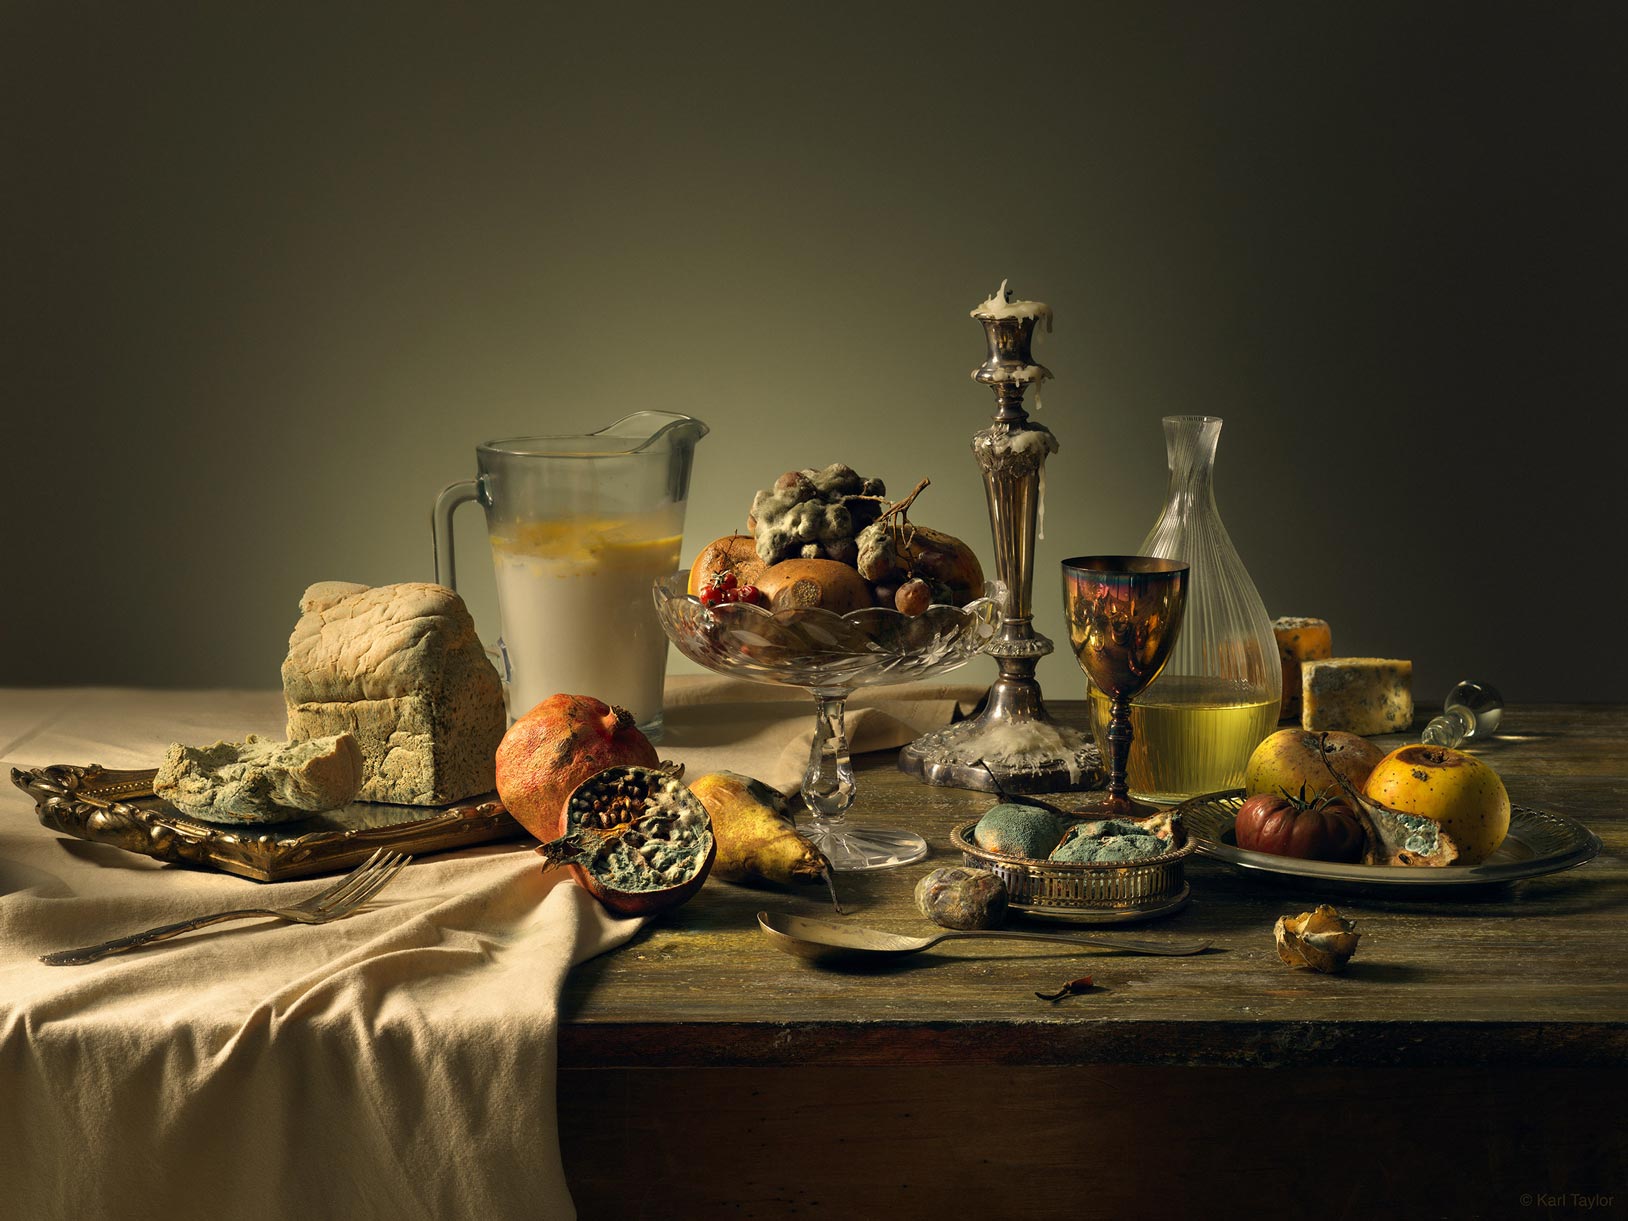
Still Life: Natural Decay
In this live show, Karl takes inspiration from the historical Old Masters to create his own ‘Natural Decay’ still life photo.
This show covers the start-to-finish shoot as Karl explains his concept for the image, his props, composition, camera settings, styling, lighting and colouration.
You’ll learn how to create the ‘warm’ look associated with this style of imagery using basic colour adjustment methods before seeing the simple lighting setup used to capture the final image.
Using just a couple of lights (this setup is achievable using just two lights, though three is better), Karl explains how to control the light using flags and reflectors and how, by working methodically and taking care of the little details, you can capture a near-perfect image in-camera.
Topics covered in this show include:
- How to set up a still life photo
- Camera settings for still life photography
- Composition and styling for still life photography
- Props for still life photography
- How to control light and shadows using flags
- Using reflectors to create additional light
To learn more about focus stacking, the following classes may be of interest:
- Live Workshop — Focus Stacking Shoot
- How to Focus Stack – Rings example
- Creating DIY photography backdrops
If you have any questions about this show please post in the comment section below.
Comments
Why don’t you use adobe for picture staking instead of the software you use??
Hi, I use Phocus which is the proprietary software for Hasselblad cameras. There is also another good tethering software by Capture One, which Adobe software are you referring too for taking pictures. If you are referring to processing the RAW files in Capture RAW is PS then there would be no difference and to doing that in Phocus and it would just be another step in the chain that isn’t needed as I’m already shooting the images into Phocus.
Hi, the Adobe focus stacking option is much slower than Helicon and I find it less accurate with it’s results.
you are the best teacher ever 🙂 thx for putting all this knowledge out !!!
Thank you so much!
Amazing!
Thank you.
Thank you very much, that was a great tutorial. I love the fact that you share all your little tricks and theory about lighting , and, the fact that most of your results are set on stage and not afterwards on Photoshop!I very glad that I have joined this photography course platform!
Hi Charlie, thank you very much for you comments that is much appreciated and I’m glad you are enjoying the courses.
Thank you so much, I learned a lot from this video tutorial .. Teacher Karl Taylor
Thank you.
I love the attention to detail and the aspiration to get it right in camera. Fascinating watching you work. Top quality!
Thank you Kirk.
Question about your process of composition.. initially it took you six hours, but we are seeing a rebuild so the mental process presented is slightly different. Here in the video you are recreating, so I view this process a little differently than the initial creative process. The question is about how you approached arriving to the initial end result. In my mind, I break out the styling into working out the overall form, then placing details and connecting the elements together, then lastly lighting and adjustments. I’ve read about the theory concerning overall shape.. building the pyramid.. so it makes sense to develop a constructed form which gives you that shape. Did you spend a high percentage of the 6 hour time working out that form, or did you choose the props to help you achieve an result, which was achieved fairly quickly? Adversely, was the majority of the time then spent working on the details once the constructed form was built? I think the question is how much effort was expended working toward a preplanned concept as opposed to how much time working from a gut feeling and making continuous decisions. I have had minor successes creating still-lifes, so I know to improve I should either plan better, or research more, or have a clearer vision in mind. I wanted a little insight into the creative process during those six hours.
Hi Gary, yes absolutely correct most of my time was spent working out my form and connection between each object and how it felt. This process is far to long to run on a live show as it would take all day so I chose to run a repeated version of it here. The choice of props was actually quite quick as from experience I felt I knew what would work together, it’s the final little placements that take the time, prepping the candle, getting the shape and angles of the food etc. The pre viz concept of the feeling and mood was already formed but until I start moving the objects around it’s hard to define. The planning was in finding all the right props that would work together in the first place and then of course all the experimentation with the decaying products over several weeks. Although I’d say it all went well and how I’d expected I do remember having trouble placing the stopper of the wind decanter near the decanter as I just couldn’t get it to work, in the end I moved it to the right hand side next to the cheese and made use of the caustics and refraction and I realised that it didn’t need to be right next to the decanter.
The end result shows the effort. I’ve tried lesser forms of this but have been restrained because I have a meagre assortment of props.. collecting.. searching. It is a process. I particularly liked the additions of the spot highlights and the refracted use of the stopper. Good food for thought. Thanks
Hi Gary, we always find a lot of good props at second hand stores and charity shops. Cheers.
Hi Karl, what an amazing image! could you please tell me the name of the photographer that you love. Thanks
Thank you. Do you mean a photographer I mentioned?
Yes, I loved his work from the images that you have shown
I think it was https://peterlippmann.com/
Many thanks Karl
Did I somehow miss it? What was the compositional technique?
Hi Sharon, please could you explain a little further what you mean? Here I used a ‘pyramid’ composition.
I thought it must have been. I really enjoyed the session. I appreciate the attention to detail and commitment to getting in right in camera opposed to post. I learnt a lot watching your progress! I must have missed you mentioning the ‘pyramid’. It may have just been my exception that you go into more detail about composition.
I’m very glad I signed up! These courses have been invaluable for me developing my skills.
Thank you Sharon I’m glad you enjoyed it. As you can see with this one there was far more work involved in the preparation, prop sourcing and testing the composition than there was in the lighting which essentially was quite simple. It is that combination of careful preparation and props that give the shot its ‘authenticity’ to the era/theme and often you will find that that is where as much work is need to get the desired result.