
Photographing Creative Water Sculptures
We made a splash in this live show as Karl demonstrates how to create art with water and a simple object.
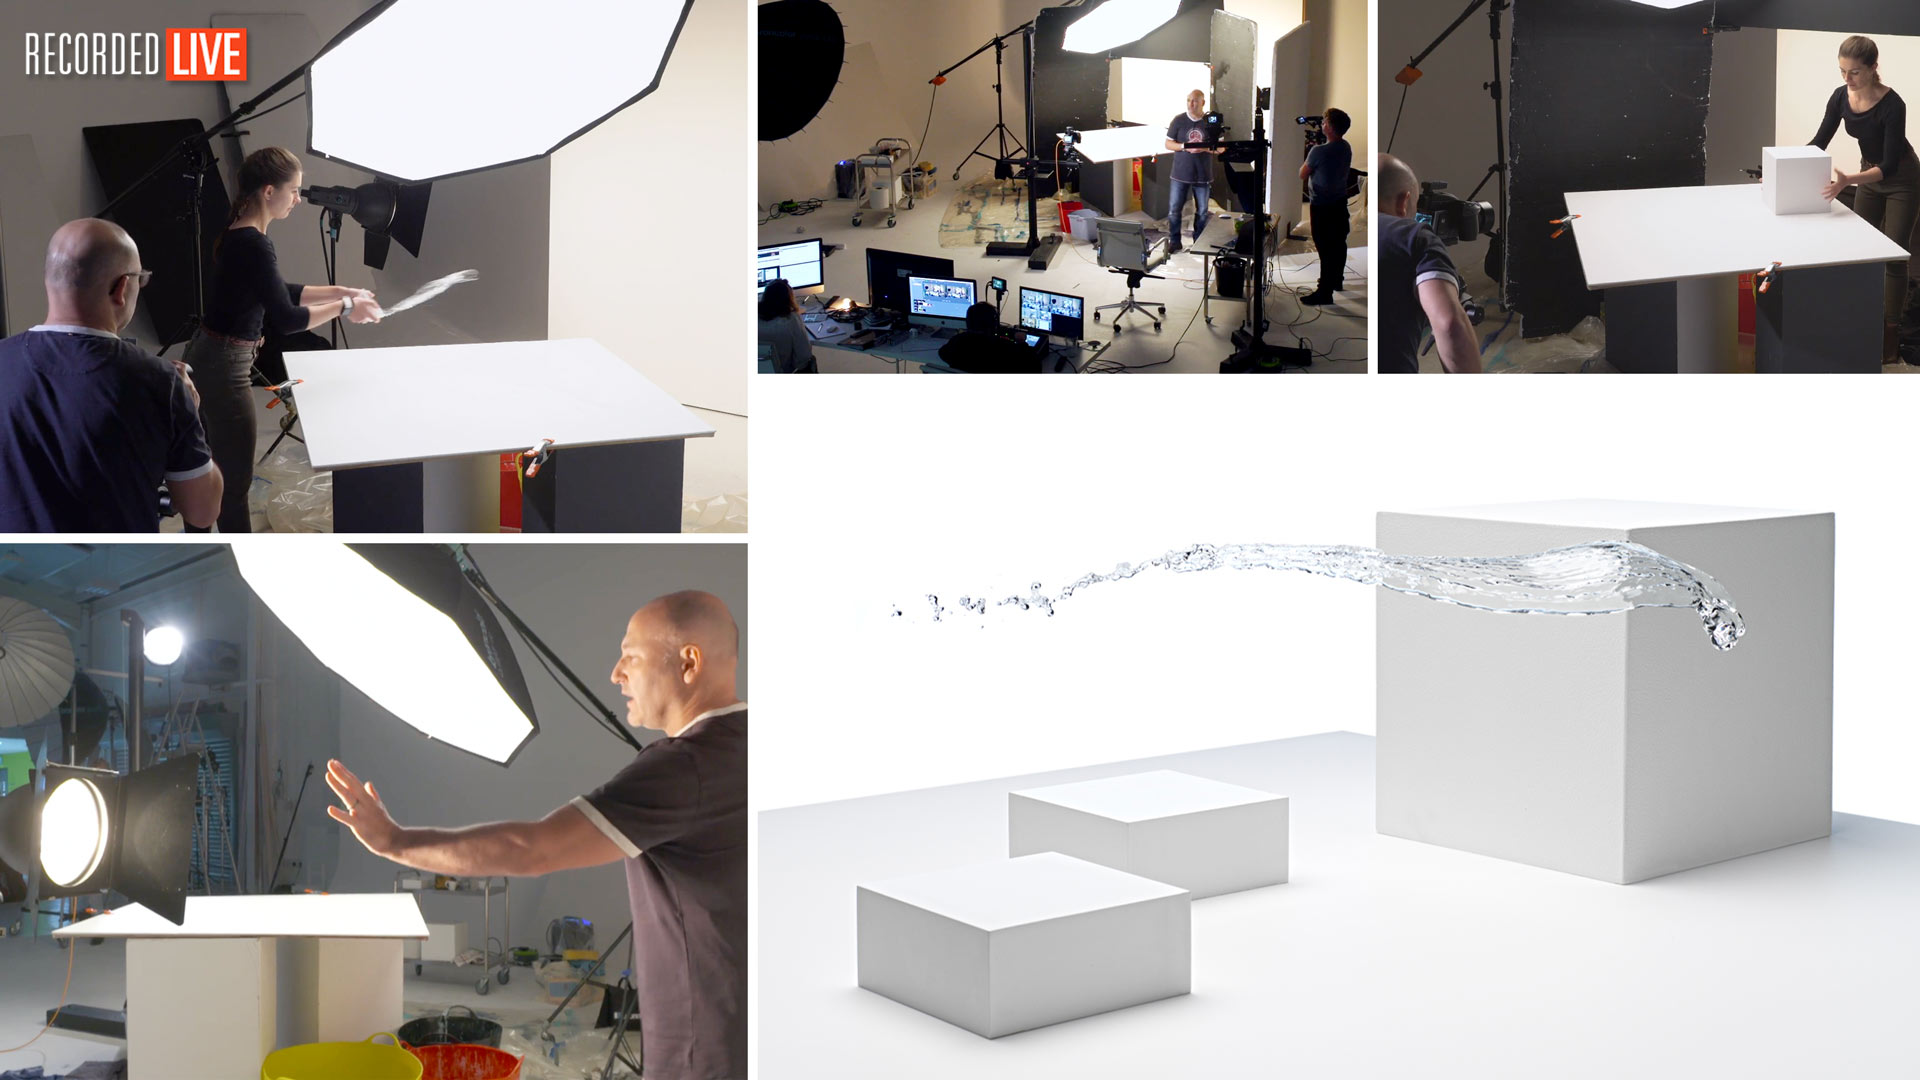
Photographing a white-on-white image, Karl explains the technique for photographing water on a white background, and how you can enhance shape and form in the liquid. He also covers concepts like fast flash duration, what it means, and what speeds you need to freeze liquid shots like this. Additionally, Karl explains the lighting setup he used to create the white background and light the water.
To end the show, Karl demonstrates the retouching process and techniques to comp together the final image.
This information-packed show provides a simple three-light setup that you can easily replicate in your own studio, no matter the size, and will allow you to test new techniques, get creative, and add some eye-catching images to your portfolio.
Topics covered in this show include:
- How to photograph liquid splashes
- How to create white backgrounds for photography
- Photographing water on a white background
- Using fast flash duration to freeze movement
- Retouching splash images in Photoshop
Additional classes mentioned during this show include:
- Understanding flash duration
- The relationship of shutter speeds and apertures to flash
- Live Workshop – Liquid Art and Motion
- Live Workshop – Liquid Photography With David Lund
Questions? Please post them in the comments section below.

Comments
Thanks Karl.
I have just signed up and am enjoying your product photography videos. So the time has come to purchase a flash head kit. I’m assuming at this stage I need 2 heads. In order to cover my bases I’ll assume that I will need the ability to freeze liquid motion in the future. So can you tell me would 2 of these units from Godox be suitable workhorses moving forward or should I go with something else? I see on the specs they support 1/8000 HSS. Thanks.
https://www.godox.com/product-d/AD600Pro.html
Hi Will, glad to hear you are enjoying the classes. First of all the flash you have linked is a great unit but just to let you know this one is a lithium battery so you can use it outdoors as well as in the studio? They do an electric cable version too that can only be used in the studio too. The flash duration of these is very good. Also take a look at the Broncolor Siros range.
is there a way i can DIY those white boxes or a store to buy them from
Hi, here you go – https://visualeducation.com/class/studio-blocks-and-frames/
Hello, may I ask what would those white cube be called when shopping for them? Thanks
Hi Sean, we don’t buy them we make them as you can see here – https://visualeducation.com/class/studio-blocks-and-frames/
Beautiful shots. I will try this one this week.
A few things I love about this module. up to now I am using the Taylor principle of
a) Make a plan
b) Solve one problem at a time
and I now add
c) Don’t be overly pedantic and go with your instinct
I cannot overstate how much I value this advice. I love this process, as there is a risk that you can over plan and be too technical and lose the story. The plan is critical but I am finding myself solving problems by using creative stuff like duct tape, mirrors and whatever is to hand, and in the end, just trusting my instincts.
I LOVE this platform. I have progressed so much. One day I would love to do a KT field workshop if that is an option.
thanks
Hi Derrick, that’s great to hear the strategy you’re adopting and thanks for your comments.
Loved this tutorial!
Thank you.
Hello Karl,
Great tutorial as always, quick question, if anyone wants to attempt this kind of shoot, do all the lights used on the shoot need to have a short flash duration or just the one that is focused to freez the water?.
Thank you so much for any respond that you could provide.
Hi thank you, it’s best to have them all as fast flash duration but I do find you can get away with just the key light as a fast one. In fact I think that’s what I did on this shoot – https://visualeducation.com/class/paint-explosion/
Hi Karl
Great show as always. Have you ever had an occasion in “product” photography where you dedicated the full 3200 joules of power to a single light?
It would seems that most product photography scenarios use 25 to 200 watts per light, in this tutorial the power on the backlights were approximately 25 – 40 watts per, so buying mono blocks with 400, 600 and 800 watts light when one did only product photography seems to be overkill?
Amit
Hi Amit, no I can’t think of any occassion where I have had to direct 3200J directly at a product with a single light. But I’ve had lots of ocassions where I’ve needed to bounce 3200J around a large studio, less so if it’s a smaller studio, or where I’ve needed to throw light from a very long distance but that’s about it. I spent the first 15 years of my career working with heads that were a maximum of 1100J and 50ISO film so with the improved ISO performance of modern cameras you are already gaining one or two fstops.
Classic Karl, clear simple instructions that you can replicate.
Hi Karl
Love your videos! there’s something I have to tell you, which you might not thought about…I started buying prettygreen T-Shirt because of you, so you might can ask an ad-due from them 🙂
Thanks for your teaching
Mo
Hi Mo that’s great, I love Pretty Green brand I buy nearly all my stuff from their. It used to be owned by Liam Gallagher from Oasis which is where the style is drawn from but I think it has since been sold to another company.
Thank you for the detailed video!
I’ve only been signed up for a short time but I’ve learned a lot from your videos and started shooting tethered. I only photograph for a hobby but I’ve been experimenting a lot more recently thanks to inspiration from your videos.
Although I’m fine to shoot tethered I can understand that some people could be alienated to to the concept, thinking that they would need an expensive cable or specific cameras, etc so I think it would be useful if you had a video for that as well like you mentioned.
Hi thank you, yes this is something we are going to produce. Cheers Karl.
Hello Mr. Taylor,
Are there any books that you can recommend about composition in product photography?
Thank you for a very informative class,
Ahram
Hi I don’t of any but I recommend you watch this – https://visualeducation.com/class/composition-2/
Wow, thank you!
“If the script’s rubbish the film’s gonna be crap”. Now there’s a quote for the ages! Great show. Super interesting detail on the refraction of the light and lensing effect through the water.
Thanks Joe.
Hi, Karl!
Have you ever tried to use acrylic semi-transparent matte plastic as a scrim for your shooting?
Hi, yes you will see that in many of our tutorials, that’s standard for product photographers.
Hi Karl!
I have been a member of your courses for a long time, I have learned a lot, thank you, I consider you to be one of the best teachers in the field.
We are more or less the same age, digital photography has been very helpful in every way, however, when I was young, I only had my films developed by some lab, but I never knew how it was done. You comment a lot about the old days, and I think it would be very useful (even to the new generations) to know how that process was.
Is it possible for you to show us some of the techniques of the past to understand the future?
Regards!! thank you for your time….
Hi I can certainly describe it but there are very few labs to actually show you the process but I’ll keep it mind to talk through how it was done on a future live show. Briefly though in a completely dark room the film was removed from it’s canister and loaded into a spiral reel or tall hanger, then it was put onto a machine (all by touch in the dark) then the machine dunks it in warm chemical tanks – Developer, Stop, Fix, Wash then dry and the film would come out about 10mins later, then it’s cut. Then it’s loaded into Enlarger’s which are big projectors that project light through the film down onto paper and you adjust colour filtration in the enlarger and make a test print which also has to go through another machine with big rollers to suck the print through warm chemical baths of Dev, Stop, Fix, wash and dry and then out pops the prints. Then you’d check the print adjust your colour and exposure time etc and print another. All the chemicals had to be energised or changed regularly, machines cleaned etc. Very messy and time consuming.