
Stellar Camera Product Shoot
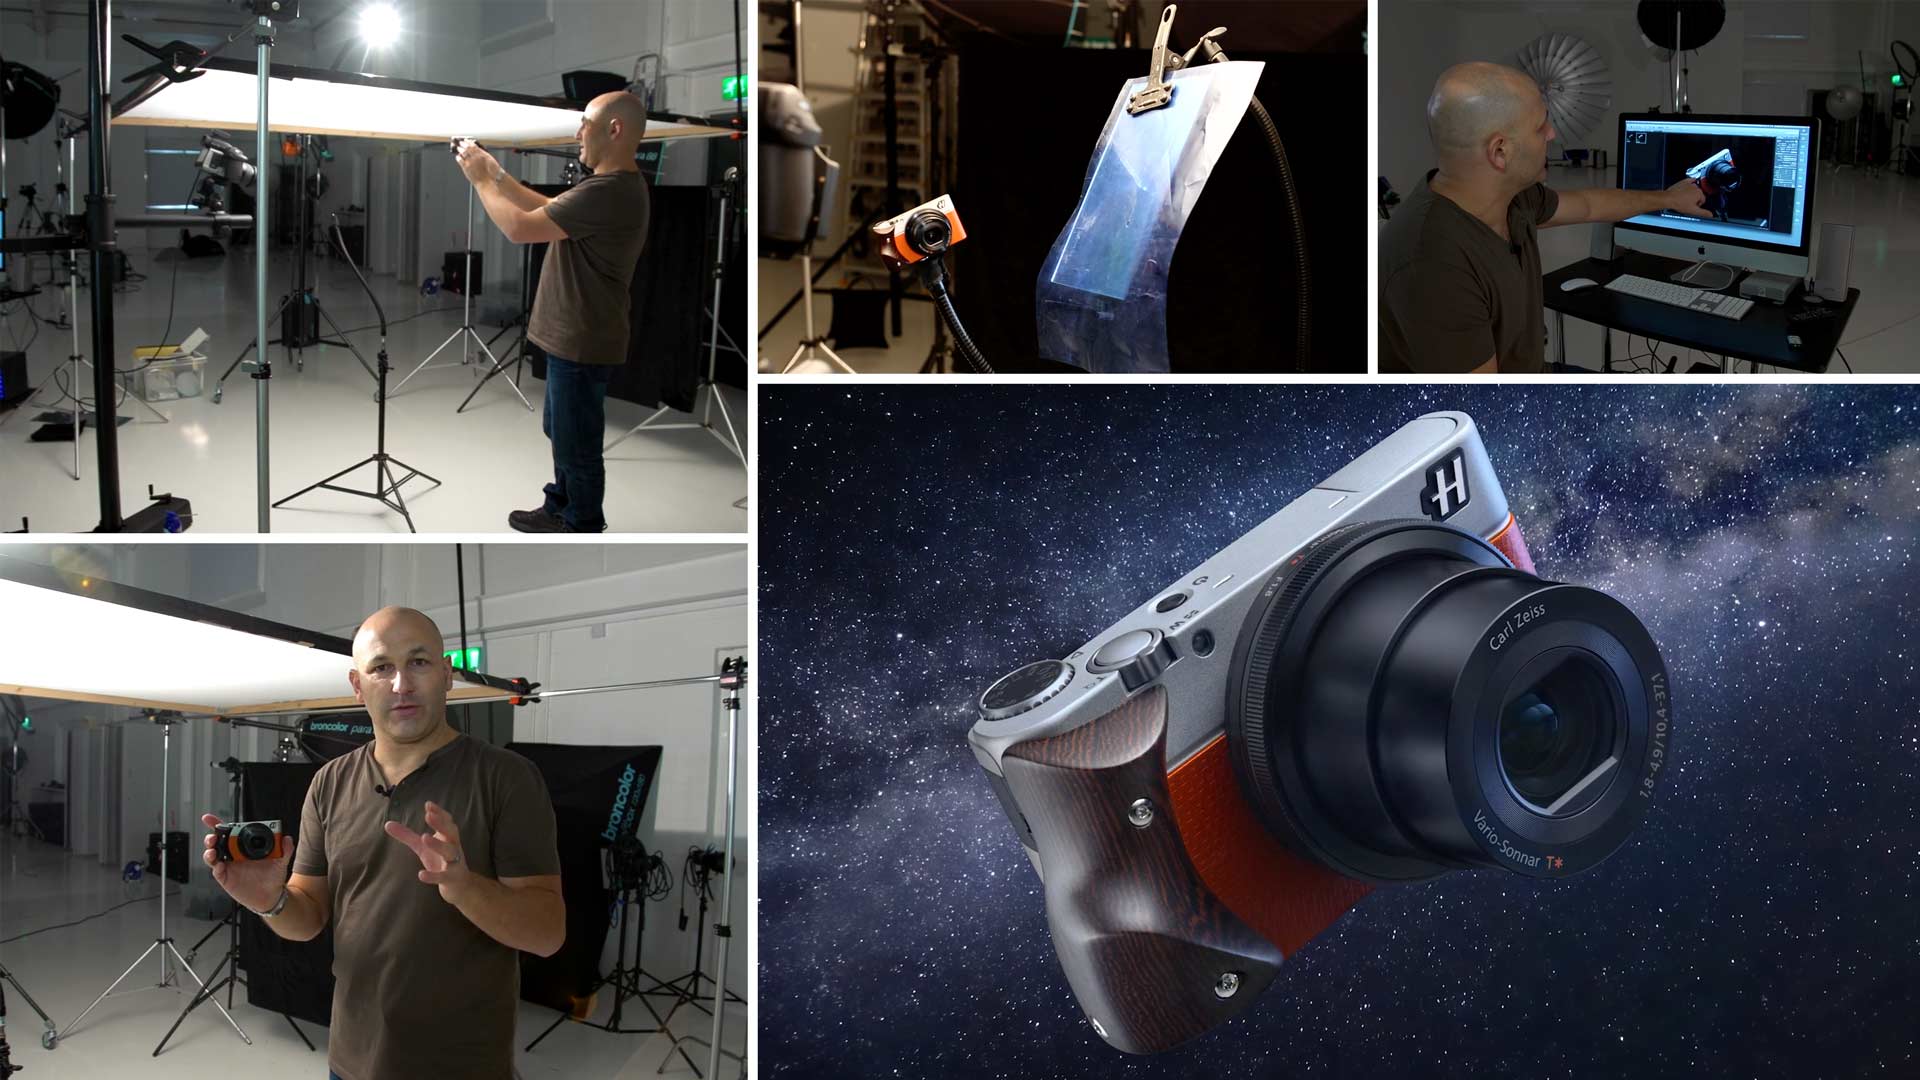
In this photography class, a bonus product photography shoot, Karl photographs a Hasselblad Stellar Special Edition Camera.
Karl talks you through how to photograph a product image – from deciding your angle of view to how to use coloured lighting gels for creative effect. He also explains the common challenges you might face when photographing a product like this and suggests how to overcome them.
At the end of this class, you’ll feel confident photographing shiny, reflective surfaces, understand when and how to use a polarising filter for product photography and know how to achieve sufficient depth of field when photographing a small product.
In this class:
- Product photography: How to photograph a luxury item
- Product photography tips
- Studio lighting setups for product photography
- Lighting modifiers for product photography
- How to photograph reflective surfaces
- How to use a polarising filter for product photography
- Using colored gels for product photography
- How to focus stack an image
To see the full retouching classes for this product image, please watch Part 1 and Part 2 of our Product Retouch classes, which you can find in the Post-Production section.
Questions? Please post them in the comments section below.
Comments
This is an amazing shot!
Hi Karl,
If I’m using a Canon 100mm macro lens, does it mean I don’t need to use the extension tubes? Thanks!
Excellent demonstration. Product photography doesn’t really get me excited as I like portraiture mainly but this was a real eye opener and may motivate me to have a go myself. I love how creative and detailed you can get with one light and a few mirrors.
I just used this setup using a crazy old (and cheap!) Speedotron system I bought on Craigslist, a scrim made from tracing paper, a couple of reflectors and some black acrylic, and I just couldn’t believe the results. I’m so appreciative of the care you take in explaining how it all works and I’m excited for the next brief so I can participate. One question, how do you get all the dust off the acrylic? No matter how hard I tried it was still dusty.
Hi James, I’m glad to hear you trying these techniques and them working for you. Dust is always a problem, you can by tins of high pressure clean air with a small nozzle and you give the product a blow just before shooting. The tins were about £6 each and over the years I’d spent a fortune on them so I moved to a 3L 300bar cylinder with a dust blower nozzle and cable that my dive shop rigged up. You’ll see me using it in the car shoots.
How would using a tracing paper scrim compare to using the diffusion fabric? Also, how much smaller could that frame be and still get the same effect?
I love the use of simple materials to create some pretty amazing effects, especially the blue gel on mirror. Beautiful composition, also.
Hi James, the material is LEE216 diffusion. Scrims are always better bigger, especially if you’re dealing with curved objects like this – https://visualeducation.com/class/sunglasses-product-shoot/ There are however many rectangular shaped objects that you could use a much smaller scrim, remember the physics – the object if glossy is basically a mirror reflecting an image of the light source, if that object is curved then it is reflecting an image of a wider area just like a convex mirror and that’s where we need bigger scrims. Many objects like sunglasses, cosmetics, etc have these curved attributes which require a bigger scrim some do not. Cheers Karl.
Hi Karl, first of all thank you for sharing all your knowledge!
What do you use for your difusers? What is the difusion material, I am in Germany and I can’t find this specific difusion material for photograohers…
Hi Leo, thank you for your comments. We use LEE 216 or LEE 400LUX in 1.52m wide rolls, 7m long.
Hi Karl,
so for me to understand the light setup (being a beginner)
It is one modeling lamp from the top and the flash (I guess on the camera?)
When you control the light exposure stops, is that for the flash?
Hi Sebastian, many people get confused by this when they are new to lighting but no the modelling light and the flash tube are in the same place, the flash tube wraps around the modelling lamp – please watch the first two chapters in this section – https://visualeducation.com/section/lighting-theory-and-equipment/
Hey Karl
Can you give the full description of those magic arms?
The look very sturdy compared to what i’m finding.
Searching online but not finding them.
Hi Michelle, if you are in the UK – https://www.manfrotto.com/uk-en/heavy-duty-flexible-arm-520mm-237hd/ if you are in the USA they have the same thing on the USA Manfrotto website.
Found it – thanks!
Some great tips paying attention to the reflections by choosing a frosted card, mirrors with gels, the use of a polarizer and also black fabric. These definitely help solve some of issues I have faced in the past. For me there are some lightbulb moments in this one. Thank you!
Cheers Geoff.
just getting into some studio work at home to fill in between wildlife trips to Africa… this video has been VERY helpful, thank you…
Thank you.
Karl another great video.
One question you probably been asked. In your graduated lighting setup with the scrim could you get away with using a large flat white board in replacing the scrim and bounce light up into the board let’s say bare bulb or with a p65 ? This would be similar to bouncing off a ceiling but much closer to the product like sun glasses etc. I been having issues getting scrim material in the USA. Also wanted a durable method. As you mentioned nylon rip chord leaves a mess with wrinkles in the material. I guess my solution is a flat wall or foam board ? If it will work ?
Hi Jared, yes this technique is common in car photography for creating gradient lighting. You need a very smooth pure white board.
Just joined. Very impressed so far. I do agree that the music, while lovely, is slightly distracting. That said, what is it? Cheers.
Loved the way Karl built up the shot… step by step to achieve a fabulous image. Not sure the video needs the music track though, as Stephen says, it’s a bit distracting.
Thank you Martin. I’ll also mention that to our video editor 🙂
Great video but what’s with the music a tad distracting although a beautiful piece of music.
I think the above description is for the previous chapter. Anyway great example of using gels on mirrors to create mood.