
Shadowless Lighting for Photographing Products on White
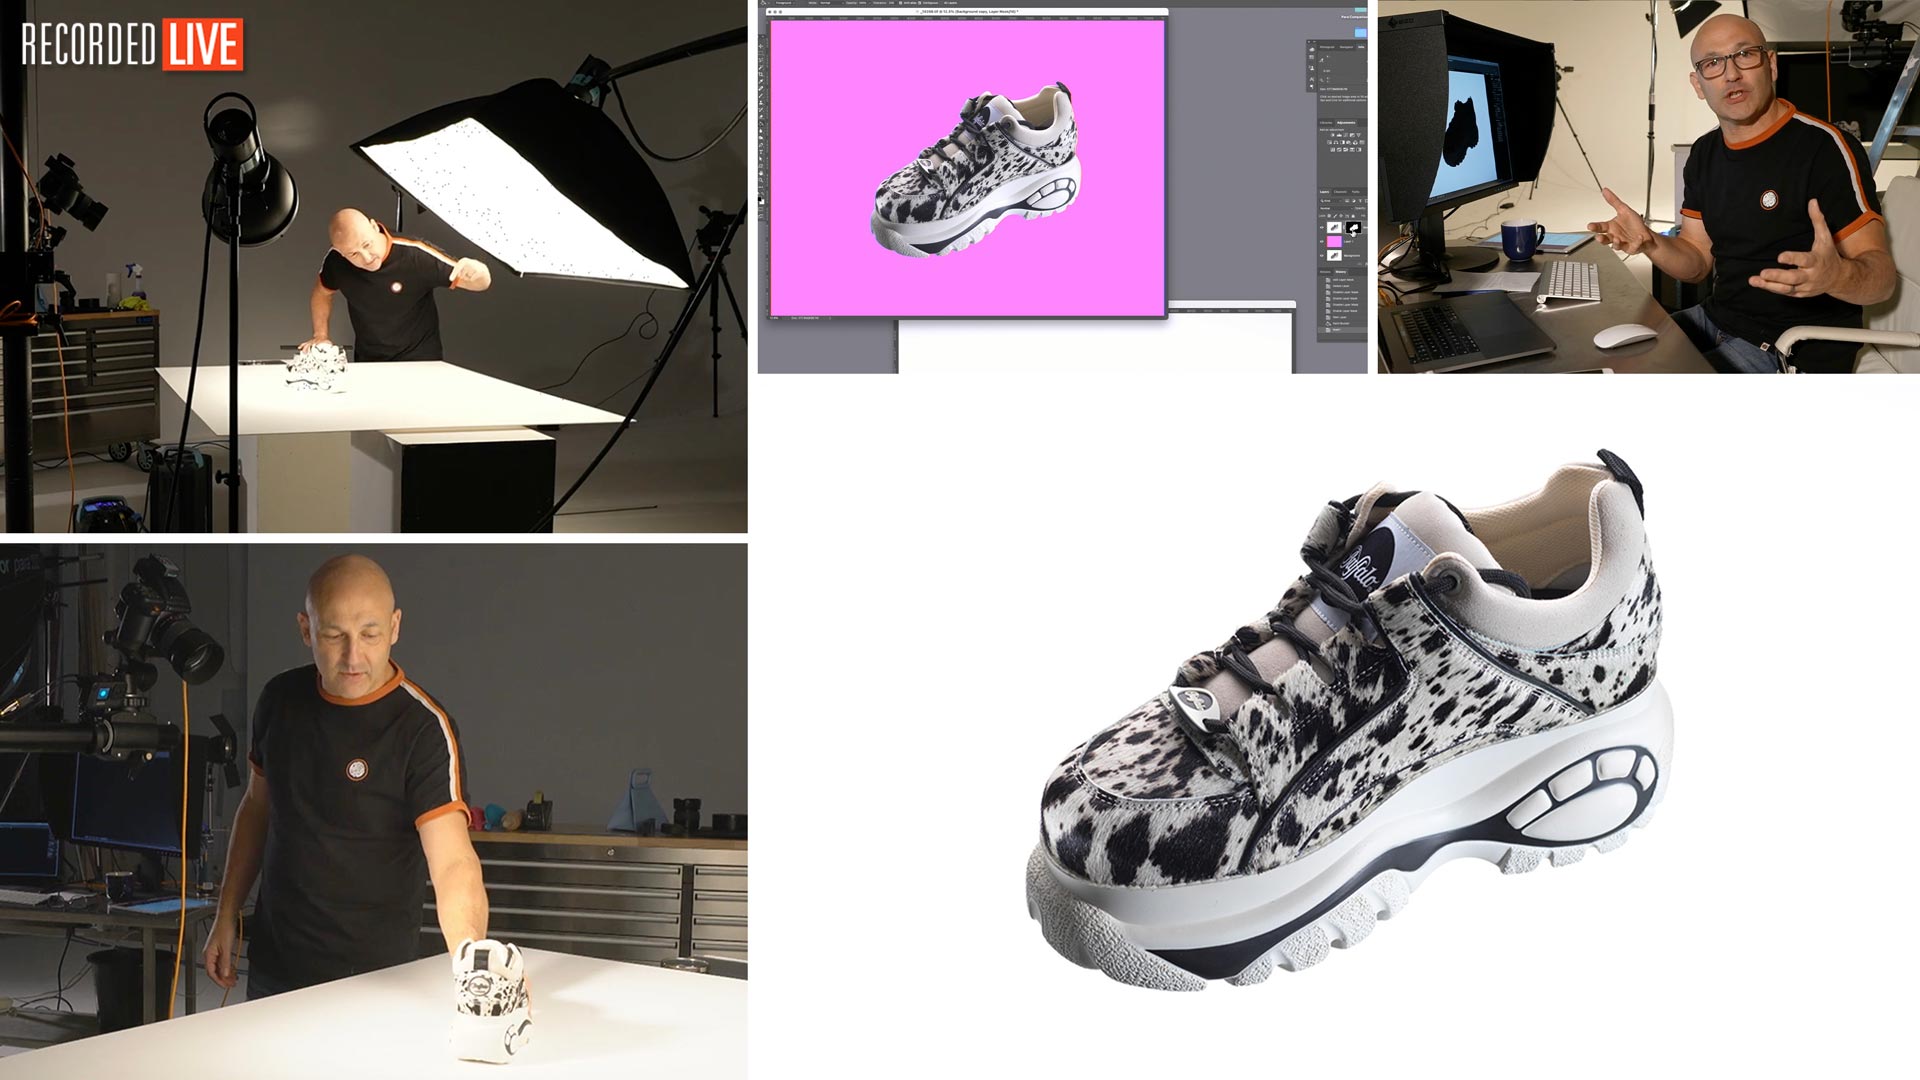
In this live show, Karl demonstrates a useful technique for creating shadowless lighting when photographing products on a white background.
This technique is often required for e-commerce or catalogue product photography and is something we’ve been asked about a lot. To help you achieve this look Karl demonstrates a start-to-finish shoot showing the simple technique that can be used to achieve this.
To start, Karl shows how one would normally light products on white (you can find more in-depth demonstrations on this in classes such as our packshot product photography class, high-end headphones product shoot, or rings jewellery photography shoot). The problem with this technique is that it can be very difficult to eliminate shadows entirely, which is what is often required when shooting e-commerce products.
The solution to this is actually very simple and requires nothing more than a simple change of background material.
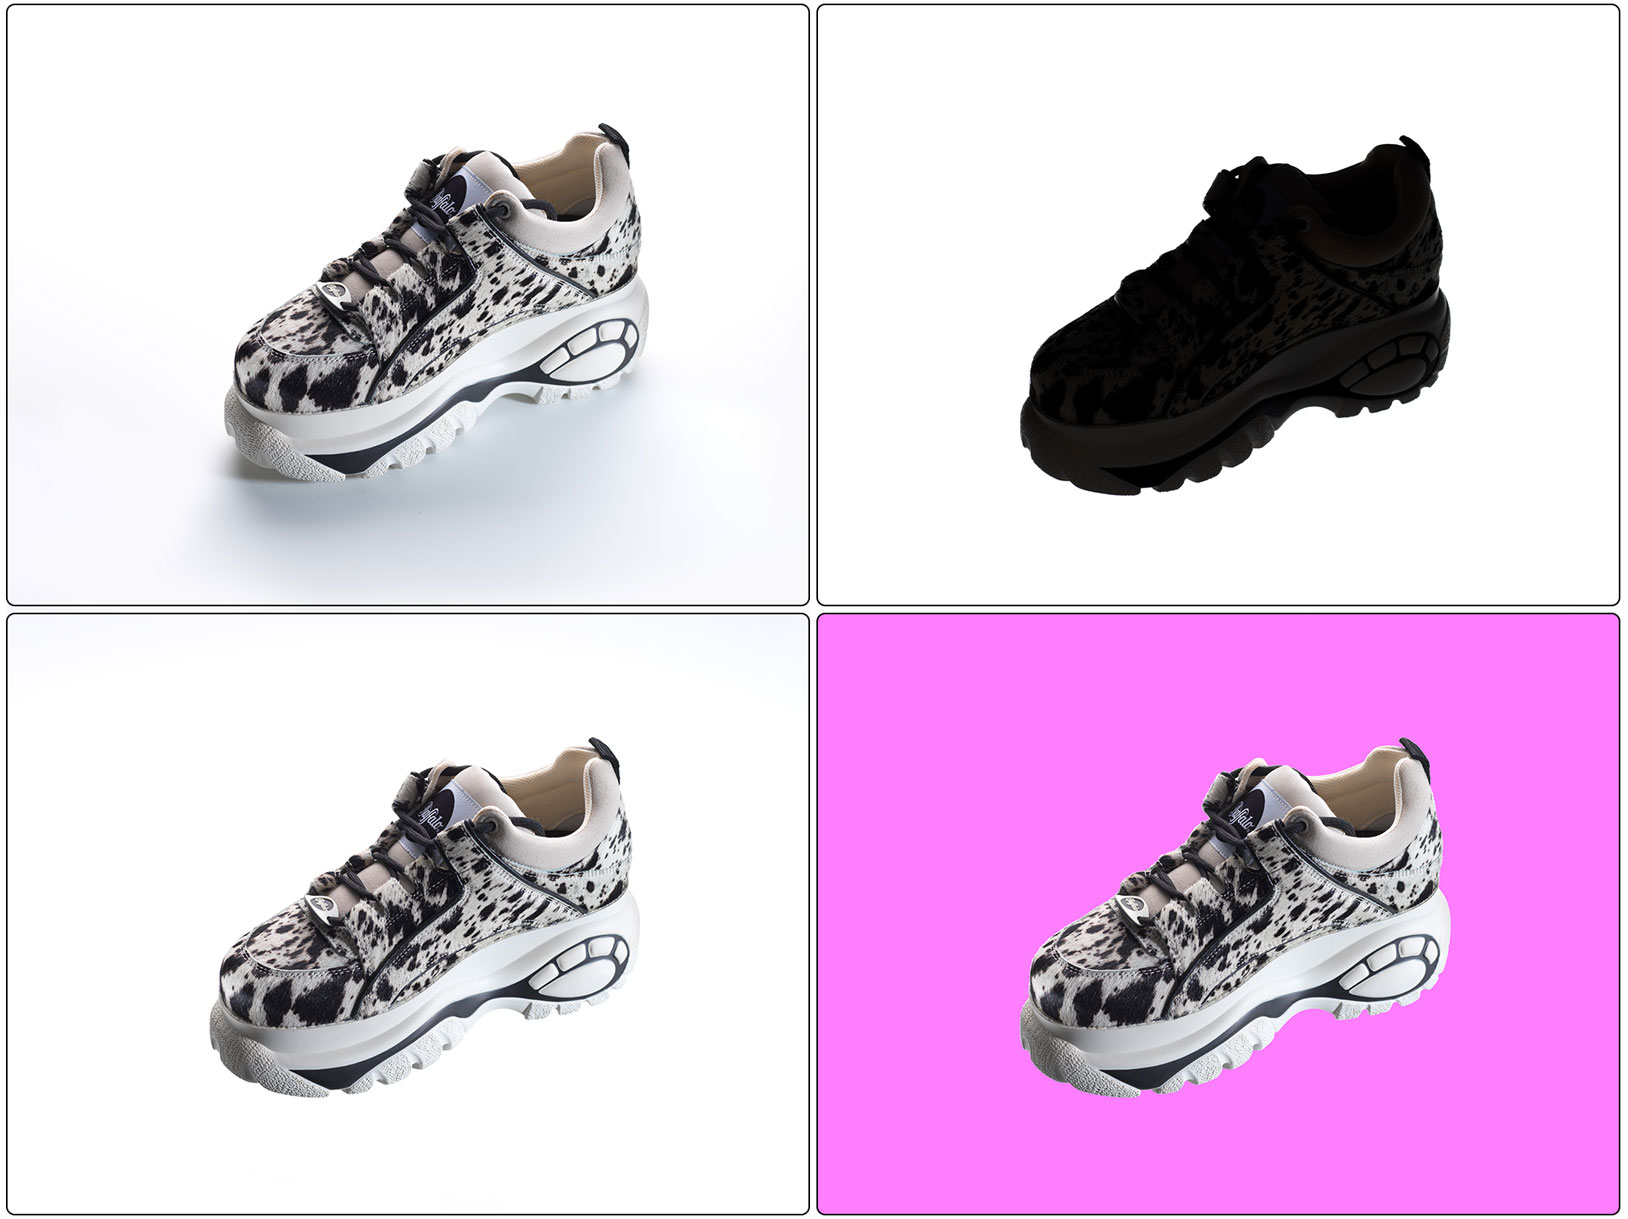
In the show Karl demonstrates exactly how to achieve this shadowless lighting, thereby eliminating the need to spend hours in Photoshop doing cutout work. He then goes on to show a simple trick to make cutout work even easier and how to easily change the background colour in Photoshop!
Topics covered in this show include:
- Creating white backgrounds
- Photographing products on white backgrounds
- Creating shadowless light for product photography
- How to create quick cutout selections in Photoshop
- Changing background colour in Photoshop
There is also a follow-up live show related to this, where Karl demonstrates how to create natural-looking artificial shadows in Photoshop.
Comments
YOU, are a genius.
Ha ha thank you 🙂
Hey, Karl 🙌🏻 I’m new here and i’m just loving the classes. You are the best man!!! ✌🏼
I would like to ask you one thing. I watched the videos from continuous light, reflection ones and this one with glass surface. In all 3 videos you teach how to arrive in pure white background straight in camera. Reducing the work in the post production.
If the client ask for a picture with natural shadow under the product? Exist a way to get the pure white background straight from the camera with natural shadow shooting with seamless background, no reflection and in the same level of the product???
Thanks ✌🏼
Hi Guigo, welcome aboard! I just need to clarify a couple of things and to make it easier for us to offer you the best support. If you need to refer to a particular class please note now the time in the video and which video so we can quickly find the item you might need help with. You mention ‘continuous light’ is this the one with the two ‘Dove’ Shampoo bottles? Anyway it is much more difficult to arrive at pure white and shadow without any post production. There is a technique for doing so but it is too complicated to explain exactly how here as it requires back and top lighting that can adversely affect the product you are shooting but I will add it to my list of new courses to produce! If you want to try it in the meantime, get the whitest material you can find and if you are shooting the product from the same level as the ‘Dove’ shampoo then you need to light from the back and up high to light the white surface with a big softbox. Cheers Karl.
Love this tutorial! I had a similar setup idea for catalog photoshoot but wasn’t sure it’s going to work. Immediately tried this method after watching your tutorial with a small piece of acrylic board and a small plush toy. This works almost perfectly until I run into a technical problem with Phocus and Lightroom.
I am using a Hasselblad X1Dii and shooting tethered with Phocus 3.5.5. Everything works perfect when I am shooting and I got perfect 255 white background corner to corner, however when I import the .fff files into Lightroom I instantly notice that the background is not 255 anymore and I can see the acrylic board is a little darker to that other part of the background. I didn’t have any exposure setting adjustment in my Phocus software so I am really confused by where that difference came from.
Can you help me with the issue or point me some directions of what should I check?
Thanks!
Hi, sounds odd? But I’m not sure why you are importing into LR? Phocus is a better RAW processor for the Hasselblad 3f files so you should be exporting them out Phocus as tiffs, then open them in PS to check the values.
Thanks! Exporting as tiffs is my work around right now. I admit I should give Phocus more tries but to my experience Lightroom is a little more stable when batch processing a lot of pictures, specially for catalogue jobs like this.
Also having a problem like this, I just feel more comfortable if I can figure out what makes the difference.
I tried to export as .tiff and the image has pure white background but when I export as .dng the background is not pure white anymore. So it does feel like Phocus did some adjustment to the file but I checked all the settings in the adjustment panel, I don’t have a single thing changed. So does this mean Phocus has some default hidden adjustment that is not in the adjustment panel?
Thanks again for the help!
Hi, I’m afraid I don’t know of any issue with phocus and DNG’s but I never have reason to use them as I’m only ever processing my RAW files in Phocus and then exporting them as tiffs to finish them off in PS. I don’t use LR or any type of cataloguing system as I just organise my RAW images and Tiff images into a folder for that particular job and date. I find Phocus very stable for batch exporting but it’s cataloging options are limited.
Thanks, Karl! I also noticed a slight difference color and exposure between the .fff files from Phocus and the .3fr files directly from my X1D ii. Is that normal to have?
Hi, no that shouldn’t be the case. It sounds like you may have an import profile set that isn’t ‘standard’ which means when you import files it automatically applies adjustments that have been saved.
This provided so much clarity and made my workflow much easier. Thank you.
Great to hear, we have another class on the horizontal version coming soon.
Hi Karl,
Have you ever made the white blocks you use to place products on? They are easily available when in a professional photo studio but I am trying to make them at home out of MDF.
Any tips?
Thanks, Joe.
Hi, we had a carpenter make white blocks from MDF.
We use Amari Plastics (amariplastics.com) to get our acrylic / plexiglas — to get large sheets (4ft x 8ft) and just cut it to size. IF you ask nicely, they’l even cut it up for you.
Thanks for the info. I use Barkston Plastics.
Great show, Karl. You guys really upped your game this week with such a limited staff.
This might be helpful to some, since everyone has an IKEA shelf: I’ve been using 2 Kallax 4 cube 77cm shelves from IKEA that I had laying around. I put wheels on them so they roll around my little studio and they are great for holding reflectors and such on the shelves and sturdy enough to hold glass or mdf on top.
Thanks for the tip James.
Thanks for the tipp James.
By the way. The wheels for the kallax are also available from this furniture store 😉
great as always…
Thank you.
In case anyone finds this useful: stackable, plastic crates can be bought cheaply to use instead of Karl’s bespoke white boxes. The advantage of these crates is that they come in different heights, so buying a selection cheaply gives lots of different heights. They often get sold in sets of several too, which makes them even more economical. Just an idea …
Thanks for the tip Barry.
Looking forward to the upcoming product shoots you mentioned. My product shots sell my products. That’s why I subscribed. Plus all my product movies have improved from what I’m learning about stills on this site. I’m getting a fantastic return on my money spent here. Thank you! Thanks to your staff as well.
I’d love to hear what next week’s guest has to say about product videos. The marketplaces you mentioned in this video Etsy, Shopify, (eBAY too?) are allowing short videos. Etsy is pushing them with guidelines for sellers etc.
Thanks for balancing being supportive with being unfiltered, Karl. I’ve watched every replay since I subbed last month. Not only do I fast forward past the intro music, I watch at 1.75x speed. What a time to be alive! 😇
Hi MxGyrus, great stuff and glad to hear you’re enjoying the platform. Don’t watch the playbacks too speeded up or you might miss one of my jokes 🙂
I found this video useful if I had a) a studio with similar amount of space and B) the finance to purchase the props.
Are there any videos, by you Karl, for those who are in smaller spaces and without the props and with a smaller budget?
Hi, you don’t need a huge amount of space to do this set up but you do need some basics of the required props and kit, that’s unavoidable. You can’t cook a pizza without an oven.
Ruby LDN: A table with a white surface, 4 cubic glass washers (approx. 15cm high), a sheet of glass from a picture frame (Danger: breakable!).
You do the Set an Shooting as Karl described it. You can also this shoot with camera flashes 😉
Good luck an enjoy it.
Thanks Karl for this lesson. What do you make to bigger Objects (1,5m and more)? A bigger sheet
Hi Patrick, thank you. No it’s not feasible with very large products unfortunately these would need to be shot on the ground or a more stable surface and cut out.
Thanks Karl
Brilliant class Karl. Learned so much
Great to hear!
Are you serious??? I had to wait 35 minutes for this archived program to start!!! Why don’t you trim the beginning???
We do trim the beginning Christopher the following day so it will be done today. Unfortunately we can’t have all the staff working all hours because you were unable to use the fast forward button on the video player?! You know from experience this is the case because you have mentioned it many times that there is a 30min lead up to the live shows that is necessary to test the broadcast equipment is working before we go live, so you should know you can just fast forward 30mins. And please don’t start throwing the customer is always right stuff at me as this is Karl you’re talking to and you know that won’t wash. It will be trimmed today as always, within 24 hours of the live show.
Some people may have the KTE Website confused with FedEx Same-Day delivery? The fact that you even post the live pre-edited video replays at all the same day is a miracle… nobody does it better!
Cheers John.
Thank you very much for the efforts