
Studio Business Portrait
Business portraits are a common job for many photographers and it’s always useful to have a few key lighting setups that you can refer to time and time again. In this series of business portrait photography courses, Karl shares his standard lighting setups that he frequently uses.
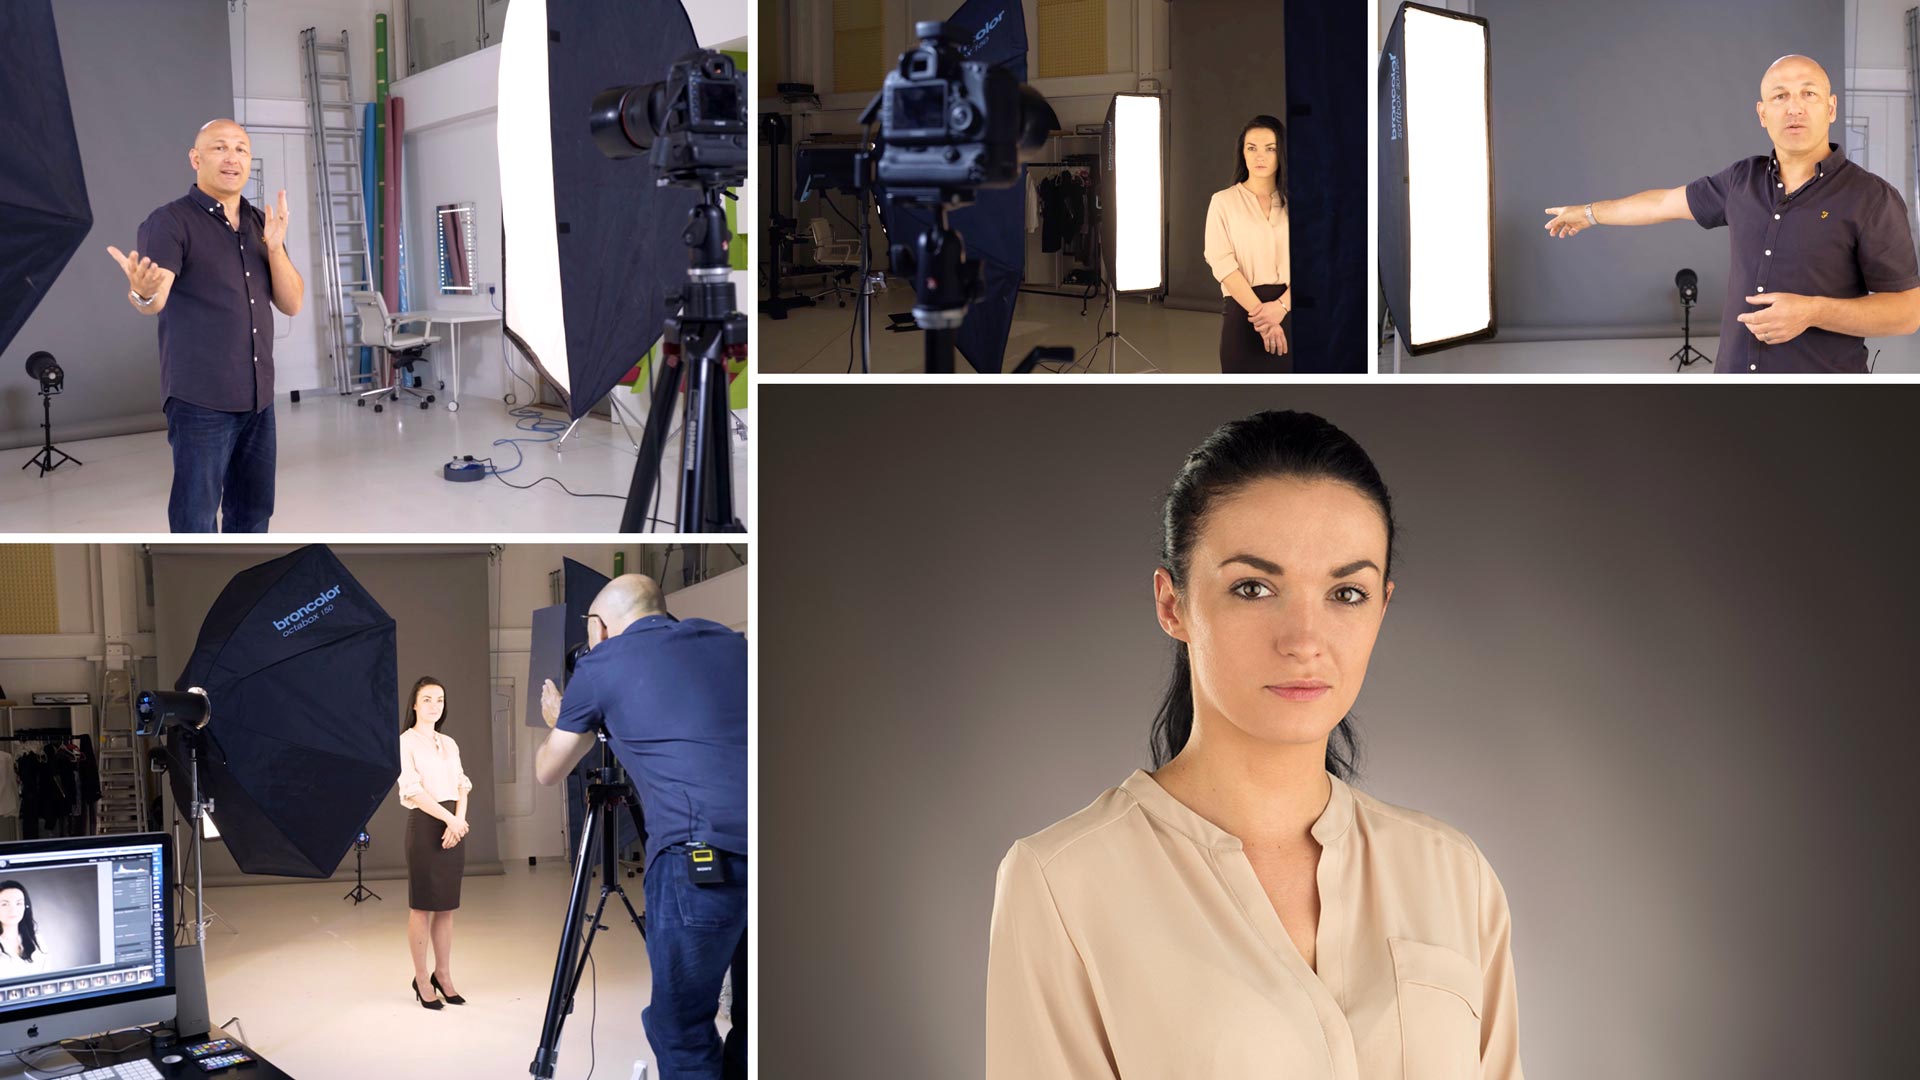
This first business portrait photography class utilises four lights and yields great results that are easy to repeat, even in a small studio.
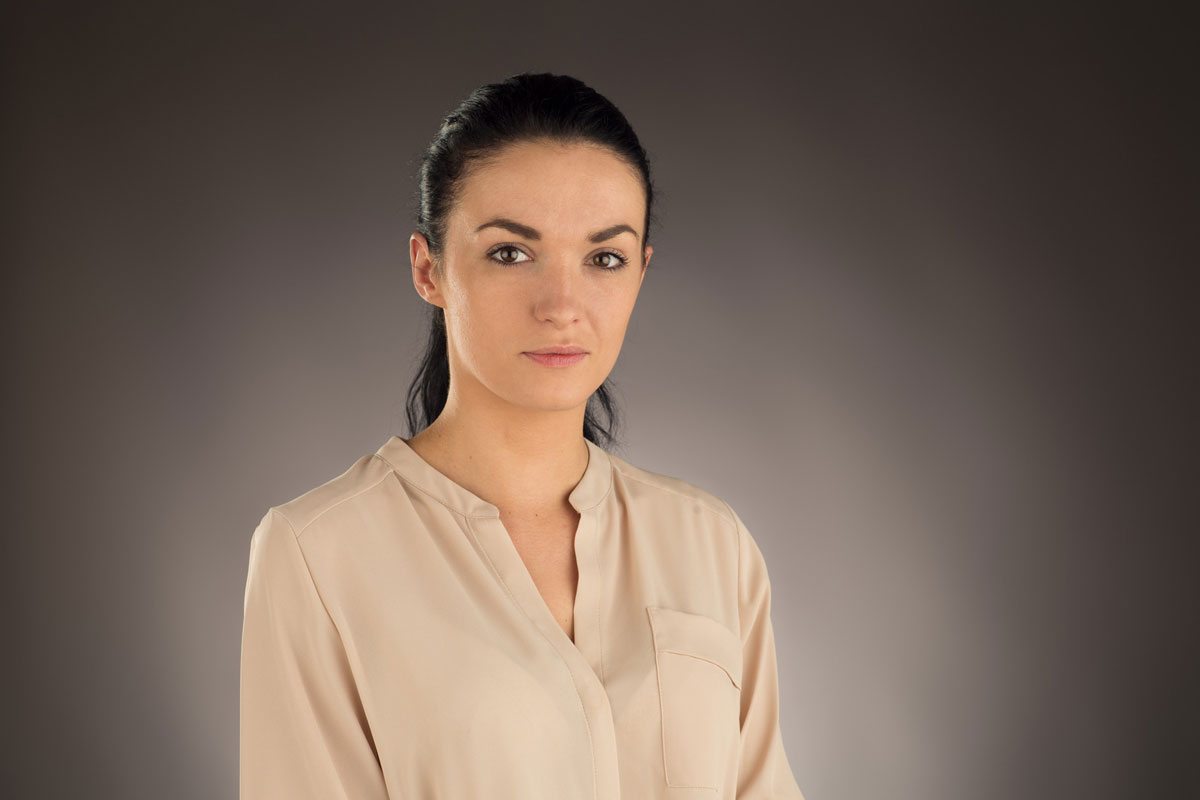
Karl runs through each of the lights and explains the purpose of each. Starting with his background light, creating a gradient background (which you can learn more about here), he works his way forward until satisfied. He also explains how the setup could be adjusted for both male and female subjects and even adapted to a three light setup.
In this class:
- Portrait photography: Business portraits
- How to take business portraits using studio lights
- Lighting setups for male and female business portraits
- Lighting modifiers for business portraits
- How to use multiple studio lights
- How to photograph in a small studio
- Camera settings for business portrait photography
Questions? Please post them in the comments section below.
Comments
hello, nice tuto !
however, I don’t have all these huge softboxes… so i can’t reproduce what I learn here.
I have a ad400pro, 2 ad200pro, 2 godox V1, magbox 24″, godox octabox 85cm, magsphere, maggrid,
For a half height portrait, it should be possible to make tutos with more simple setups, isn’t it ?
When i look magmod facebook page, they do a lot with two ad200pro 🙂
best regards
marc
Great course, even for an experienced photographer. Quick question..what brand is your little background light tripod? I like how small it is.
Cheers
Mike
Hi Mike, that’s a manfrotto, I think it’s this one – https://www.manfrotto.com/uk-en/black-aluminium-low-mini-pro-stand-156blb/
Hi Karl, is the background light a continuous light or a strobe ?
Hi, All my lights are studio flash. Please watch this – https://visualeducation.com/class/types-of-studio-lighting/
Hello Karl,
Is there any specific reason why you don’t use a grid for the rim light? I’m always using one to avoid lens flare but I’m sure you know that hence my question.
Hi, Sylvain. A grid makes the light slightly harder and if I don’t think flare is going to be a problem then I don’t use them. Generally speaking I don’t use them anyway though as I have other ways of controlling flare such as using flags or window masks which you will see me use in many classes on this website. I use grids regularly on spotlights for creating small beams but not often on softboxes. Grids on softboxes can be useful if you are working in a small studio though as they reduce light spill but as I mentioned they will create a slightly more contrasty and harder light compared to without them.
Karl, how would you position the main light if the subject was wearing glasses?
Hi I don’t compensate for glasses because then I’d compromise my main lighting. If the glasses are a real problem I shoot all the shots with glasses on and then I take a few with glasses off and merge them together. Or if the reflections aren’t too strong I just deal with them in post.
Hi Karl,
I was wondering if you have any tips for dealing with paper rolls with that gradient trick you show here. Especially grey ones seem to always look bumpy if I put a light on them. Are there little tweaks to the lights that can help or am I just going to have to try and deal with it in photoshop?
Hi Don, I’ve always had ripple issues with paper rolls. It’s caused by them bending or humidity changing the paper. Best tricks are too store them flat on the floor or vertical in a rack and keep them tightly rolled when not in use. If you are going to keep them on the background support system then try to use the metal cores which stop them bending which is what happens on the cardboard tubes. This video shows how to correct the problem in post – https://visualeducation.com/class/practical-demonstration-on-business-retouch/
Hi Karl,
great video and well explained, i have one question, with this 4 light set up including that background light, what if i want to make my background totally white background and using the 3 lights, Key light, fill light and hair light , should i add two more light to to bounce to my white background? or?
Appreciate your advice on this..
Hi, 2 light on the background is better for making a pure white background but you can also do it pretty well with one light and a large silver reflector on the other side.
Hi Karl,
Thank you very much for the reply,
you mean one light to use to bounce to background then on the other side is huge silver reflector, can you suggest what is the ideal modifier, will it be octa or strip or normal square softbox?
You can see my friend Urs doing it for the background here https://www.youtube.com/watch?v=YCErNYWS5CI&t=12s
Hi Karl,
First of all, great content you and your team produce. I enjoy watching your educational videos.
Could you help me with the following please? What is the minimum size for a studio to be able to create these beautiful lighting effects, with the darker gradient background and the very flattering lighting on the model as showed in this course?
Reason for my question is, I am in search of a suitable location right now. I assume a 2 meter x 5 meter studio with white walls can’t manage this lighting setup and get the result you showed in this course.
Appreciate your feedback.
Hi Robert, thank you for your comments. I would say that 3x5m would be my minimum and you would have to look at having to control the light bounce off of the walls as we demonstrated in the earlier chapters of our studio portrait course modules.
Hi Karl,
I enjoy watching your shows, but I do have a question for this one.
Your distance from the subject was 4.3m, what if we only have a 4.3m space to work in?
We would have to use the inverse square law and use smaller gear but then we are introducing harsher shadows and contrast? I would like to see what you do if the biggest space you have is 4m…..
Cheers
Tiaan
Hi Tiaan, in the following chapters you see some more examples for smaller spaces.
Just another question: is Lidia (hope for the right spelling of the name) right-handed or she is left-handed?
Hi Bogdan, I don’t know, why do you ask?
Hi again Karl, so sorry for the late reply: I do believe that one’s face is unequally developed in terms of muscles, bones, structure and texture of the skin a.s.o., and I was just thinking about symmetry (or rather the lack of it) and eventually how to choose the right side of a subject’s face, either right or left, according to “the most flattering” principle.
On the other hand, tomorrow I am going to do quite a large corporate shoot (70+ people) in quite a short amount of time, so my plan is quite clear and sound: I will be there earlier and take an hour or so for setting up everything, take test shots etc.
Please allow me as a far-away-from-professional hobbyist photographer one only final question that I still have on my mind: given that I will need to deliver images as soon as possible (probably straight out of the camera, on spot, as they want to give them to a printing house to make some ID-type badges and also larger (either printed or online) brochures), and also my post-processing skills are very low for the moment, shouldn’t I use the portrait / vertical orientation of the camera on the tripod from the very beginning?
P.S.: I have gotten a lot of inspirational ideas from you. In this respect, if need for critique might occur (or not), I would anytime put my tomorrow’s work at your disposal.
Hi Bogdan, I generally shoot landscape like this and then crop as necessary https://karltaylorportfolio.com/business/vsmb5fcx2vv7f94xkk1pt73w60b8gs Also I wouldn’t give the client files without doing a little clean up work in post on them. I’m not sure of your situation with this client but in the future aim to tell the client they will get a better service from you if you can do the post production work and cropping for them after the shoot.
Hi Karl, fabulous tutorial for what I am going to do quite soon, thank you very much indeed for this! Yet, please allow me a question:
As, being alone (i.e., no assistant, no one to help me at all) and by all means limited in carrying pieces of equipment and also I can not afford a portable studio light setup on location, I would rather use speedlights.
My main problem now is that I am not at all aware of the location where I shall be shooting in (especially dimensions), but still I know that I must deliver at least good headshots and three-quarter images for corporate further business purposes. I already have in my mind’s eyes several scenarios (one of them based on using a strip light like a lateral hair light, two 80-cm octaboxes for even background illumination, a 103-cm white-with silver/black reflector (for ladies, and a silver reflection for gents) umbrella for the main light aimed at 45 degrees trialed angle, one 90×120 cm softbox as a “B”/filling light and a 90/60-cm silver reflector placed at the model’s waist level just for filling up hard shadows beneath the chin). my other scenarios are based on this tutorial (e.g., I am thinking of placing a hair light on a boom-arm just above the model’s head top).
So kindly please advise: if you were to deliver rapidly some (100+) good images having only speedlights at hand, what scenario would you have gone for?
Hi Bogdan, I can tell from your message that you are getting anxious about the details. I’m afraid though that you are going to have to think differently and work differently for success. The fact is that every room, size, people, scenario, walls, colours etc are different and there is no particular formula that will work for everything, only starting points that you need to modify. You say you don’t have an assistant but you do have yourself and you can get a remote trigger or set the time release so you can test the images on yourself by using manual focus. You can arrive early to set up and make your tests so that you can give your client the best result. Beyond that in the ‘Lightsource’ course I’ve shown you the capabilities of many different modifiers and in the first 15 chapters I’ve taught you about light and what to expect from its properties and interactions with matter. You have to think differently in the way you approach your work. When I first started out 20+ years ago I too had the same concerns and pushy clients who wanted you in and out. Sometimes to do a good job you have to explain to them that you need to work a certain way and you need the time to set up and test. When you convince your clients this is a good idea then you get better results and they are happier.
Thank you very much indeed for this input Karl!
Hi Karl,
I have a question about background light.
When using seamless paper with background light, sometime the effect is not perfect gradation because of the un-smooth paper… And I also saw in the video.
Can you tell me how to fix the problem both in shooting stage and retouch stage.
Thanks,
Ryo
Hi Ryo, yes this is a common problem with paper rolls which is why whenever I can I use flat walls, however I do show how to rectify the paper ripples problem in our ‘Photoshop for Photographers’ course in the ‘Post Production’ section.
Hi Karl,
I’m from Mauritius and I’m getting to shoot more and more CEO’s, directors, etc… and I usually use one light source (A large Square 130 x 130 soft box with a flash) since they are usually busy, and I have little time to produce a satisfying result. My question is a little bit tricky. As I know that the way someone is lit will create an emotion, what is the proper way to lit a CEO/director to create the proper emotion “suitable” to a CEO.
Thanks and kind regards.
Jean Jacques Fabien
If it’s a male one large softbox like you are using should work, from the side slightly frontal close to the subject with a reflector on the left. You then have to consider how much light is bouncing around the room. Tune into the live talk show with Alex Wallace for some top tips on this type of photography, he does a lot of this type of work!
Karl, Should we always use polarizing filter in portraits? what positive impact it makes?
Hi Yogendra, no definitely not in fact they can have many negative effects as they can remove natural reflections from skin that you fully expected to see in the final image. There is a time and place for everything and tools that you use when you need them only.
What if a subject is wearing glasses?
Hi Yogendra, In those instances where you have a softbox or light reflecting in eye-glasses then you can either try using a polarising filter but this will also affect some of the lighting reflections on the skin or as I often do, is shoot the subject in the same position without their glasses and then merge the area of the eyes into the shot with the glasses. There is also the option to position the subjects head at an angle away from the light.