
02. What Is Exposure in Photography?
When it comes to photography, ‘exposure’ is a term you’ll hear often. Quite simply, exposure refers to the brightness or darkness level of an image.
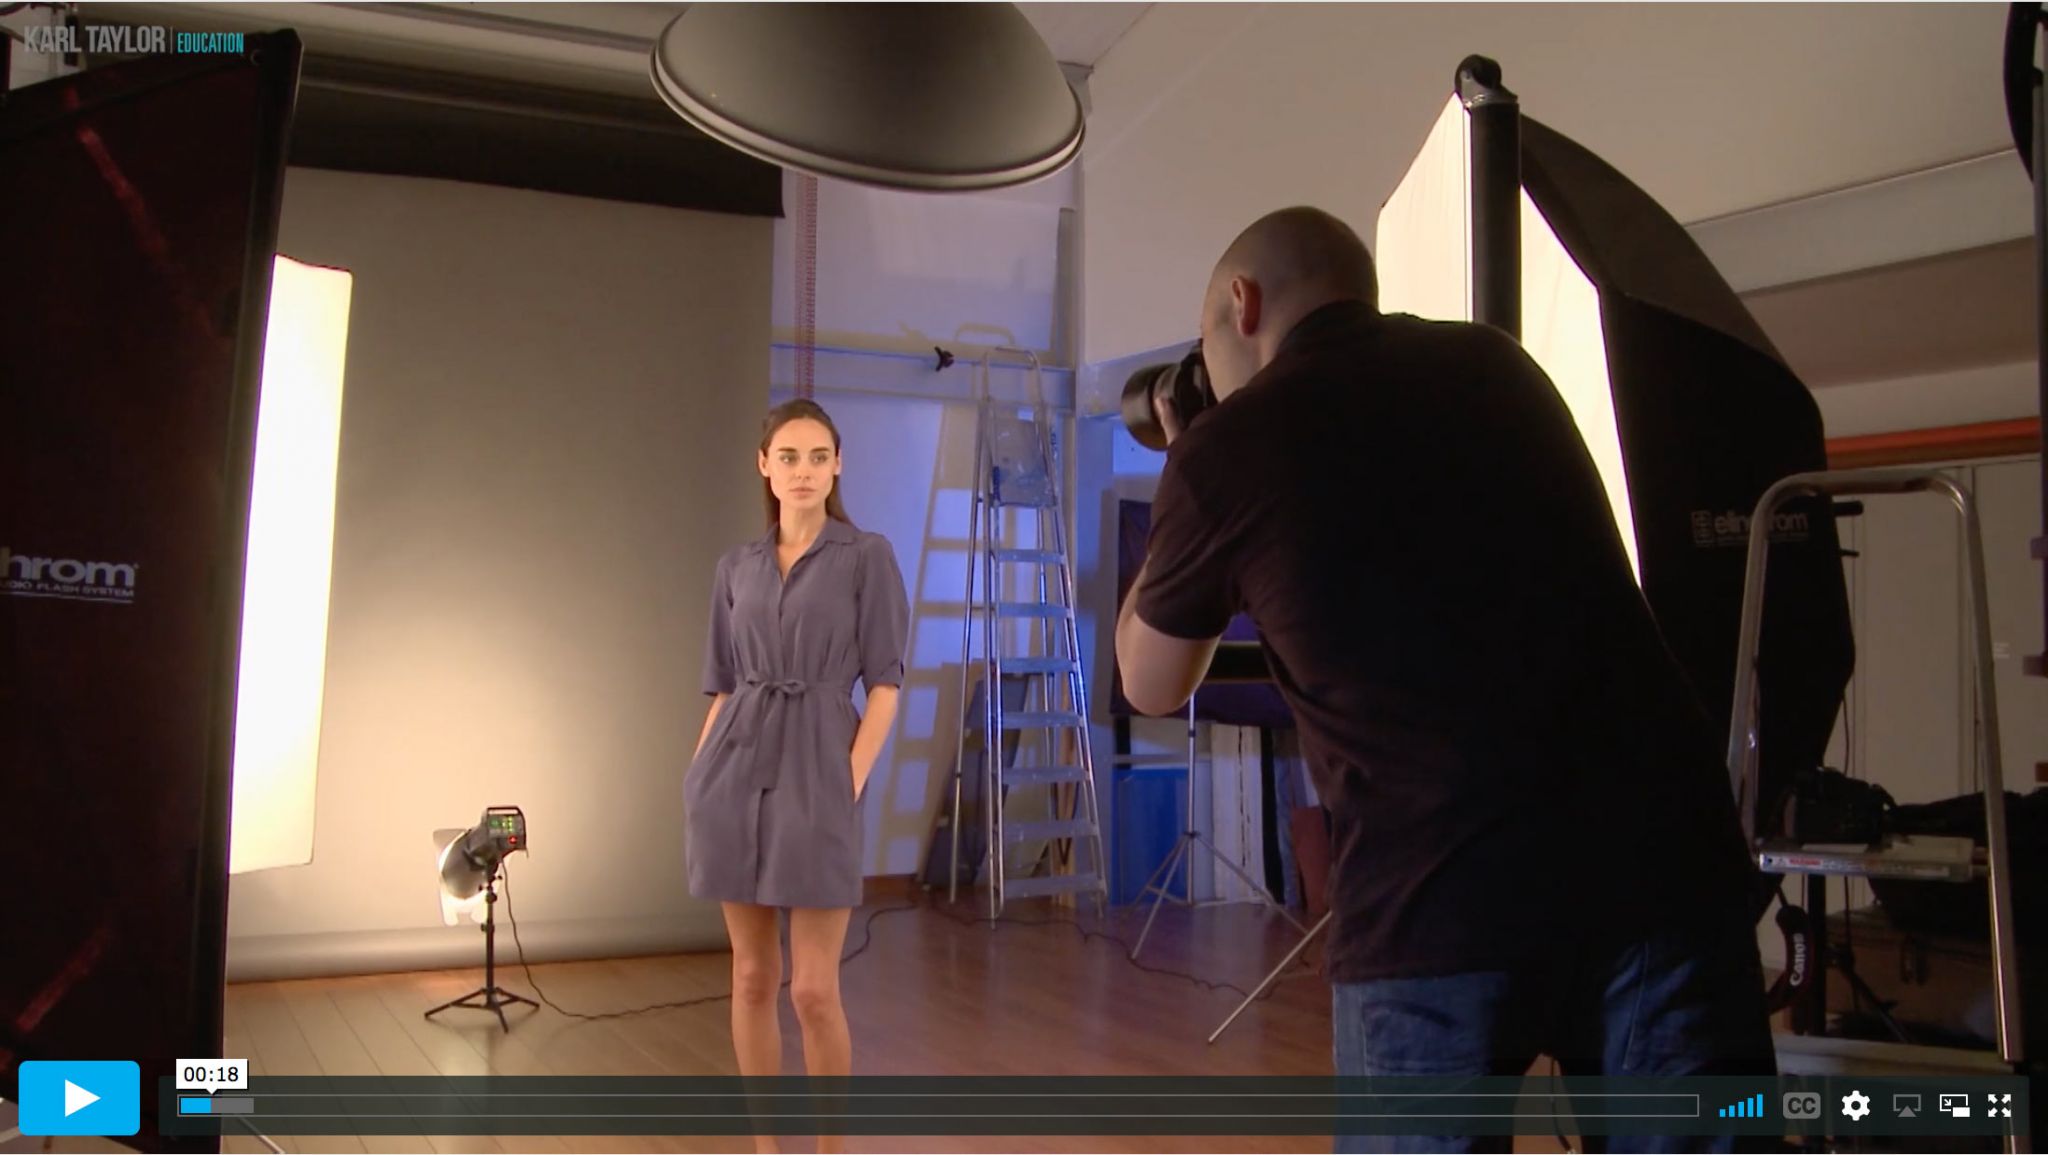
We can control the exposure of an image using the two main mechanical functions of a camera: shutter speed and aperture. Using these two functions, either individually or in combination, allows us to control the amount of light that reaches the sensor to record an image, as you see me demonstrate in this video.
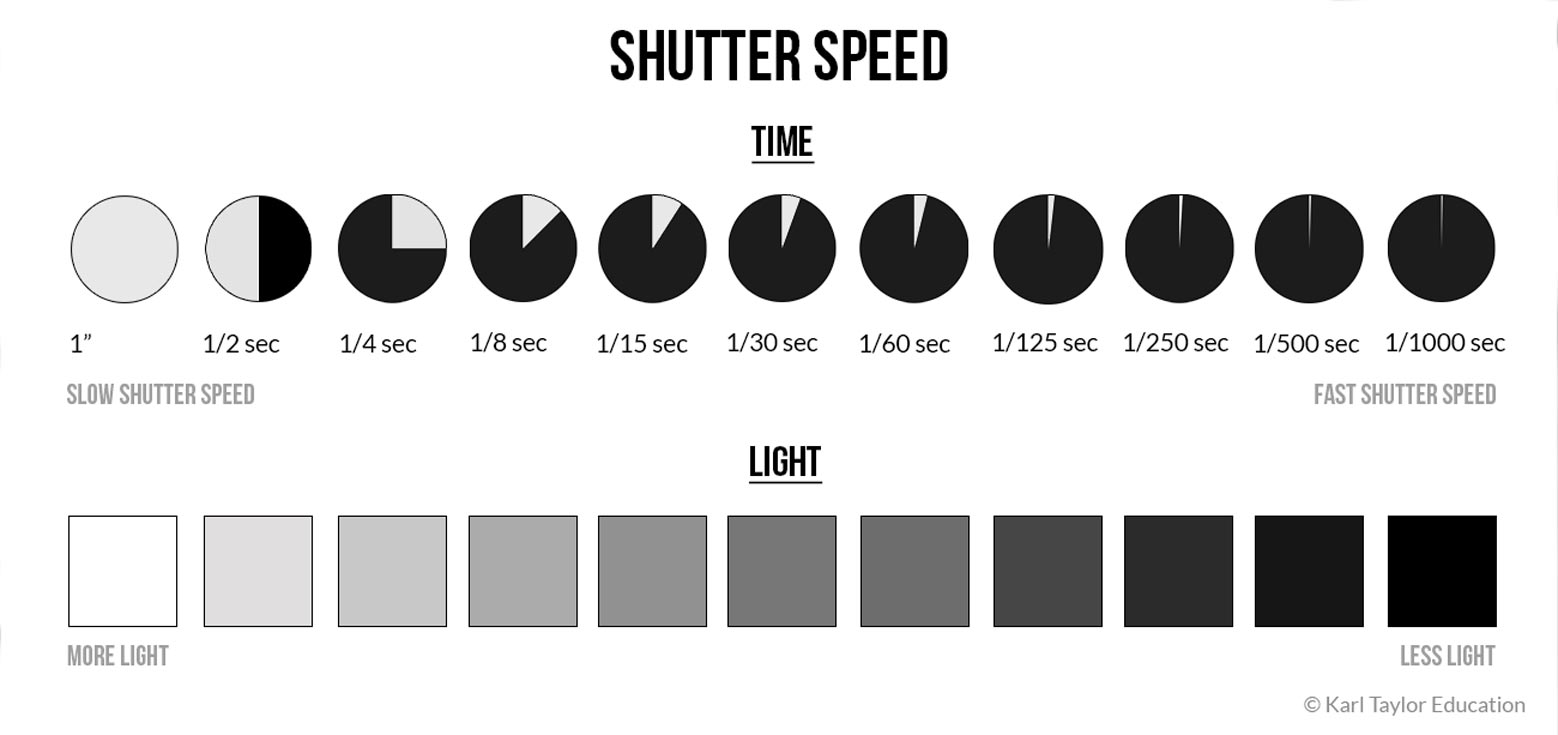
Shutter speed
Shutter speed refers to the length of time the shutter remains open when recording an image. The slower the shutter speed, the longer the shutter stays open, allowing more light to reach the recording medium. Faster shutter speeds mean the shutter stays open for a shorter duration and less light is recorded.
Aperture
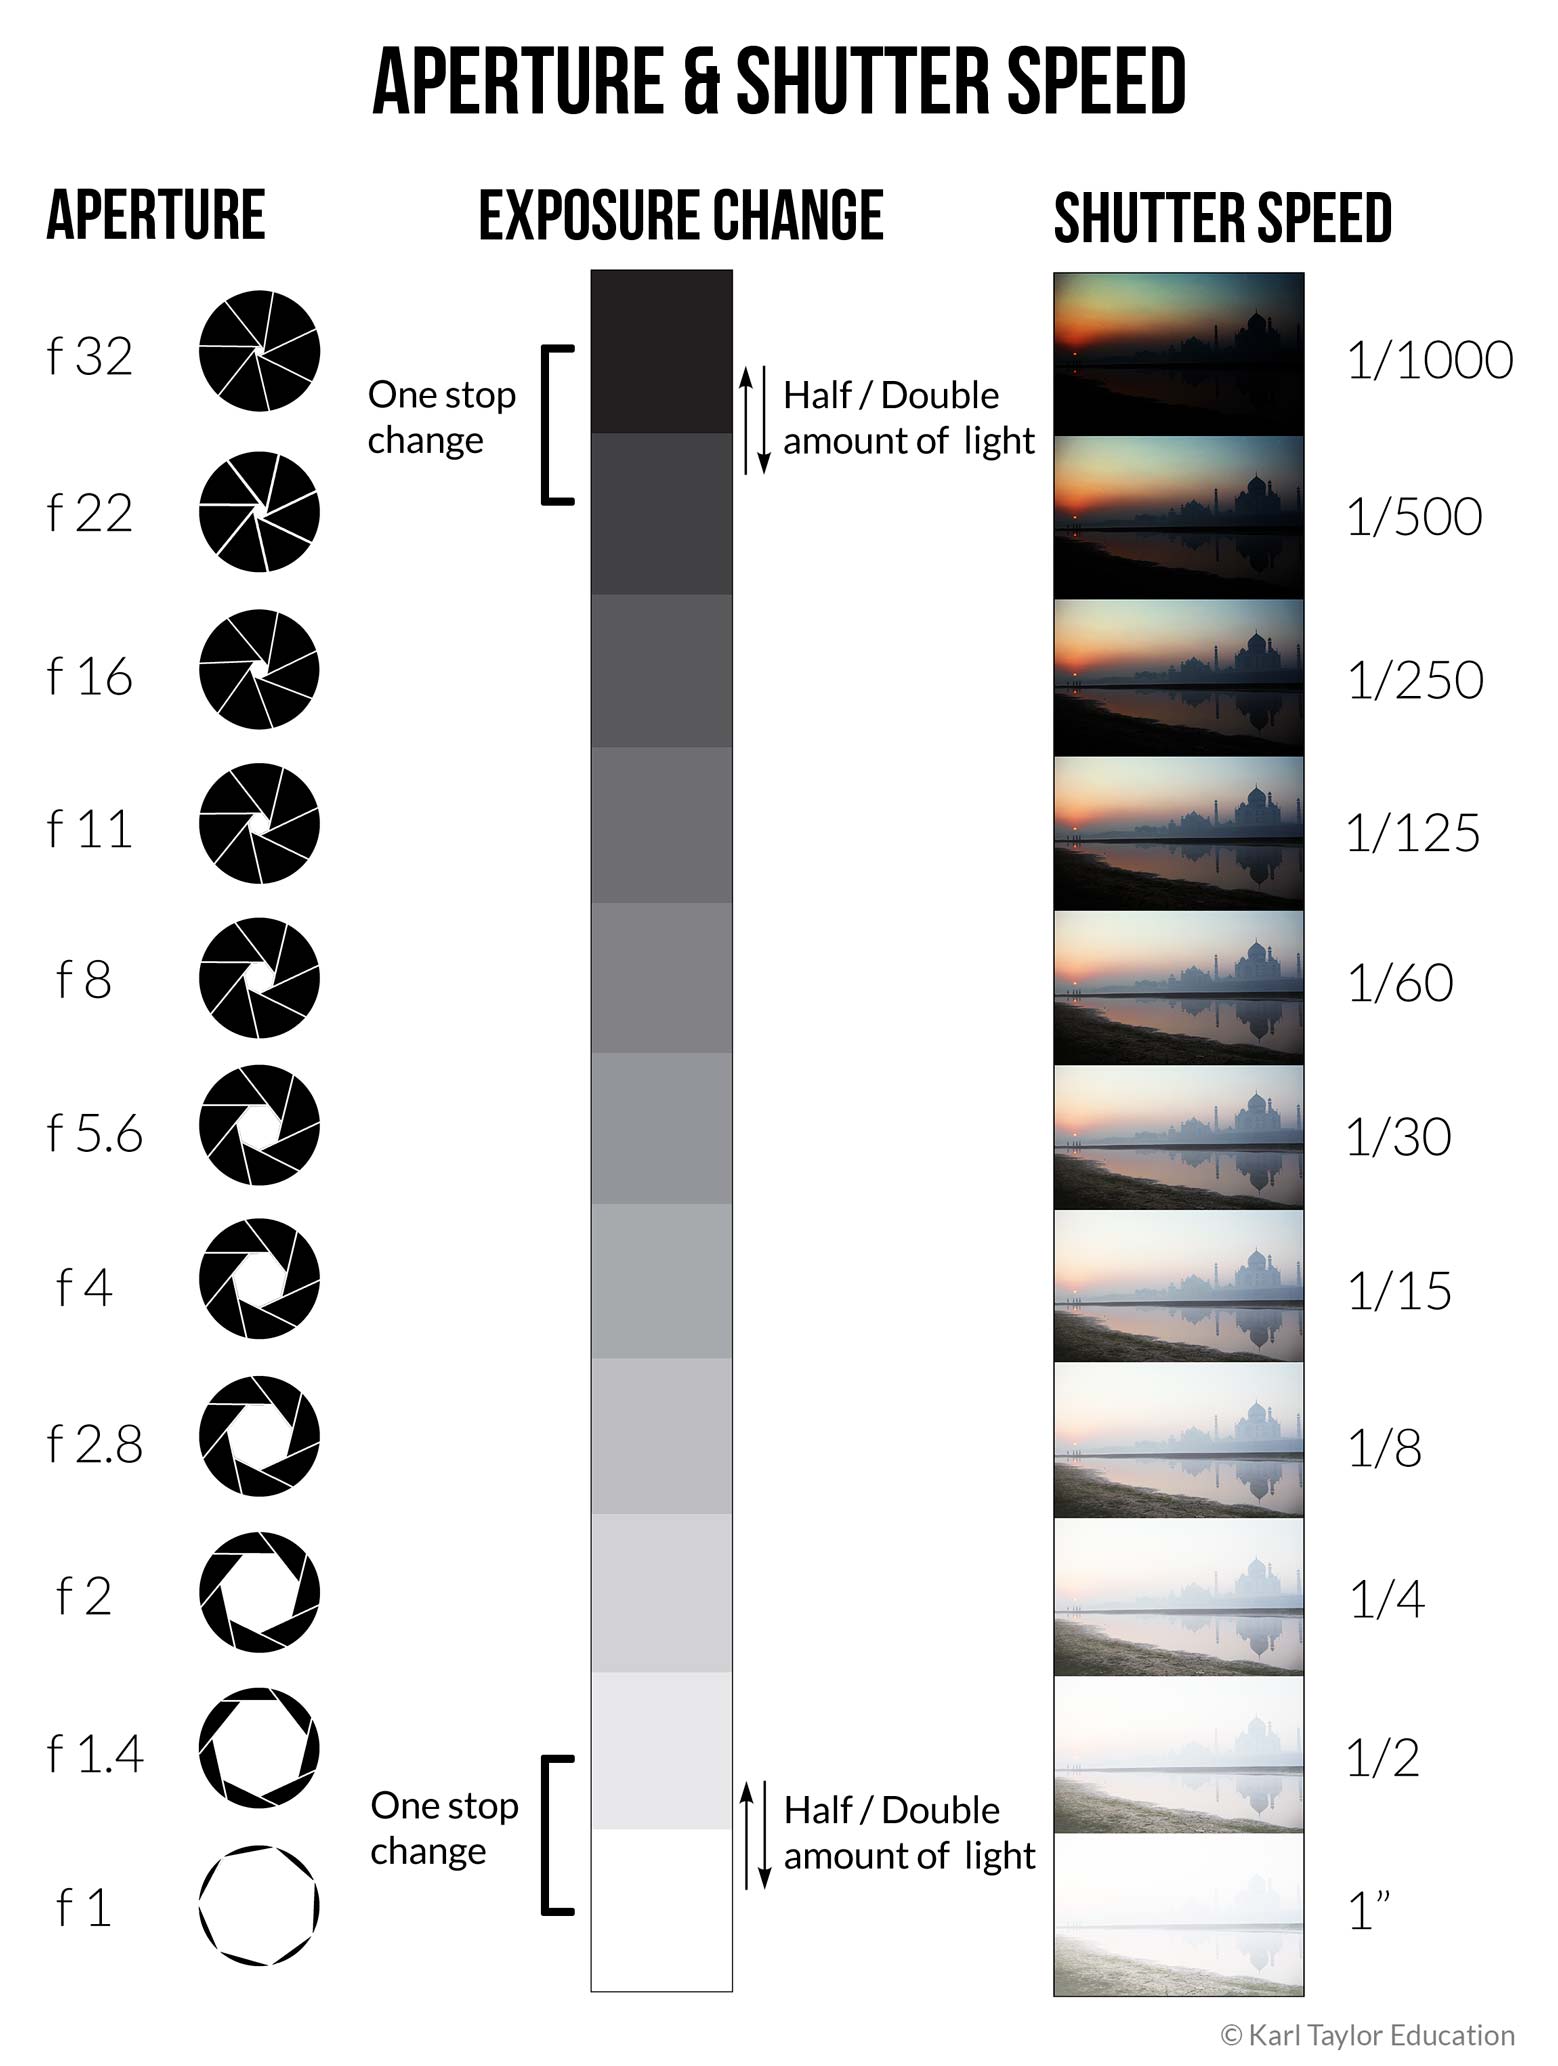
Aperture refers to the opening in a lens through which light passes before reaching the recording medium. The greater the size of the hole, the more light passes through, and vice versa. Aperture is recorded in f-stops and shown as f1.2, f5.6, f16 etc. The lower the number, the larger the aperture and the more light that can be recorded.
To correctly expose an image, you need to find a balance between both shutter speed and aperture, which you can do by using your camera in Manual mode while referring to the built in light meter (as you would have seen in the video above).
We can add or subtract stops of light by changing the aperture or shutter speed. A change in any setting that doubles or halves the amount of recorded light is known as a one stop change. For example, a change from 1/125 to 1/250 will decrease the exposure by one stop. Opening the aperture from f16 to f8 will result in a two-stop increase.
By controlling these settings yourself using Manual mode, you’ll have the greatest amount of control over what your final image looks like.
The exposure seesaw
When it comes to adjusting your settings, try to think about exposure as a seesaw. If you change either shutter speed or aperture, the other will have to be adjusted accordingly to maintain that balance. For example, if you increased your shutter speed by two stops, you would have to open your aperture by the same amount.

Let’s take an example of photographing on a hazy day, where the correct exposure is at 1/125, f8. This is equal to 1/250, f5.6, because the shutter speed has been increased by one stop, but the aperture has also been opened by the same amount. The faster shutter speed cuts out more light, but the larger aperture allows in more light. This ensures the exposure remains the same.
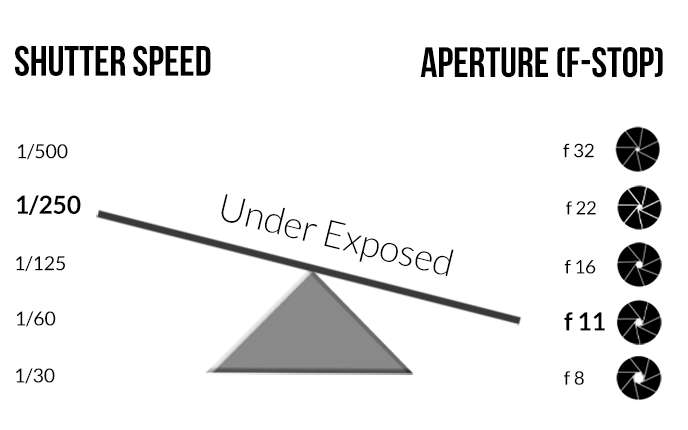
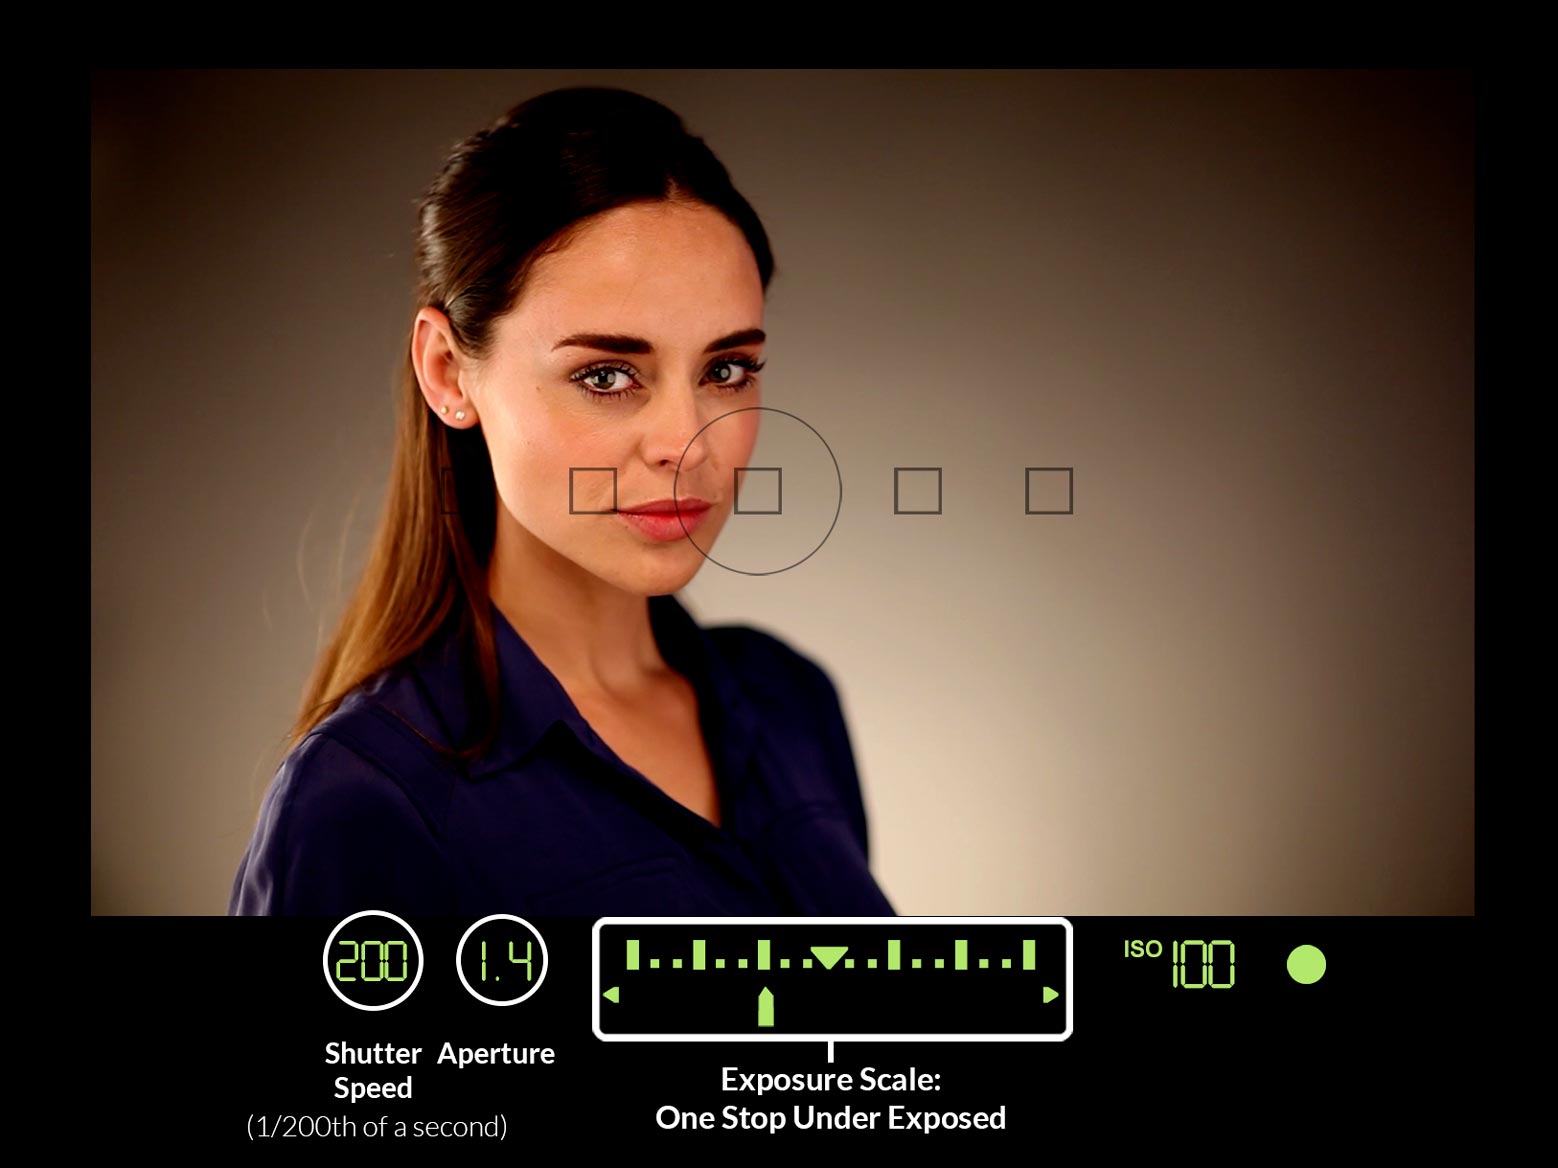
In the same conditions, the combination of 1/250, f11 would result in an underexposed image. This is because the shutter speed has been increased by one stop and the aperture has been closed by one stop. Both changes result in a reduction of one stop of light each, darkening the image by two stops in total.
To maintain the correct exposure, if the shutter speed was increased by one stop, the aperture should have been opened by one stop.
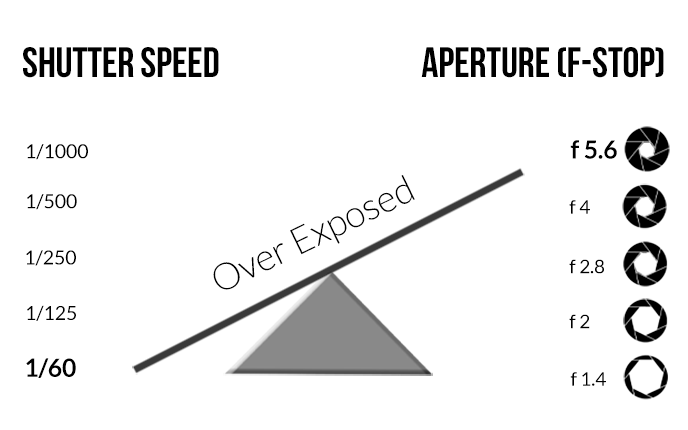
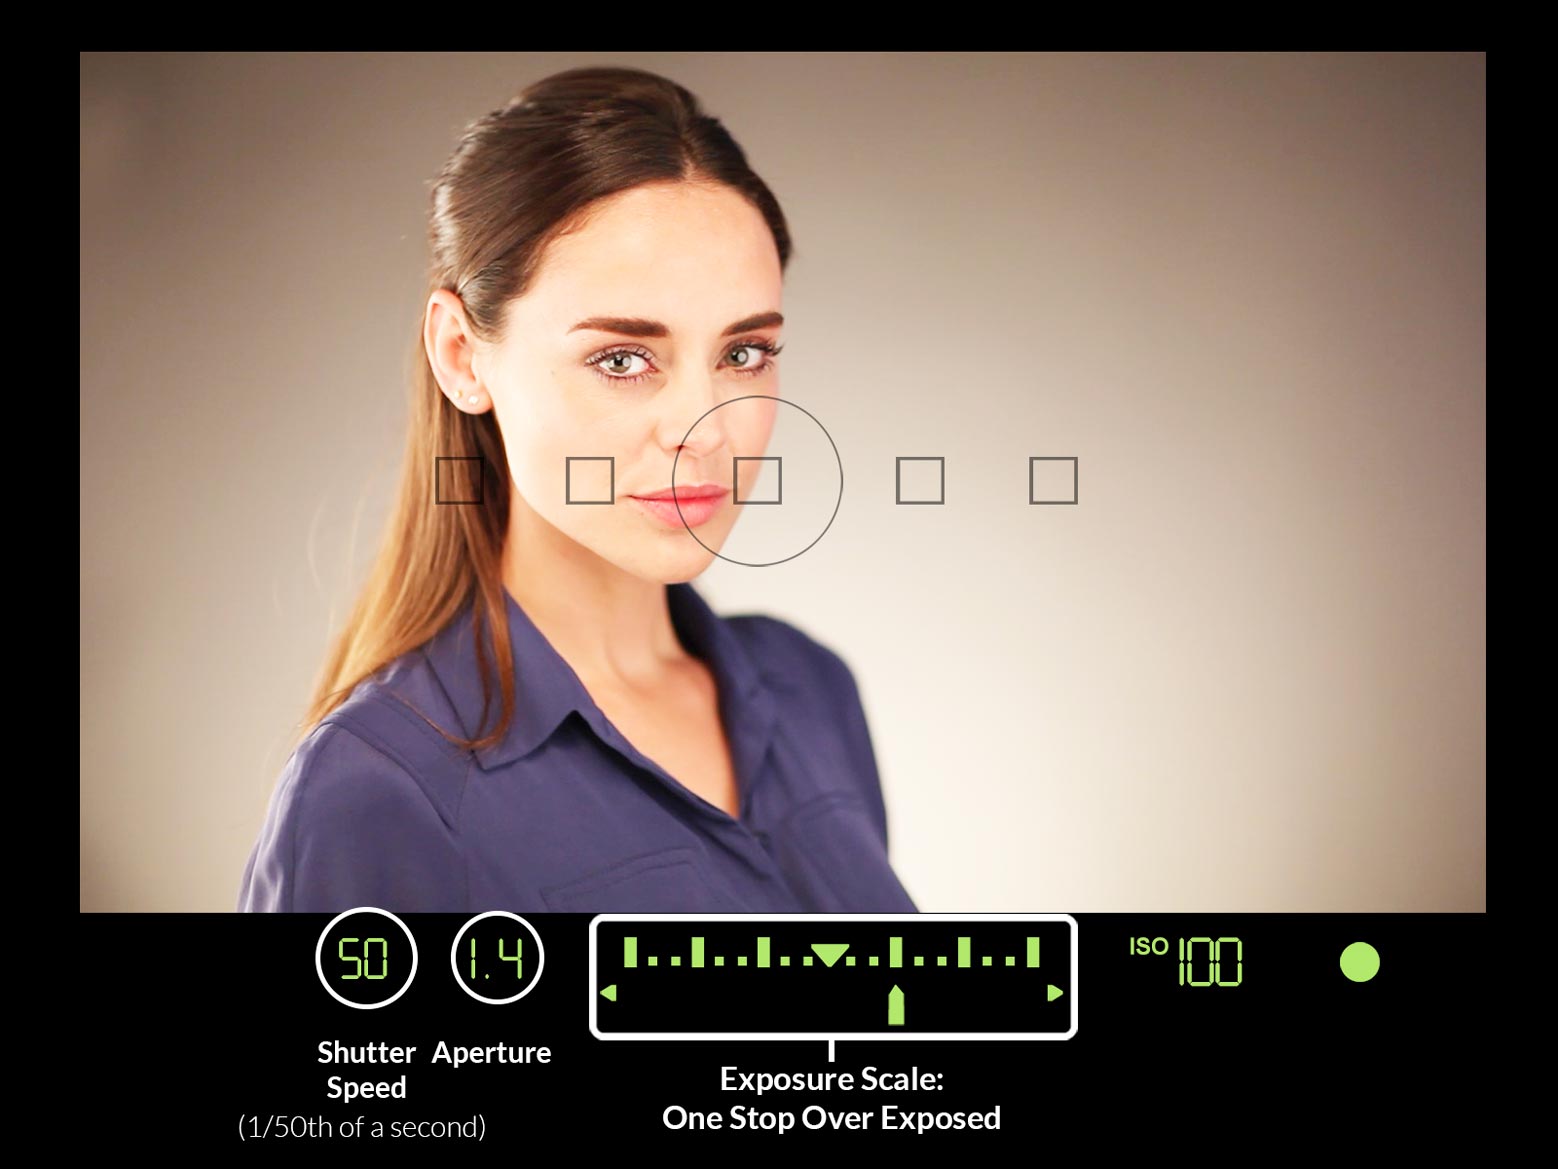
Also in the same conditions, the combination of 1/60, f5.6 would result in an overexposed image. This is because the shutter speed has been slowed by one stop and the aperture has been opened by one stop. Both of these changes allow for more light and result in an overall two-stop increase in exposure.
To maintain the correct exposure, if the shutter speed was decreased by one stop, the aperture should have been closed by one stop.
Determining the correct exposure
Once you’ve understood aperture, shutter speed and one-stop changes, the next thing to understand is how to get the right exposure. This is a question that comes up a lot and is something many photographers struggle with.
There are a couple of technical ways that can help guide you with achieving the best exposure, but essentially you should determine exposure based on the creative look you’re going for.
One of the features you can use to help you is your camera’s built in light meter, which you can see through your viewfinder. Most cameras have a meter from -3 to +3 stops, with 0 indicating the ‘correct’ exposure (this is according to your camera). Anything to the left of 0 (in the minus) is considered to be under-exposed and anything to the right (in the plus) is considered to be over-exposed.
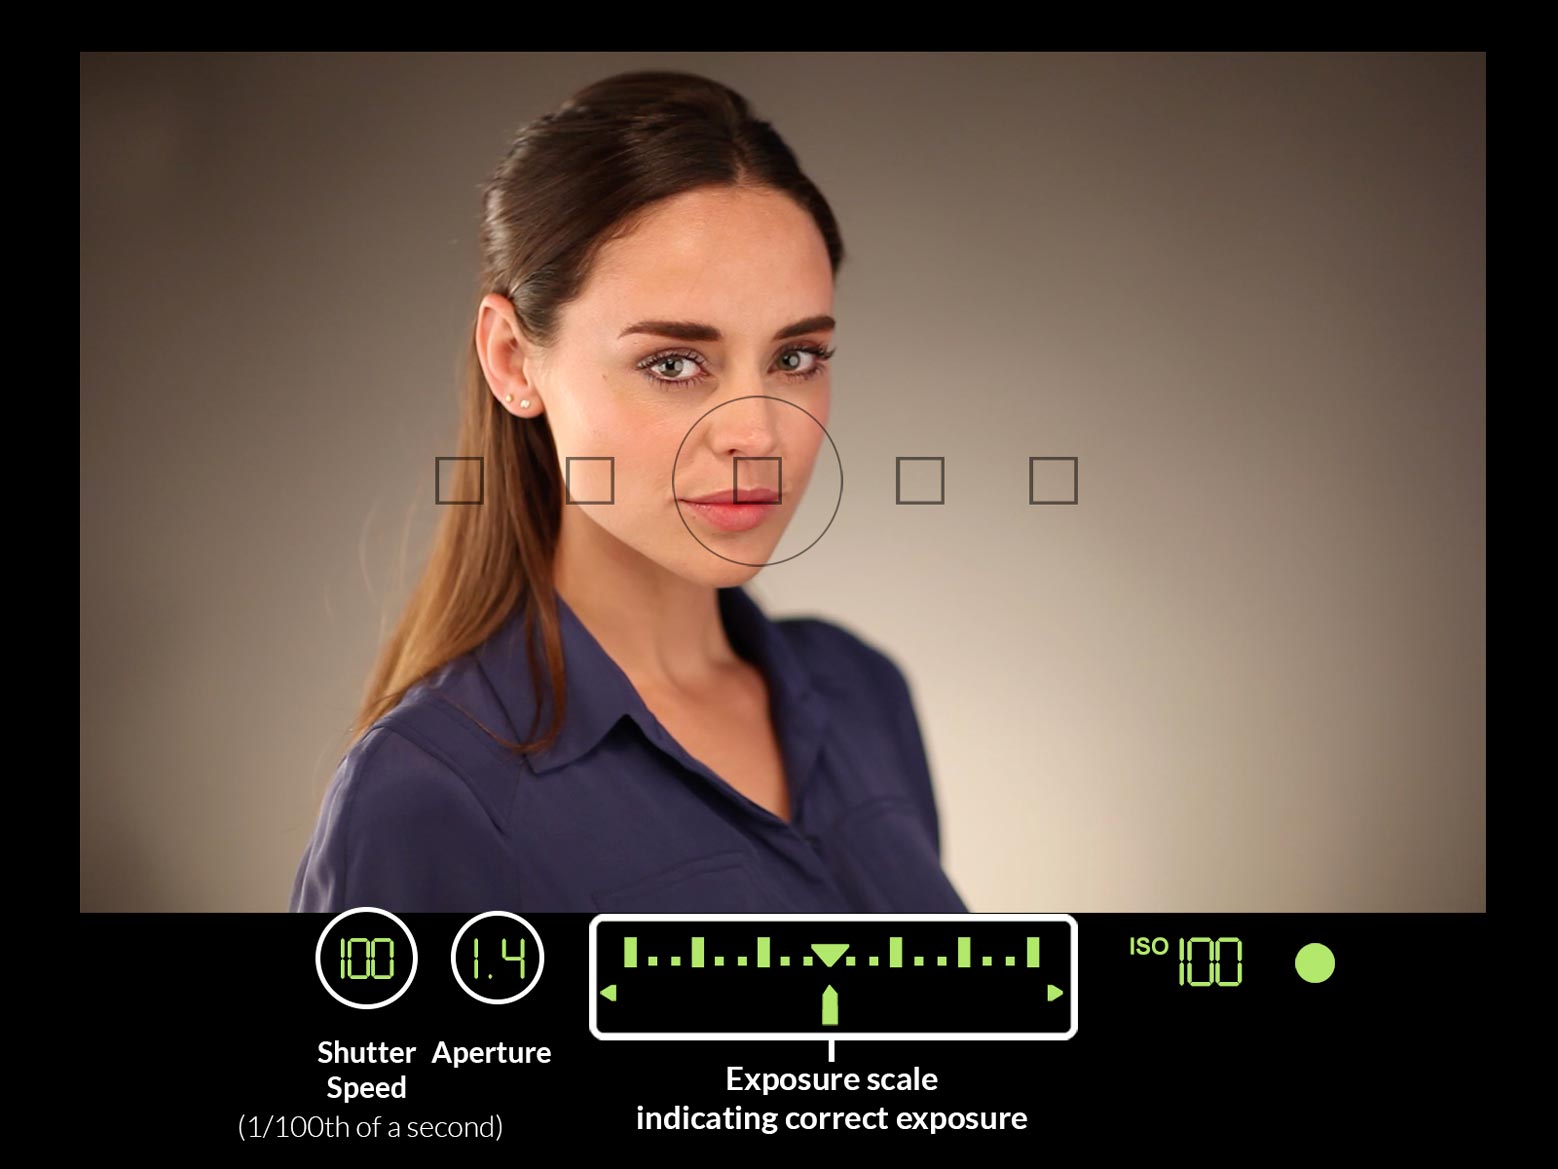
Light meters in different camera brands can look slightly different, but essentially they all tell you the same thing. For more examples of in-camera light meters, please see the complimentary e-book.
The histogram is another way to judge exposure, but unlike your camera’s light meter, you can only use this after you’ve taken your picture. A well exposed image will have a histogram that is evenly spread from edge to edge without any gaps. The left side of the histogram represents the blacks and shadows in an image and the right side represents the whites and highlights.
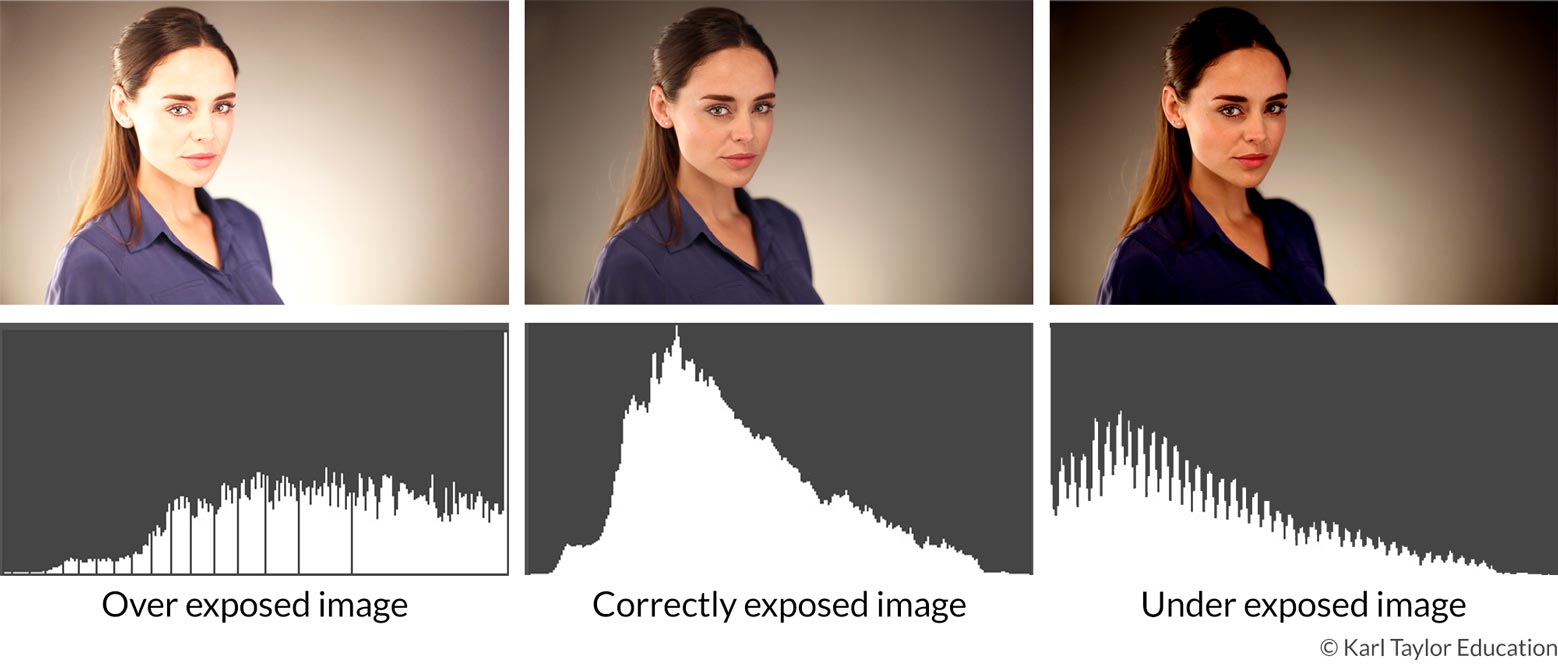
You can view the histogram for an image on your camera or in photo editing software.
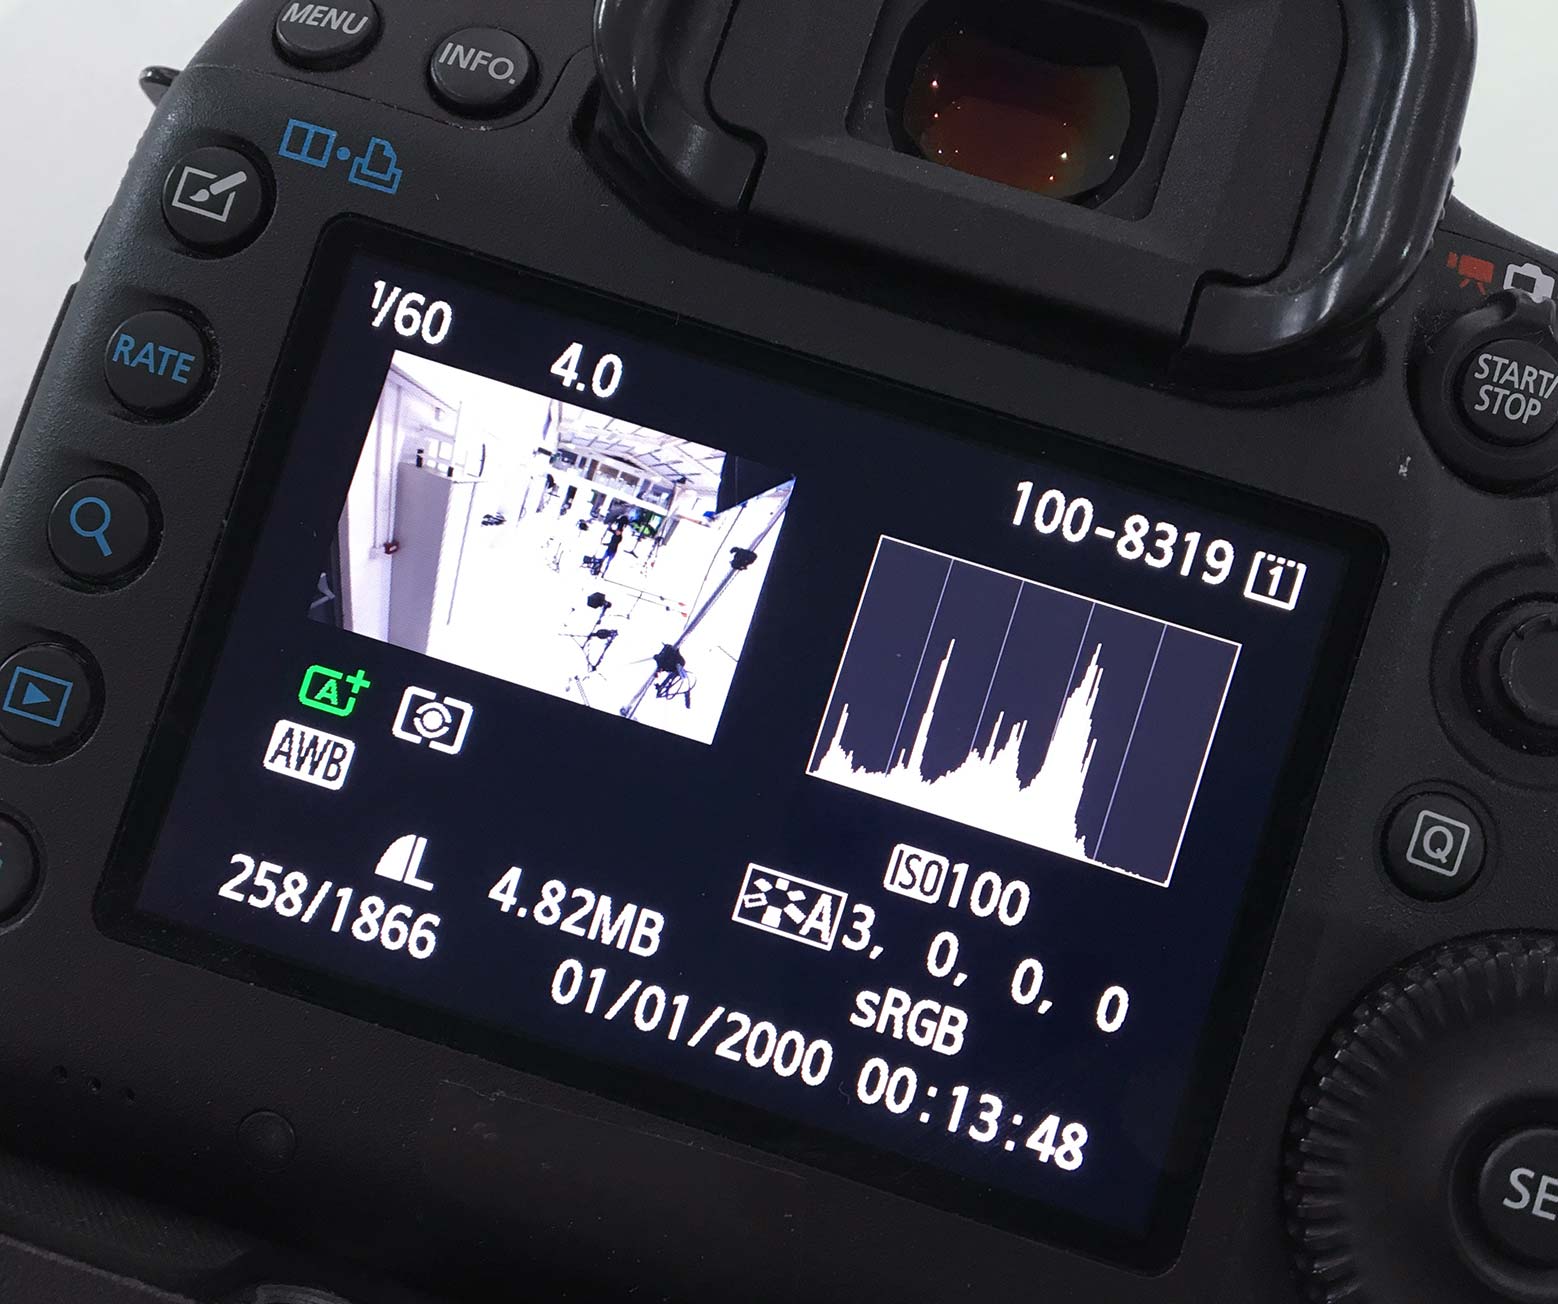
Here you can see a histogram on the back of a camera.
It is important that you don’t get too caught up in what your light meter or histogram are telling you as often the scene you’re photographing can confuse your camera. For example, your camera might think a shot of a white cat in the snow is overexposed and overcompensate until you have a grey cat on grey snow, the same way it might also struggle with something like a black dog on a black blanket and try to increase the exposure until you have a grey dog and grey blanket.
Remember that it’s your image and you should make the creative decisions, not the camera. Over time, with practice, you’ll be able to better judge what exposure you want and how to achieve it.
All content © Copyright Karl Taylor Education.
Get the e-book!
Introduction To Photography
To get your copy of this 90 page e-book click the download button below.
Comments
Hi Karl,
Needless to say that this is a great tutorial.
I have three questions:
1- Is “F-Stop” like the universal curreny of light in photography? For example; Does increasing the iso from 100 to 200 have the same EXACT effect as opening the aperture from F4 to F5.3?
2- How does the camera determine the correct exposure? What is underexposed to my eyes could be appropriately exposed to yours?
3- In some caneras, as Sony, there is an exposure dial. What does that dial change in the exposure triangle?
Thanks in advance
Hi Minia,
1. Yes for measuring values of light or exposure, it can apply to Time (shutter speed) Aperture, ISO or the amount of light from a studio light. So yes 100 to 200 is doubling the amount of light just the same as going from f22 to f16 is doubling the amount of light or just the same as changing from 1/250th to 1/125th is doubling the amount of light.
2. It guesses based on predetermined values associated to known reflectance of a neutral 18% reflective grey. It is never 100% accurate and it is also good to check your screen and histogram. However if shooting in RAW you have about 2 fstops of latitude to correct it afterwards anyway.
3. It can be a combination of all three, time, aperture and ISO or a combination of two or one of them it depends on other preferences you have set in the menu. I would leave your exposure compensation dial set to 0 at the moment and concentrate on using the camera in manual and setting ISO, Aperture and Shutter Speed yourself to learn how they all balance with each other.
Good questions by the way!
Karl.
Hi Karl this is Sojan from India the materials are very good and educative . Now i feel that i have made a correct choice in enrolling for the course . Thank You.
Thank you Sojan.
Dear Karl,
As I’m just starting photography , I need a help on how to set up my Nikon camera in Manual mode for food photography, it maybe sounds bizarre as question, but its not easy when you just start, any help?
Thank you very much
Lili
Hi Lili, no problem but get to the end of this course first and you’ll understand on your own. If not come back to us.
Thank you very much, Karl….
Lili
Hi Karl
I am new to your course and a total novice at this, but do enjoy taking photos. One question I have, and goes back to what Michael Allberry mentioned is. The picture you took at 1/200th of a sec and under exposed, to me and probably others looks a good photo although it may seem a little dark but still has good detail. would this be classed as poor quality or even such a bad photograph.
Forgive me if this seems a little stupid
Best Wishes Steve
Hi Steven, no problem and it’s a good question. It wouldn’t be classed as a bad photo if the look you were trying to acheive was that look. Much of my own work looks quite dark and some would say a little underexposed but that’s the style I like https://karltaylor.com/overview It is all subjective, I think you could only class it as ‘bad’ if the information in the photo was indiscernible or difficult to look at.
Hi Karl
Thank you kindly for such a speedy reply.
All the best
Steven
thank you 🙂
Hi,
I am Solomon from Lahore, Pakistan. I just join your course. I have been doing wedding photography last 3 years but by profession i am a video editor with more than 15 years of working experience. I have seen 2 videos from the introduction to photography and the information you shared was very useful not just for the beginners but also for the professionals. I hope it would be a good experience to learn from your course. Thanks.
Thank you Solomon
Karl,
I just join your course. Very excited!
I also just bought a new Panasonic g85 mirrorless. Is this suitable for food photography? I am gearing tort the product and food. If not, what is your recommendation? Thank you.
Hi, anything is suitable if it has manual mode 🙂
Hi Karl, I’m new in photography but i can tell right I made the right choice for selecting this specific course.
My question now how do you get the 12 pages PDF reference guide?
I have just sent you through an email with the PDF attached 🙂
How do you know if your image is under or over exposed? asides from wether it ‘looks’ how you want? is there a specific way to tell, for absolute beginners, whether your photo that may look ok to the untrained eye, is actually over or under exposed? thanks
Oh… it’s literally the next video in the course. ?
Hi Karl, I am yato from Japan, its so great for me to joint your class. I was taken conventional class in Japan many years ago but wasn’t good enough for me. You teach it so clearly and systematic, so it is so easy for mr to understand. thank you so much.
Thank you Yato.
I’m so excited to take this course. I’ve been very afraid to take the leap and learn photography because i’ve been so overwhelmed with the info available. i found this platform from a facebook photography group. I’d like to have a successful career in photography but i dont know if i have what it takes to start from scratch. i hope that these courses can help build my confidence to do more. any pointers on how i can build my confidence with photoshoots would be well appreciated. 2019 is my year of achieving milestones!
Hi Magdalene, thanks for joining us. Work your way through the modules in order if you can even though it may be tempting to jump around. Then take as much time to practise what you are learning in the classes. Any questions that you have just post them in the comments section below the module, sometimes the questions may be answered in later modules but don’t be afraid to ask. All the best and good luck Karl.
One solution is set the meter to matrix and expose for the highlights isn’t? I still can’t do it properly… But my results are better… Sometimes the subject gets a bit underexposed u can correct on post or just fill in with a speed light… My problem is when the sky gets in the frame … I expose for the sky I can bring the subject back in the post but the color a not that vivid as they suppose
Hi Alexandre, I wouldn’t consider any of the meter settings a solution. As you progress further with photography you will come to realise that the only solution is a decision as to which range of tones YOU decide to capture most accurately and in doing so some may be overexposed and some may be underexposed because cameras cannot capture everything that your eye can see and it cannot be reproduced or displayed in the same way. As an example, imagine that your eyes can see life around you as a 1-100 range, your camera however can only ever see 80 spaces in that range. You can choose to set those 80 spaces from, 10-90 or 1-80, or 20-100. The point is when you work in manual mode as you will learn through this course, you will decide where to place that range based on a creative decision that you will come to learn. No light meter can really ever decide for you what is best, the light meter is just a computer it can only approximate what it thinks it should do.
Hi Karl, How is Aperture number calculated in terms of f-stops.
Hi Chethan, it’s calculated in general terms by the focal length of the lens divide by the diameter of the opening aperture physical size. Essentially though f8 or f11 on one lens should be a similar exposure value to f8 or f11 on another lens.
Hi Karl, How can you tell if a photo is perfectly exposed?
Hi Joel, the simple answer is when it looks right. A slightly better answer would be when your highlight detail is within reproducible limits and only the very very darkest area of the image is black but the areas of shadow are still perceivable and yet with all this does it still look right.
I’m so glad I joined…you simplify it so well..thank you
Hi Marilyn, thank you. Of course if you have any questions just leave them in the comments section below any module.