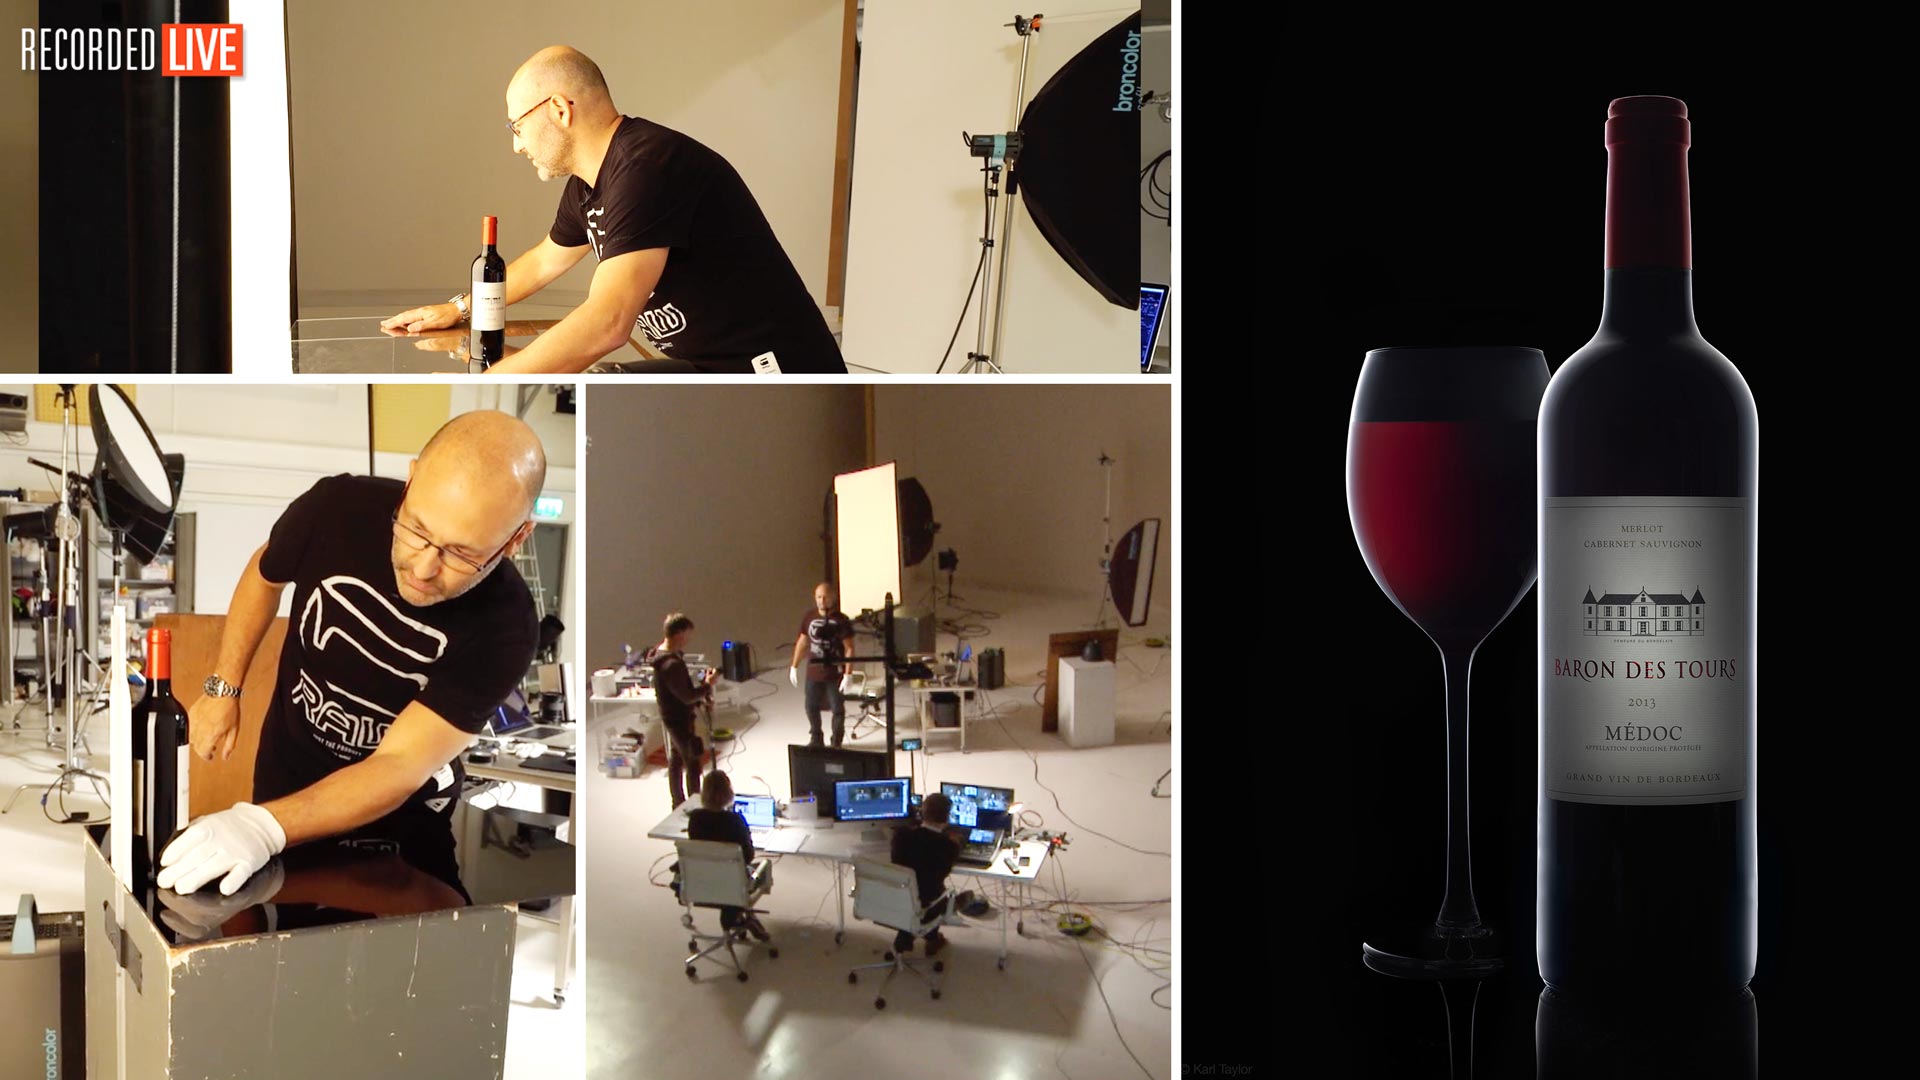

Wine Bottle Photography
Struggling to get your bottle shots right? Let Karl show you how to light them like a pro.
In this product photography workshop, recorded LIVE, you’ll watch Karl shoot a bottle of red wine. As he does so, he shares a host of useful techniques and tips to help you improve your own bottle photography.
Demonstrating two different lighting setups as he captures a variety of images, Karl explains the modifiers, background choices, lighting considerations and post-production requirements you need to replicate each one for yourself.
Learn from a pro and follow Karl step by step as he shows you how to achieve the perfect photograph of a bottle of red wine!
In this class:
- Product photography: How to photograph wine bottles
- Product photography tips
- Lighting modifiers for product photography
- Rim lighting techniques
- How to control reflections in bottles
- Working with composite images
- Correcting image distortion
- Photographing using coloured gels
If you enjoy this class, check out Whisky Photography or explore our huge Product Photography section.
Questions? Please post them in the comments section below.
Please note that we no longer sell diffusion material directly, but Visual Education subscribers are eligible to receive a wide range of discounts from top equipment suppliers.
Comments
HOW TO SHOOT A BOOTLE OF RED WINE WITH RIM LIGHT – BEHIND THE SCENE – PRODUCT PHOTOGRAPHY
January 31, 2021
Exactly same lighting procedure a year before your video.
This live show was shot in January, 2016. This same person has copied (badly) many of our techniques and tried to publish them as his own.
Hi Karl,
Thanks for letting me know this person is a copy cat. Things of that sort are not acceptable.
Your work is excellent. Enjoy all your video’s and information.
Needing to purchase a pisolite and projection attachment. Have tried a DIY snoot, works but not great. My lighting is all Broncolor.
Hi Karl. This was great. Such a ‘simple’ subject but jam packed with learning points as always.
I tried the second shot and I’m happy with my result but I don’t think I managed to get the same perspective on the bottle as your demo despite shooting from the same angle. The bottle in my image is proportionally the same size as yours, but yours looks grander and seems closer. It’s hard to describe the difference but I think you’ll know what I mean.
Would your MF sensor make the difference? I’m using a crop sensor Canon and used a 50mm lens. I can focus closer but then can’t get the whole bottle in the frame. Is this the reason and if so can you help explain?
Thank you
Hi Stephen yes the size of the sensor and focal length combination will have a bearing. I think in this shot I’m using an 80mm lens which would be about equivalent to a 50mm lens on a full frame 35mm camera?
Amazing content! 🙂 I would be curious with regards to the first setup, if there is a retouching/photoshop tutorial on how to extend the black area to the full background in photoshop. Thank you!
Thank you Izakata, this is the best place for you to start, it’s a concise and easy to follow Photoshop course that will get you up to speed – https://visualeducation.com/post-production/#photoshop-for-photographers
thank you! 🙂
Hi, Karl!
Amazingly helpful, as usual. I can’t wait to watch the white wine tutorial when it’s up.
My issues ongoing when watching your videos is that my space is about 300 sf, and also just don’t have all the same gear that you use due to space and budgetary constraints! Any tips you can share about possibly paring down this set up for someone on a bit of a tighter budget would be much appreciated.
Thank you!
Allison
Hi Allison, thank you. We haven’t managed to film that yet but we do have some that contain similar techniques required for white wine:
https://visualeducation.com/class/photographing-clear-liquid-bottles-gin-vodka/ but I will keep a note to try and complete a specific white wine class. Yes 300sq ft is not a great deal of space for a studio so there will be limitations unfortunately. With regards this set up you can see at around 35mins that my actual physical shooting area (discounting all the surrounding filming lighting etc) isn’t that large on this one. The vertical scrim is very close to the product, the camera is close to the product and the light is close to the scrim. For the rim lighting we start with one light through the scrim and it is a big softbox but a smaller one should also provide some effect. This video you might find interesting, here I had to find a solution for a company needing wine shots in a very small space – https://visualeducation.com/class/photographing-in-a-small-studio/
Thank you, Karl, this is very helpful. I was able to work on some bottles in my space using your techniques (with some tweaks) and they turned out great! The clients went nuts for them. So, thank you again. 🙂
Great to hear!
Hi Karl,
I’d also love to see a white wine show in the future.
Thanks for the great lessons!
Hi Karl, can you pleas write wich diffusers from lee you use here
Hi Please see this class and the equipment list below it – https://visualeducation.com/class/making-a-scrim/
Just thought of something else…..the bottle was too close to the flag?😏
Hi, I’ve just completed the first section, creating rim lighting on the bottle. I’ve come back to the video to continue and realised that my rim light is quite narrow with not enough gradation. I used a large soft box and large scrim with the light source close to the bottle. The only thing I can think of is, did I make my bottle flag a bit too large and that is the cause of the problem? Thanks for your help.
Hi Maxine, yes that could have been the problem which should be able to be solved by moving the flag slightly further back which will then allow more light to get around it. The second thing is the look of the gradation of the rim light will be dependent on the distance of the softbox from the scrim.
Hi Karl, I’ve just re-watched the first part of the video and I think the scrim was too close to the light source but its ok, I will re-shoot the bottle when I am ready to move on and add a wine glass. I actually think I learn more from making mistakes so its a good learning process.😊
Hi Maxine, absolutely making mistakes is often the best learning tool. When you’re shooting though and you notice a problem with lighting try to break it down to the basic physics by carefully examining what is happening and why it is happening and then you can usually figure it out and fix it on the spot.
Hi Karl
I’ve only got Speedlights. is it possible to achieve the same effect in the first shot with the wine glass with food colouring using 2 speed lights (one as the rim lighting and the other for the “red”wine)?
I’ve been trying to get my “red wine” to light up, but cannot seem to get enough light? is it that perhaps my black cutout is too large? I’ve diluted my food colouring, I’ve moved my second soft box around and cannot seem to achieve the same colouring.. it is only lit up showing “red wine” at the bottom and the very far left edge
thank you
Hi Jaqueline, by light up do you mean you are not getting enough light in the liquid in the glass? It is difficult for me to ascertain why without seeing your lighting setup and/or it being compared to what I did in this class. Obviously the dilution and colour of the wine will have a factor. The only other factors will be the angle of the light into the glass, the type/shape of glass and the amount of light coming out of your light relative to the settings on your camera. One of those 3 things is the answer. You can see in this session from around 40mins that it required a separate composite shot with the softbox to add light into the diluted wine. Then at around 43mins we added more food colouring and adjusted the colours in post. It did also require an increase in lighting to get the colour to show. I would suggest repositioning your light and trying from different directions to see which starts to give you colour and then working from there.
Okay, so perhaps I should try a different shaped glass. I have watched and rewatched this portion of the video several times and I still cannot get my liquid in the glass to light up. I have moved my scrim back and forth, I have moved my lights different angles positions, I have moved my glass forward from the black cut out, I have even had my husband watch the video with me. He sees that I have the lights place fairly close to where yours are. My soft boxes are not as large as yours and I am using speed lights, however I cannot get any light into the liquid 🙁 so frustrating. I have managed to achieve other shots you taught, however this one eludes me and it is very frustrating, as I really want to learn how to light up liquid on a black backdrop.
Hi Jacquleine, it sounds like a lack of light. Can you try putting your speedlite on it’s own firing into the glass from the same back angle so we can determine how much light you’re getting.
Is there any way to do the first shot without a picolite?
Hi, yes a very tight snoot or even a home made snoot can replace the light on the label but it’s not quite as effective.
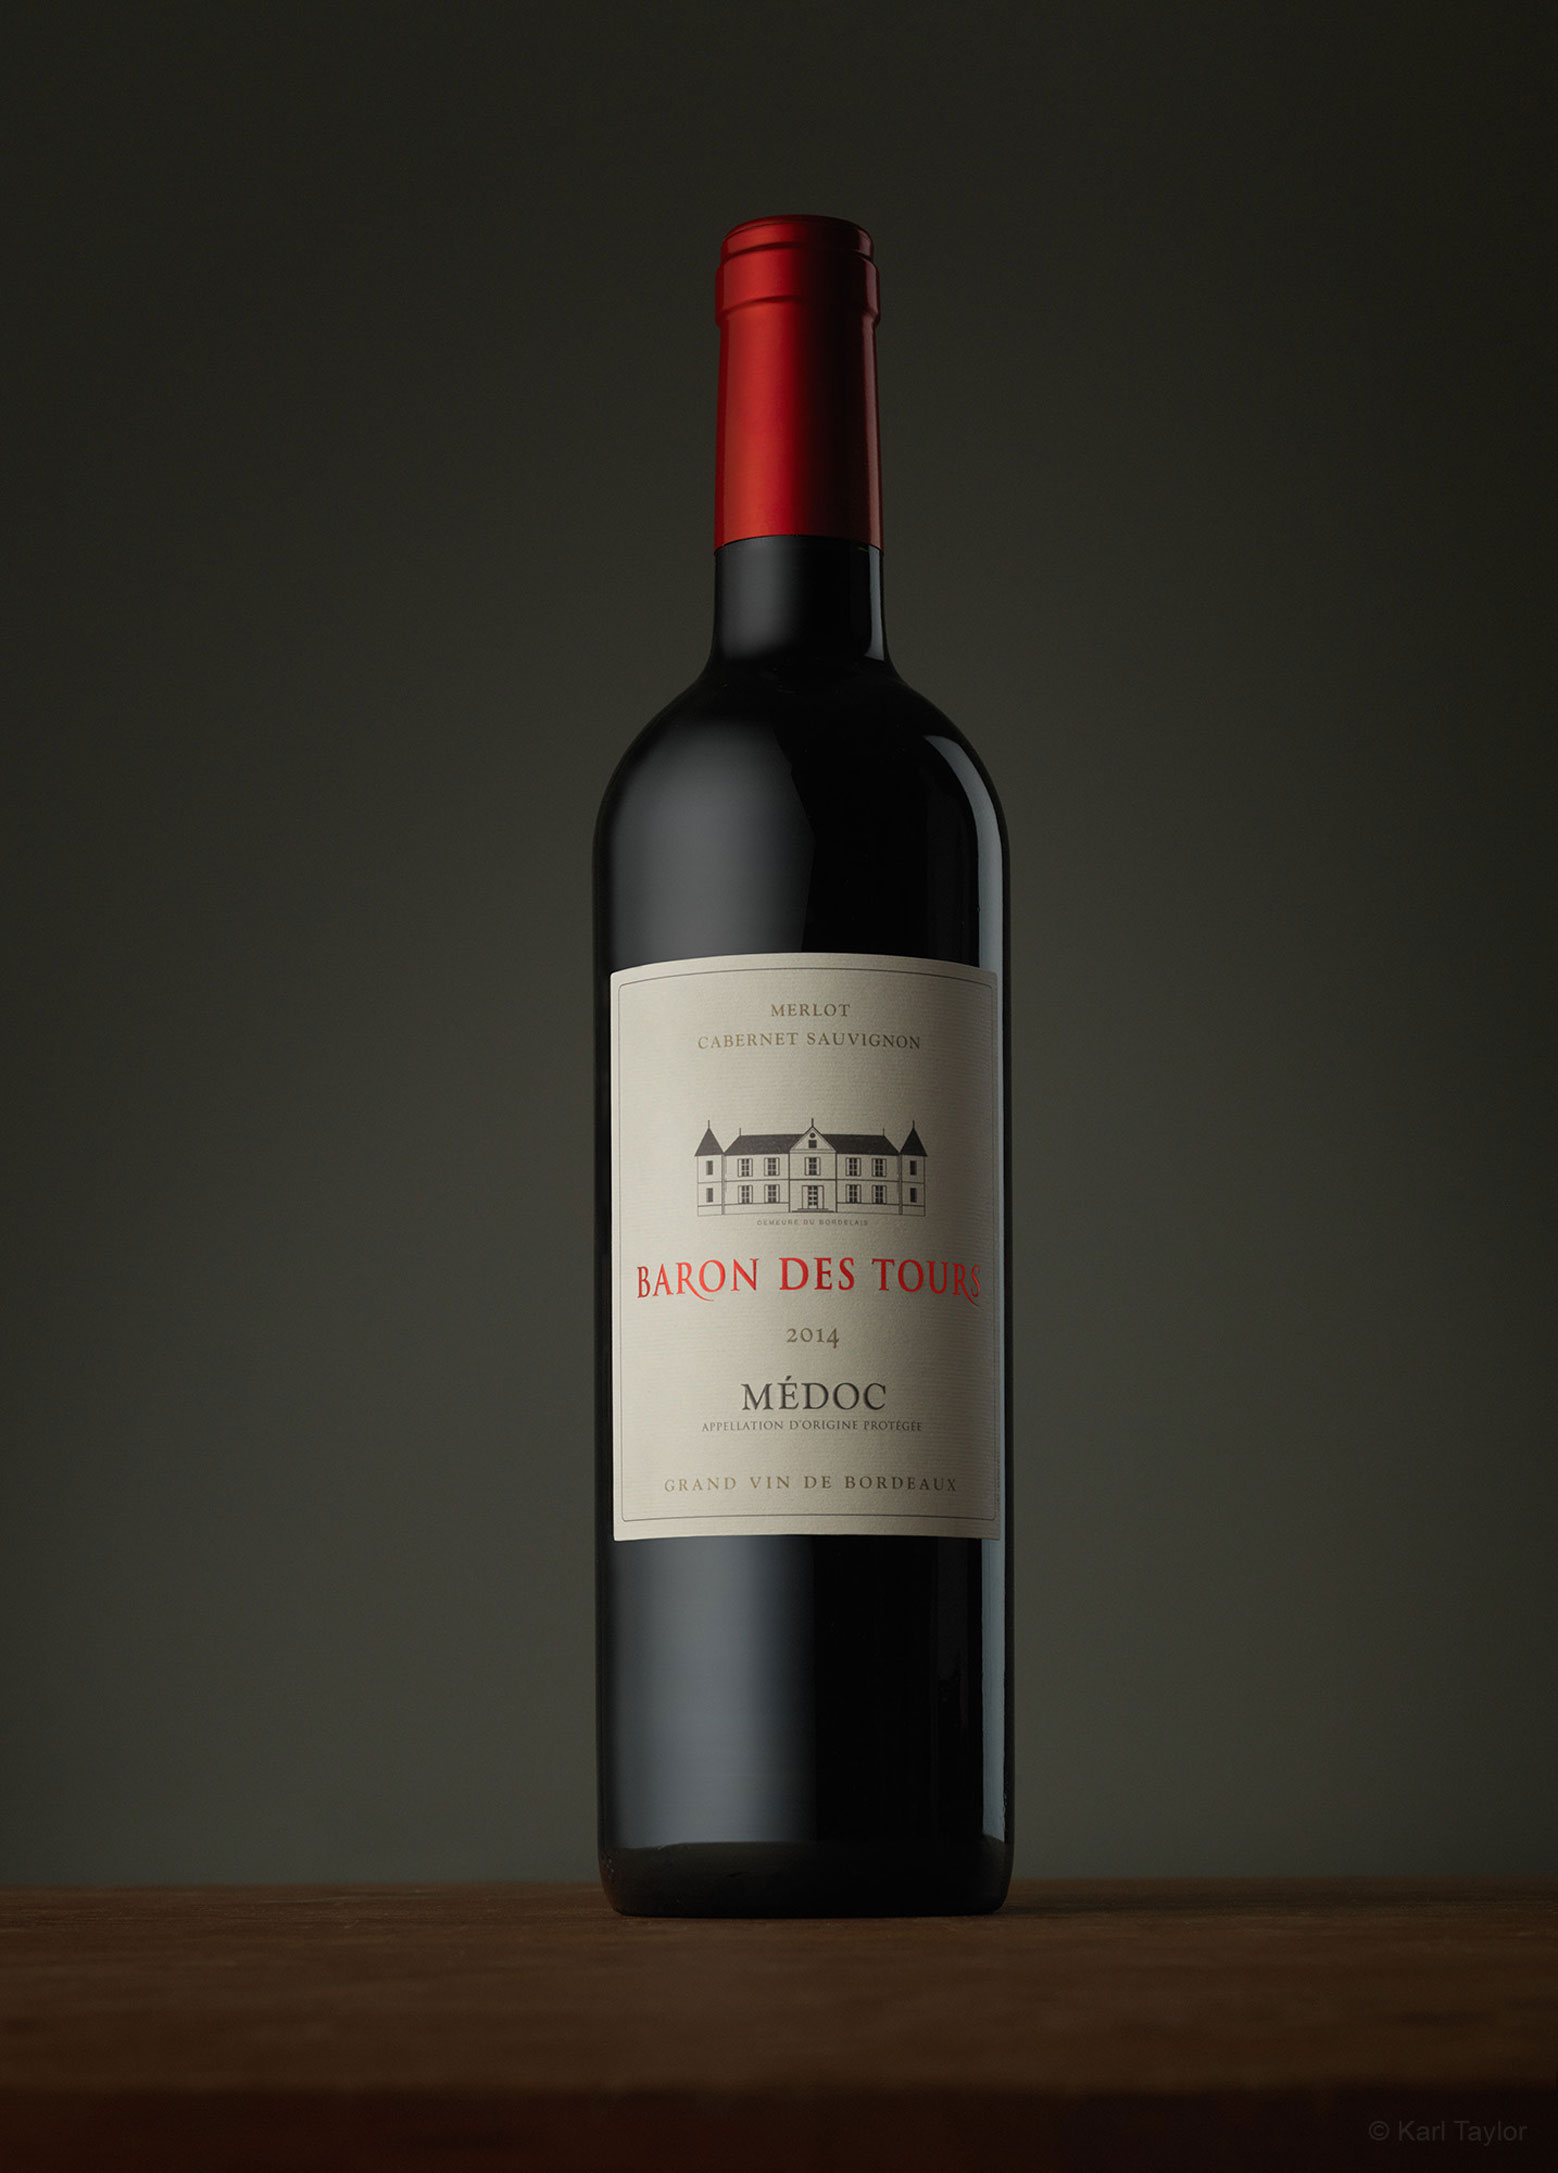
At 1:31:04 where you are showing your favorite shot, if you look closely at the shoulders of the bottle, you can see the reflection of the top of the roll of diffusion material. Could this be alleviated by raising the roll of paper higher, or would you fix the reflection in post? Is this due to the shape of the bottle? I.e., no matter how high you raise the roll of diffusion paper, you would always see the top of the roll because there will always be some part of the curved bottle that would reflect it?
Hi Mdregiff, yes that’s absolutely correct and you will see a similar response and comment here explaining the same thing.
Hi Karl,
Nice step by step guide in this video.
Do you have any more information on the peeko light? (probably not spelt correctly)
Thanks,
J William
Hi J, this is the picolite – https://broncolor.swiss/products/picolite?variant=2289https://broncolor.swiss/products/picolite?variant=2289 my guess is that after seeing this class you are actually interested in the projection attachment that fits on it. There are also alternatives that you can see in this class – https://visualeducation.com/class/live-photography-workshop-creative-portrait-lighting-2-0/
I’ve just watched the first part so far so forgive me if you explain this later in the show. I would like to master things bit by bit before I move on. With regards to the rim lighting of the bottle and the label being illuminated by a picolite, in the absence of a picolite I’m trying to think how I can improvise. If I used an optical snoot spot projector just with the lens and no gobos inserted (I don’t think I have a rectangular shape gobos), defocus it and then shine it through a flag with a rectangle cut out onto the label, am I on the right track or am I making it way too complicated please? Is there a simpler way that I haven’t thought of ?
Thank you.
Hi Maxine you are on the right track. It can also be done with a very very small home made snoot as I did in this budget version of the same type of shot – https://visualeducation.com/class/mini-home-studio-part-2/
👍🏻 Thank you.
in the second wine bottle shot on the wood block. is there a way to light this so that the gridation goes all the way from the neck and around the “shoulders if you will” to the body of the bottle?
Hi Jacqueline, are you talking about at around 1 hour 26min 34 secs, where you can see the lighting on the side of the bottle so that the light on the shoulder also joins the light on the main bottle and the neck of the bottle?
I don’t see where the light continues from the neck, around the curve and down the sides completely. is there a way to “fix” that or have it so that the light is not cut off at the “shoulder” part of the bottle?
Hi Jacqueline, OK I understand what you mean and I’m going to help you answer your own question because I think you’d be able to figure it out from what you’ve seen so far in this class. First of all you already know where the light on the side of the bottle and the side of the neck of the bottle is coming from? Of course you do it’s coming from the big tall scrim on the left, so as that light goes up the side of the bottle and over the shoulder of the bottle it continues to be a mirrored reflection of the light source (the scrim) and then at a certain angle it stops! So we have to figure out why it stopped and the answer is simple and that is that now our mirror (the bottle) can no longer reflect the light source because it is past the angle of possible reflection (we have a great class on this coming up in December). So it is past the angle of reflection for two reasons that part of the bottle isn’t in the angle of reflection for the light source or the light source is not in the position that it can be reflected there. This is always a problem with spherical glossy items because they reflect from all directions. The solution would probably be to make the scrim much much taller and also lean over the top of the bottle more (not really practical) or move the scrim to almost touching the bottle and still much taller with a bit of lean (probably doable but a bit awkward for the rest of the set) or leave it and decide if it both reflections could be joined together in post production. I hope this helps and look out for the new class in December on angles of incidence and reflection.
Hi. Is it spelt Peko (for the peko light) you are using? I want to make sure I look up the correct product
thank you
Hi Jacqueline, Picolite – here’s a link but keep in mind they are not monoblocs they need to plug into a pack and that the projection attachment is another accessory that goes on the front of it. https://broncolor.swiss/products/picolite?variant=2289 – There are independent projection attachments available for other lights too.
On the shot where you do the wine bottle and the wine glass (red food colouring) have you a tutorial on how you do post to compile the 2 images?
I just tried my first attempt with scrims and a wine bottle. I am learning lots! Thank you!
Hi Jacqueline, no we don’t on that one but I have a very similar one on tomorrows live show.