


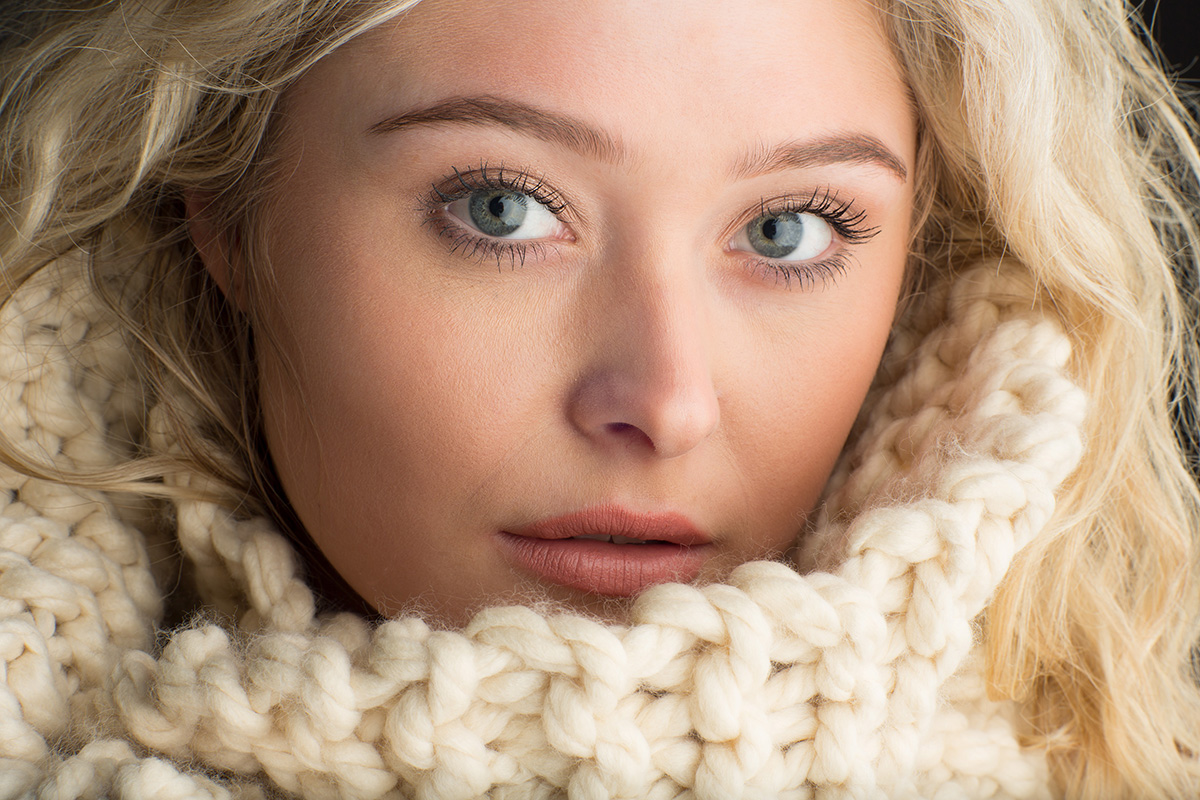
Soft Single-Light Portrait
Softly does it in this simple portrait setup.
In this portrait photography class, Karl and Urs explain how to create the softest light possible. Using a common modifier, they explain the importance of position, and demonstrate how to position your light for maximum effect. They also demonstrate common mistakes photographers make when using softboxes, and show how to correct these mistakes.
The pair also discuss how this setup would work in a smaller studio, before going on to create their own to demonstrate exactly how this setup would work and how simple changes to your studio can make a big difference.
In this class:
- Portrait photography using a single light
- How to achieve soft light using a large light source
- Common mistakes when using a softbox
- Camera lenses for portraiture photography
- The inverse square law
- How to photograph in a small studio
Questions? Please post them in the comments section below.
Comments
When you shoot tethered with H6D, can’t you connect your Mac to the H6D wifi and when you open Phocus can’t you see the pictures you shoot? Why using a cable?
That would be amazing and something I have asked Hasselblad about with the new X2D but I was told it is something they are looking at but currently the transfer speeds would be too slow as each RAW image is 100MB. I argued that it could send the jpeg preview file only initially and transfer the full RAW file more slowly incrementally. The company Tether Tools made a wireless tethering system but they abandoned it following poor technical performance: https://tethertools.com/air-direct-update/
How does the softbox size change the overall finished photo? Say like 49 in octabox? Could similar results be achieved?
Hi, a similar result can be achieved with any softbox that has a similar surface area and if it is placed at a similar distance.
Karl
Loved this class! I am still very new to photography and I am really trying to work out the problems when they are present. I was doing to do this shot with my wife and for the life of me I couldn’t get the light to fully wrap around her face. So after watching it again it hit me. . The softbox I was using was 31 x47 alot smaller….please correct me if I am wrong but is this the reason I couldnt reach the same full light on her face that you guys had. Thanks
Hi Robert, yes that is correct. But if you are new to photography you need to watch all of our lighting theory section first to get the best out of our training.
Hi Karl, I am loving the outcome of this photoshoot.
Would I get the same results with a diffused parabolic umbrella? Or would the middle of the umbrella be too harsh when pointing at the model?
Thanks,
Marta
Hi Marta, getting the same result would depend on two things. 1. Is your light source as diffused and homogenous. 2. Is it as big physically or bigger. If you can make your light source both of those things then you will get the same result.
Wonderful Tutorial. Great explanation of the inverse square law.
Thank you!
hey karl
i am little bit confused about this course
first due to inverse squire law the light should be more contrast when the soft box is nearer to the object but that was not what happened here
second thing
the more we go far from the subject the light spread away and become more softer but that was not what happened also
third and last thing why the light emitting her eyes was less brighter when the soft box is nearer
Hi Amr,
1. Yes but because we are using a softbox and not a point lightsource the light becomes significantly bigger to the subject which decreases contrast because more light can reach around her face but you will notice the background would have become darker because of the inverse square law.
2. The light doesn’t become softer when you move away the light source becomes smaller relative to the subject and therefore it can appear harder. However the level of contrast or exposure between near and far objects will reduce so for example the background will become more similar in exposure to the subject because the power of the light is now more similar in both areas. You must remember that for the true inverse square law effects only to apply then it would need to be a point light source in a black empty space. When we are dealing with softboxes or larger modifiers the size of the light source relative to the subject has a big impact and therefore if a large modifier is close or far effects it’s apparent size.
3. These concepts may seem a little confusing to begin with but please go to our Lighting Theory section and watch ‘Introduction and Understanding Light’ please as this gives some further inverse square law examples but with softboxes.
It’s more the direction of the light not the inverse square law that is resulting in that black background.
Hi you might like this class – https://visualeducation.com/class/understanding-inverse-square-law/
Hi Karl,
Sorry, I haven’t got how to turn the background into black.
Thank you.
Alice
Hi Alice, on this class we used a dark grey background a couple of meters behind the model, when your softbox is this close to the model then the dark grey will become black.
Hi Karl, would using a 70-200 lens achieve the same result ? as it would avoid getting too close to the model as some would be shy.
Hi, We were using an 85mm lens here so yes you have 85mm in your 70-200mm range. I don’t know what the maximum aperture setting of your lens is though, see if it matches or can match what this shot was taken at and then you’l be fine.
beautiful portrait.
I often see portrait with natural light coming from a window.
i don’t have window in my studio. should such 180×120 or 150cm rotalux simulate a window or do we need extra layers of transparency (1 or 2 girafe with translucent fabrics,…) to do the job ?
should people notice it is fake or only professional ?
best regards
marc
Hi Marc, either of those softboxes are very good at simulating soft window light.
hi Karl, did you use a 2x extender i.e. 85mm becomes 170mm or did you mean a macro extension ring to allow you to get much closer at the same focal length of 85mm?
Hi Charles a Macro extension tube (has no glass).
yes Karl but in the side notes to the video re gear it says 2 x extender i.e with glass therefore were you shooting at 170mm focal length?
Hi Charles, that’s an error in the side notes, thanks for pointing that out we will update it. In the video at 2:20 I say it’s an extension tube because we are shooting close. So the focal length remains 85mm.
thx Karl, really enjoying all your vids.
Hi Karl, very instructive lesson…I already knew some of the technical parts, but had not been aware of the difference it makes when getting closer in terms of the consequences on the background and…thanks to Urs, the shiny skin problem, which is a recurring problem for a non professional portrait photographer…
And so this lesson inspired me into doing a similar portrait session with one of my granddaughter who is ten years old, very beautiful and of course, as most children at that age, with no need of much make-up…but her hair is dark…contrary to your model…does this require an important change in lighting strategy? Thanks again…I’ve been through many sites like yours…but yours is exceptionally worth the price…hope you are fine and please keep safe, these are hard times…
Hi, thank you, if the hair is very black and the skin is light then of course there is a greater disparity in the value of the tones. You may have to accept slight over exposure on the skin planning to pull it back from the RAW file and lift the shadow detail in the hair. Or you might have to consider precise snooted, grided or projection lights to lift very specific areas of the hair but this is difficult if the model is moving pose.
Hello sir., this course is truly amazing. Just a small request, can we get the lighting diagrams for these images?? that will be very useful for future reference.
Hi, No I’m afraid we can’t, we believe it’s actually clearer to see in the video than a lighting diagram.
Hi Karl
Can you recommend a backdrop colour as my first purchase for headshots?
Kind regards
Chris
Hi Chris, Mid neutral grey.