Motorbike Photo Shoot
Learn how to photograph motorbikes in the studio
LIVE PHOTOGRAPHY WORKSHOP
Motorbike Photo Shoot
Recorded live on 19th December 2019 - Now available on replay
In this live show Karl will undertake the exciting task of photographing a motorbike live in the studio.
- How to photograph a motorbike in the studio
- Planning & preparation
- Lens choice & equipment
- Step-by-step lighting examples
- Tips for photographing reflective surfaces
- Control multiple lights
- Ask your questions
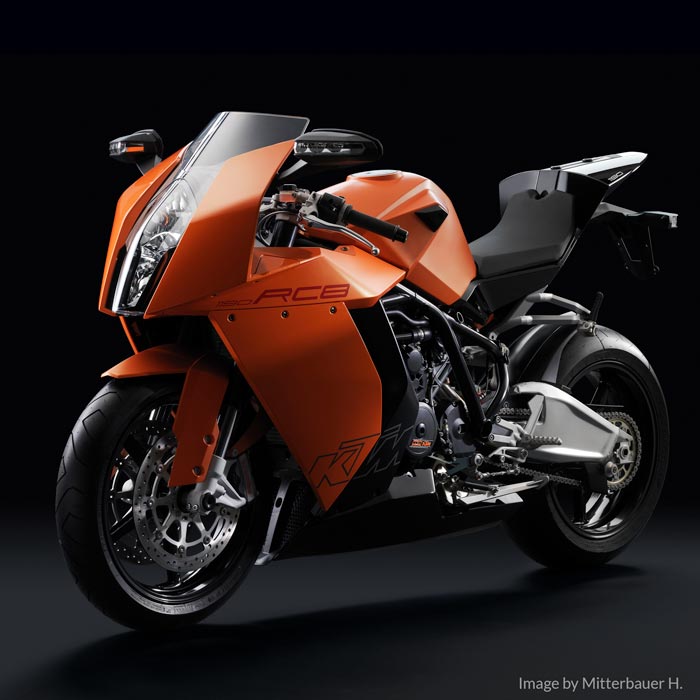
Overcoming the challenges of motorcycle photography
When it comes to photographing motorbikes, there are a number of challenges you can expect to face. Whether you’re working outdoors on location, or in a more controlled studio environment, these steel speedsters are no easy subject.
Some of the challenges you may experience include:
- Composing your image
- Lighting reflective & matte surfaces
- Controlling light
- Selecting the right modifiers
- Determining the best background
I demonstrate how to overcome each of these challenges in this live show, explaining my thought process and creative decisions as I work through this step-by-step demonstration.
As I explain how to overcome each of these challenges, you’ll realise that the key thing to keep in mind (for any product shoot) is that a careful, logical approach is required. If you remember that, you’ll soon realise that even a complex shoot such as this can be simplified into two main steps.
1. Determine your angle & focal length
Studio shots of motorbikes are most commonly done at a three quarter side angle or front on. One of the goals for any type of product photography is to highlight key features of the products, and this is no different. It’s important that your shooting angle allows you to highlight key features of the bike, whether it be the hand grips, exhaust system or brake disks.
Shooting variables such as, the amount of studio space available, the camera format you are using and the perspective of the shot, will effect the choice of lens. It is not possible to list one single lens that would be appropriate in all cases when shooting motorbikes. That being said, anything less than 50mm lens wouldn’t be an ideal choice as it would probably cause distortion.
2. Lighting
Motorcycle photography is similar to car photography in that it generally involves some form of large, gradient lighting from above, as well as fill lighting for the side panels and pockets of light to highlight key features.
There’s many different ways you could choose to light a motorcycle, from plain white backgrounds to dark shots with rim lighting. For this shot I’ll be aiming to create a dramatic, moody image on a grey background.
From the placement of my lights to my choice of modifiers, I walk you through each step of my lighting setup to help you understand how to control your light and achieve the exact result you want.
These points cover just some of the most important aspects of motorbike photography. Other things to consider include preparing for the shoot, background choice and post production. Throughout this show I show you everything you need to know to get the best possible result. To see the start to finish shoot, watch the full show on replay.
LIVE PHOTOGRAPHY WORKSHOP
Motorbike Photo Shoot
Recorded live on 19th December 2019 - Now available on replay
Learn how to create high-end images of motorcycles in the studio in this live show. Watch the start-to-finish shoot to learn about lighting and techniques for shooting these challenging subjects.
Watch Now
Join Now
© Visual Education. All rights reserved. No content on this page may be used or shared by third parties.


Comments
Where can I find the post production video of this amazing motorcycle shoot?
Hi, the Black Motorbike (Honda Fireblade) shoot will be published around end of June and the post production on it around mid July.