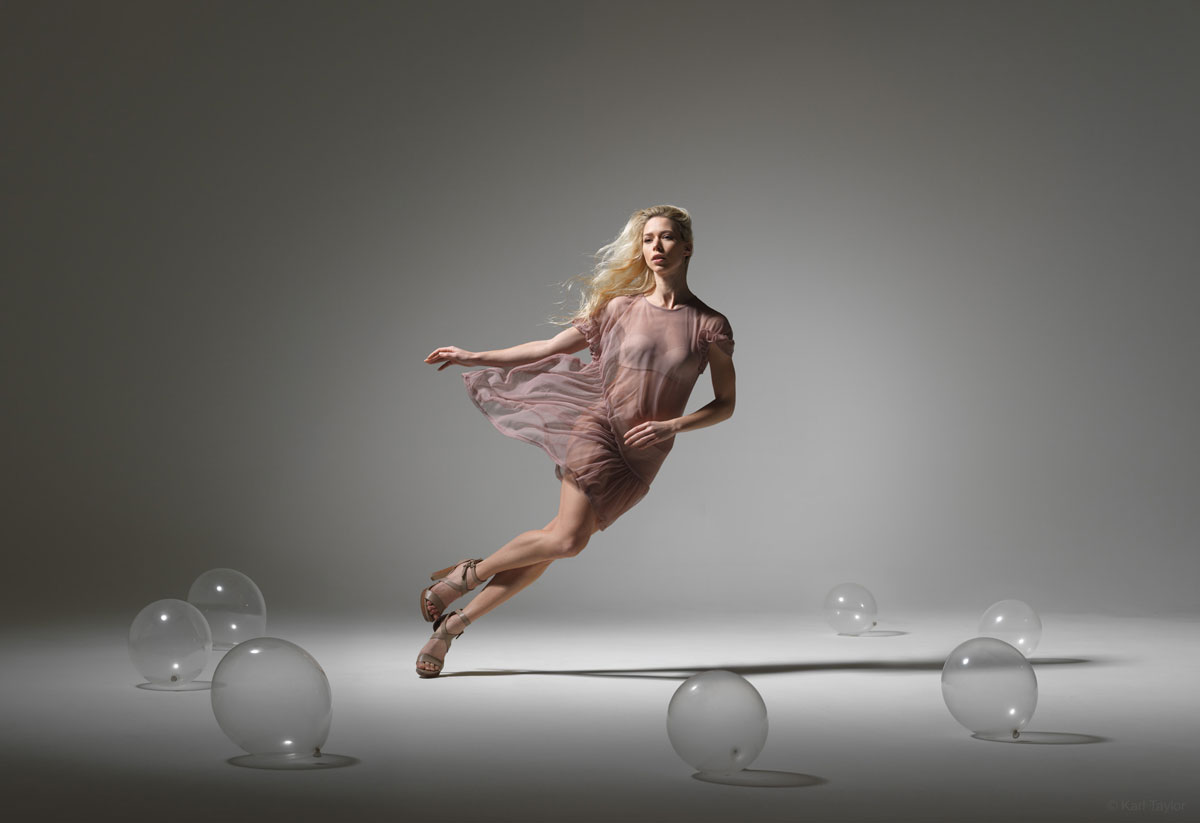
Falling Girl: Photographing a Model in Motion
Want to create an eye-catching and evocative image like this one?
In this fashion photography class, Karl walks you through every aspect of his process, from conceptualisation and styling to lighting and capturing the shot. He demonstrates careful control of light, thoughtful choice of outfit, and meticulous execution, with stunning results.
In this fashion photography class:
- Choosing an outfit
- Creative problem solving
- How to control shadows with different lighting
- How to freeze movement with flash
- What is mirror lock up mode and when to use it
- How to get maximum effect using minimal lights
Questions or comments? Please post them below.
Comments
Hi Karl, I have been following so much of your work on YT and thought it was time to join your platform after all. So thrilled! I loved this tutorial, the ripples, light and shadows through balloons add so much depth and interest.
I had a question about the flash speed for such shoots. Like you mentioned to freeze motion it is the flash light that helps, can you help understand what was the flash duration to help capture the cloth motion without any blur? I use AD600 Pro and a Nikon Z7ii with a 100mm macro. I was considering keeping my shutter at 1/160 just enough to cut out all the ambient lighting. F11 to get everything in focus and ISO 100, since I will have multiple strobes on set to light up different parts in the scene. The strobes, may be at a 1/16 (T.1 value 1/4651) work out? Since I work with these equipments, throwing these numbers and equipments to explain my query better. Thank you so much!
Hi, thank you for your comments and joining us here on Visual Education. Yes you’re correct with everything you mentioned, always check that your settings (in your case f11 1/160th) cut out all the ambient light, you can do this easily by taking a test shot without the flash at those settings and making sure that your image is just black. After that you then know that the only light in the image will be the flash and T0.1 speeds of 1/2000th or faster will be plenty good enough for this sort of work.
My favorite shot in KTE , thank you for the inspiration and the hard work you making
Thank you Kimo, much appreciated.
Hi Karl,
Been with you for over 3 years I think, I learnt so much from you already..
I just wish to ask you why the balloons? Do they have a symbolic meaning that you added them to the shot?
Thank you
Aby
Hi Aby, thank you for your support. Yes they do have a symbolic meaning, in this case the image was depicting the end of something, release, exhaustion or similar and the title of the image was ‘The Party is Over’ which can have numerous connotations associated with it and I felt the baloons on the floor would indicate the end of something as that’s often where they end up when things have finished.
Hey Karl. I love the way there is a theme running through your work of macabre moments.. of falling ladies mostly.. perhaps you need to thrown in a falling good looking business suit as counterpoint. lol.. just a thought. I regret not having a para in my arsenal to capture that crisp punch.. well.. I regret not have a large studio as well, but I am working on that. To the question: Is that wind machine rather pricey? A rental? I recently picked up a smoke machine and was surprised just how inexpensive it was.. I had always made the incorrect assumption it was something costly. I could use a fan in a pinch I suppose. Is there something about the pro wind machine that gives it any advantage of which I am just unaware?
Hi Gary, thanks for your comments. This wind machine was particularly costly as far as they go and it’s a lot more powerful (and noisy) than a large fan. There are other choices though too, for example if you just want to move a little hair then a hairdryer on cold mode full blast works. A large piece of polyboard flapped by an assistant or garage/mechanic supply stores usually do these giant floor standing fans in a cage that have quite a bit of punch. The one I use is here – https://www.essentialphoto.co.uk/product/pixapro-studio-wind-machine-with-heavy-duty-floor-stand/ but this sort of thing might be good but not quite as directional – https://www.sealey.co.uk/product/5637189516/18-industrial-high-velocity-floor-fan-with-internal-oscillation
That was a very good and helpful tutorial, Karl. Thank you! May I know what focus system did you use in the camera to have your model always in focus when falling? I dunno about the focus modes in your camera, but I’m using SONY a7rIII.
Hi Afahmi, thank you. I always use manual focus for this because the model is always falling in exactly the same place so with your camera fixed on a tripod it remains the same. Do a test on the position, get it sharp, then put it in MF.
Karl, great shoot! Deborah was fantastic! I have a couple technical questions that I may not have caught the answers too. You were shooting at 80/85 mm medium format, equivalent to a 50mm lense in a 35mm camera?. Clearly the detail in the image had to be F8.0 or higher. Iso? Shutter at 250? To capture the motion at a standstill? And your Para 133 pole setting? Mid? Thanks. Great tutorial. Thomas
Hi Thomas, all of our courses when you are logged in have an equipment list on the right hand side of the page a little lower down, here you can find each piece of equipment used and it’s model number etc. On that particular shot it was f8 but you never really need to consider the shutter speed when using flash in a controlled environment such as a studio, simply because you can block or reduce all ambient light so the shutter speed becomes irrelevant, all of the freezing of the model falling is achieved by the duration of the flash burst. Of course outdoors the shutter speed becomes more important as you are using this to reduce the daylight exposure. In the studio my shutter speed could have been 1/60th or 1/250th (it was 1/320th on that shot) but as long as it was fast enough to cut out my modelling light then it would be sufficient in the studio. The Para I think was also shown in the video and it was in the mid focus position. All the best Karl.
fabulous
Thank you!
Pimer trabajo que veo tuyo en la plataforma, y quiero felicitarte Karl, un gran trabajo!, con muchas ganas de seguir viendo todos tus trabajos, saludos
Gracias
karl, is flooter a strobe or continuous light?
thanks for this legendary shot!
Hi, it’s only a modifier that you put a light into, so I can put a studio flash in it or a broncolor LED or or a broncolor HMI.
Bonjour Monsieur Karl est il possible de réaliser un shoot comme celui-ci en extérieur?
Bonjour, qu cest bon questionne et oui cett possible. Mais vous plus bon sur jour avec nuage pour le protection du tros beaucoup lumieire du soleil si avec flash.
You’ve reached legendary status for your ability to write in french. That’s an art form by itself. 😉
Ha Ha my wife is french but my french is not very good! 😂
Can you shed some light on the Studio Two-sided White wall and how is it constructed. Is it made of Plaster of Paris?
Yes, here you go https://visualeducation.com/class/building-a-studio-cove/
Hi Karl, I really enjoyed this session, just wondering when you merge the images do you do this manually by merging and erasing part of the scene or using luminosity masks or another way? also great courses I have just finished all of the portraits sessions now onto the Fashion course! Thanks
Hi thank you, I just put the layers on top of each other and use the standard masks method.
Hey Karl sir
I’m the great fan of your work sir. After a long time of waiting final today I join your online course class. Today is a happiest day of me. You are amazing sir.
Hi, Mr Taylor
Signed up today , and this was the first content that I viewed . I must state that it was an out of the box idea followed by the flawless execution .
Thank you Nadir, please spread the word! 🙂
wawa
?
I just signed up and this was the first video I’ve watched. I’m so very excited!
Hi Aaron, I would highly recommend you first watch the lighting theory chapters especially No.1 in the Portrait Section.
Brilliant image! Very inspiring.
Did you consider supporting the model using a climbing rope fixed somewhere to her right, that she could hold onto with her right hand.
Hi Martin, no it was good exercise for me! 🙂
Sir, Can you please tell me what’s the story behind this pictures ?
and what is mood ?
great ideas !!
Hi, karl, could you tell me what brand or model the heavy light stand for para 133 is,please?
Hi Karl
Could you, please explain what delay do you mean? I’ve tried to make pictures with mirror and without and couldn’t notice any delay although I did still image. May be the delay is visible only if you do motion picture? I’m not picking on, just try to understand and after your lessons I try to do some tests to see how it works) What situation/set should I shot as a test to definately notice the delay?
Hello Karl, I just signed up for 2 Yrs your education. Several years ago I purchased your 4 DVD Series. I elected for just the DVD version without the education certificate.
Amazing work! I appreciate the invaluable resource of technique and knowledge you offer so freely to anyone who wants to learn. It is an understatement to say you have talent. You create amazing art! I hope some day to gain the knowledge and opportunity to apply it. I am looking forward to the time of further studying your work!
Thanks Robb, we look forward to you enjoying the platform and of course if you have any questions you can leave them in these comment sections on any of the modules.
This was always one of my favourites. Karl really opened my eyes to the world of commercial photography. Now I’m dreaming of getting a Hasselblad and doing some great work myself.
Hi Jupiterfry, whilst a Hasselblad renders a beautiful resolution and tonal range you can still make great pictures with 35mm cameras too.
Very impressive idea, I loved it for the simplicity, and the possibility to look the entire workflow is a great thing.
It’s to consider one thing, for play with lights like you do is needed a big infinity wall and high ceiling to simulate a real natural light, obviously this is only a little part, without creative ideas and a clear idea of the realization all gears and stuffs is nothing.
Great job, love your works, regards from Sicily !
Andrea
Thank you.
hi iam using conon 5d mark iii can u tell best lens for shot also iam a weddinng photographer
Hi Niro, that’s a broad question but most wedding photographers would work with one or two bodies and lenses, my choice would be a 16-35 and a 70-200 f2.8
Hi Karl,
I’m new to photography and new to this site and I’m loving it!
Can you explain the line you mentioned in the beginning ’18 ml equivalent to a 50 on a 35 ml format. If this is in another video,pleasen supply the link.
Second question, whats the minimum Mega pixel needed in a camera if the images will be used for large commercial use?
Thanks in advance!
Hi Malky, thank you and I was referring to the fact I was shooting with a medium format camera instead of a 35mm camera, therefore the focal lengths of the lenses give different results so I was giving a comparison of the medium format lenses to the 35mm equivalents. As for MP I’d say at least 22mp with good lenses.