

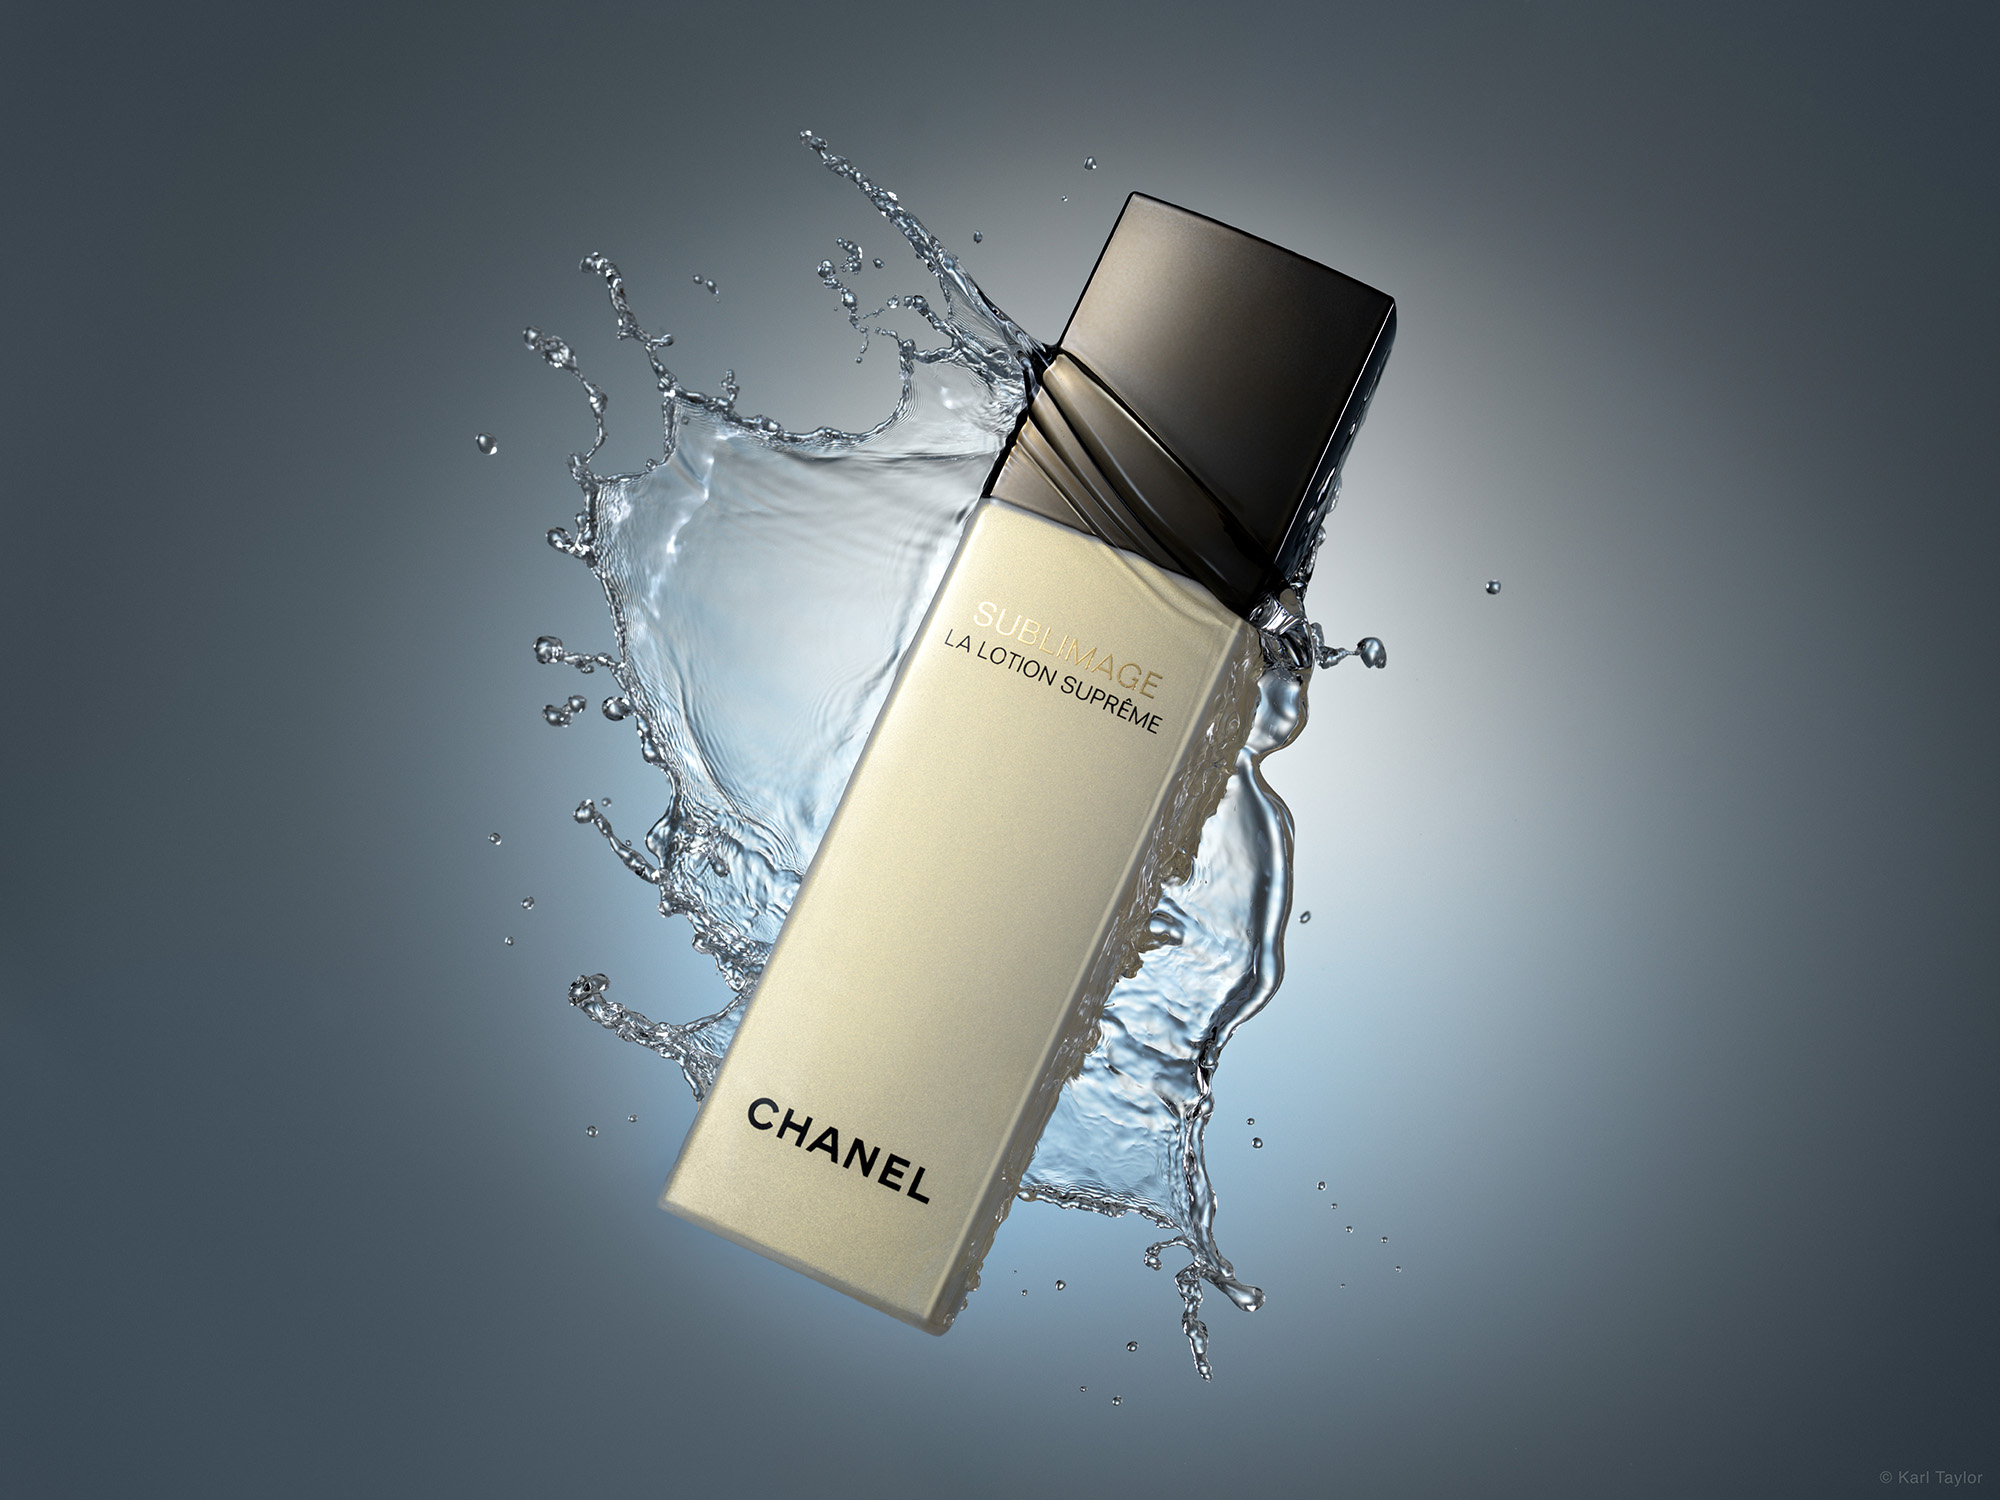
Floating Cosmetics Splash Shot
Combining carefully controlled lighting and meticulous attention to detail, Karl creates a high-end ad-style splash shot of a bottle of Chanel moisturising cream.
Starting at the beginning and guiding you through the whole process, Karl explains his planning and pre-visualisation before going on to build up his studio set and lighting.
This product photography class covers the necessary tools and techniques you need to capture a pro-level liquid splash shot like this.
In this class:
- Product photography: How to photograph cosmetics
- Product photography tips
- How to photograph splashing liquids
- How to create composite images
- The best lenses for product photography
- Useful tools and equipment for studio photography
To watch Karl edit and retouch this image, check out Floating Cosmetics Splash Shot | Post-Production.
Comments
I’m learning tonnes. This is a FANTASTIC resource. It’s like being an apprentice photographer, every time I watch the build up to a shot I feel so inspired and creative.
Thanks Paul glad you like it. Please spread the word so we can continue to grow our membership and do even better things!
Hi, Karl. Difficult shooting. Outstanding work.
Thank you Bogdan.
Karl this was probably one of my favorites of the lessons really great work! i’m currently building my portfolio doing this type of studio work, would you be willing to give me some input on how to maximize impact on the portfolio?
Beautifully executed Karl…thank you so much.
I have a question that if I want to do it with a transparent bottle the same way how can I hold it the way you did ?
Hi Goutam, you can use a strong thin metal rod that will require minimal retouching or use the same method I used which will also require retouching. If you use the same method and the bottle is flat then it would be worth considering making the face of the acrylic the same width as the bottle and the strengthening piece of acrylic as thin as possible.
Thanx Karl shall give a try
Love your stuff, looking forward for more Still Life/Splash to come.
Thanks karl
That was a flawless project. well done.
Cheers
Thank you Kourosh. Some more great cosmetics and liquids coming soon.
thanks for going into some much detail its was great .
frank garvan
Hey Karl,
Any advantage of using Miops or any other trigger system.
Hi Yechiel, I use triggers alot in some of my work but it wasn’t necessary for this one. Sometimes triggers are so accurate that you don’t get enough variety in results.
How about feathered live view ?
Hi Yechiel, what is feathered live view, did you mean tethered live view? Yes you can use live view on the H6 really well but it’s not so good on the H5.
HI Karl,
Wouldn’t one C stand be enough ?
Hi Yecheiel, no as explained the product will shake too much.
Hi Karl grate work… Sir as you said splash will go with moisture product it will not looks good with perfume. Sir I want to know if i can use the same setup for perfume which having premium glass bottle. please suggest.
Hi Shovanlal, If you are asking me if this lighting setup is correct for a glass perfume bottle then I would say no because every lighting setup is unique to the subject. Based on your question I would say that you are still missing an important piece of the puzzle when it comes to understanding lighting. Please head to this section https://visualeducation.com/course_video_page/introduction-and-understanding-light/ and carefully watch this and the following 15 theoretical modules that cover lighting and using studio lighting.
Hi Karl awesome job ! This tutorial is so well presented. I have a question about you putting the whole set to an angle, would it be possible to do the same but without putting the product+ the scrim + camera at an angle meaning everything being “vertical” like that no need to put the scrim at a complicated angle?
Hi Loic, yes but you have to also think about how your object will interact with the water and the action of gravity. I was far more likely to have gravity on my side with this set up and it isn’t too difficult to support the scrim and object at an angle you just need more stands and grips.
Hi Loic,
exactly what happened to me when I tried to take a similar shot. I tried having the scrim on the side at a 90 degree angle to the floor since my home studio is very small – with interesting results since the water forms and shapes differently due to gravity. With a bit of patience you will get very good results, different than in the tutorial maybe, but that is a good thing anyways – no need to copy Karl’s setup 1:1.
Cheers
Great “little” tutorial on specific shot and technique, seems to me a bit like a “case study”. Please do more of them, as they complement beautifully stuff presented in your main series of lessons. Thank you.
Thank you Lukasz
This is spectacular and awesome <3.
This is the best shot I've ever seen this year.
I say it all the time, you are an aspiring artist and I really really love what you do.