

Flying Tea Food Shoot
Elevate your food photography with this deliciously creative class.
In this food photography class, you’ll learn how to create an eye-catching flying tea image. All it takes is a dash of knowledge, a pinch of ingenuity, and a healthy serving of creativity – plus two experienced professional instructors in the form of Karl Taylor and Anna Pustynnikova!
As Karl and Anna guide you through each stage of the planning, preparation and lighting, you’ll learn how to create your own version of this explosive and exciting photograph. You’ll learn about problem solving and creative thinking, how to control lighting and why fast flash duration is crucial when photographing flying objects.
In this class:
- How to photograph flying food shots
- How to use pre-visualisation as part of your planning
- Lighting setups for food photography
- How to suspend items for photography
- How to freeze motion using flash
To watch the retouching and editing process that followed the shoot, check out Flying Tea Post-Production.
Questions? Please post them in the comments section below.
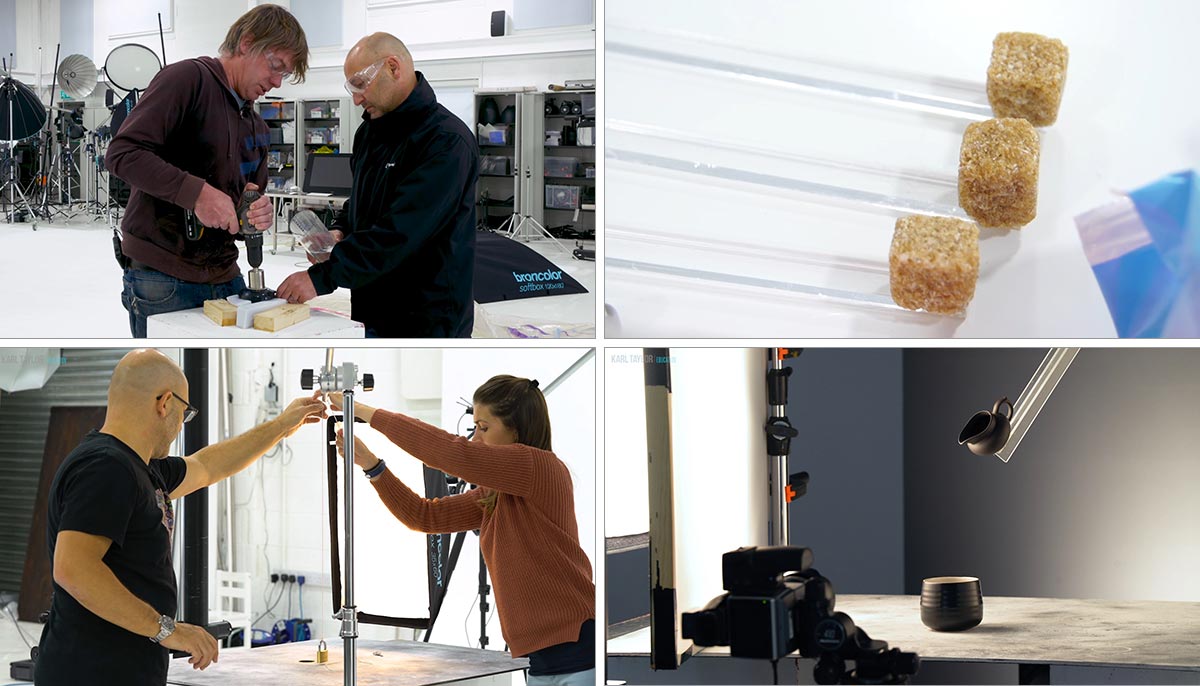
Photography often requires creativity and problem solving to realise your creative ideas.
Anna and Karl wanted to create an image of a cup with rose bud tea and sugar cubes exploding out of it and a floating milk jug above, pouring milk. Guided by Karl’s pre-visualisation, the pair were able to identify a number of challenges that they’d have to overcome to get the final result. These included:
- Create a realistic explosion of rose bud tea
- Include sugar cubes to add depth to explosion
- Create floating milk jug with pouring milk
- A lighting setup suitable for the cup, milk jug and exploding objects
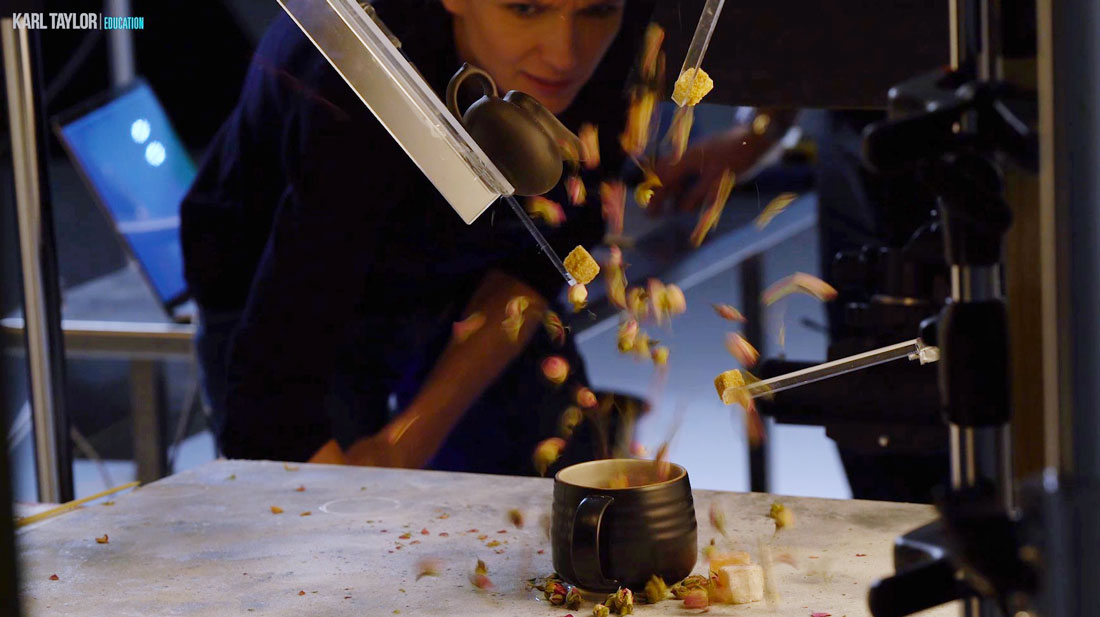
Freezing the fast moving rosebud tea was just one of the challenges Karl and Anna had to overcome.
Together, through a combination of DIY, acrylic rods and fast flash duration, they overcame each of these problems. The setup, although it looks complicated, required only four lights with simple modifiers.
In the end, this shoot proved that it is possible to bring any creative idea to life — all you need is careful planning and the right knowledge.

The final flying tea image.
Comments
Awesome tutorial Karl – Thanks 🙂
Amazing – love how you put these projects together. I read somewhere you used to work with Elinchrom strobes, which is what we have. How do you think their slower flash duration would work on the rosebuds?
Hi Neil, you’d have to check their t0.1 durations. Keep in mind though that you don’t always need to freeze everything, sometimes a little motion blur can actually add to the shot. I actually added some motion blur to three of the buds in photoshop as they all looked too static together.
Thanks Karl,
Elinchrom quote these at 1/5260 seconds but that of course is at T0.5
Still feel like giving this a go, particularly as I have a full scuba tank sitting around that needs emptying!
Awesome! Will you please tell me where I can learn about flash duration. I’m not sure if that’s different than shutter speed. I use Paul Buff lights. I don’t believe that’s an option. I can only change intensity of the strobe and model lamp. Additionally, I have watched the technical videos. I do understand aperture and shutter changes in relation to stops but I seem to have missed ISO. When you increase the ISO from 100 to 200, it’s a 1 stop increase? Thank you. This school is changing my work. Oh, and I rented a X1DII last week. AMAZING qualitative shift from my Canon 5D Mark IV.
djl… I have several Paul Buff lights as well. If you have the Einsteins you can get up to 1/13,500 sec. (t.1). They have lots of duration information on their website.
Thanks John! I just want to clarify, the “flash duration” has to do with a setting on the light, not the shutter speed, correct? And I’ll check their website! Also, do you know the answer to the ISO question? Appreciate it!!
djl…
Yes, “flash duration” has to do with the capabilities of and setting on the light, not the shutter speed. Karl addresses this is great detail throughout several of his videos on this site. I am sure either he or his staff will chime in with a more concise reply when they get time.
Yes changing ISO from 100 to 200 equals 1-Stop difference?
AWESOME! I REALLY appreciate the reply. Hmm, not sure how I missed the flash duration. I’ll start reviewing. Thanks again!
Hi, please watch this chapter very carefully https://visualeducation.com/class/understanding-flash-duration/ then watch the one before it and the one after it, if you have any questions come back to me. Cheers Karl.
I just found that last night! Thanks for your patience. I somehow missed one of the initial sections. Thank you Karl!
NICE .. NICE Setup . , But this workshop need really professional gear such as lighting in good time duration , and more things , we need one workshop for who dont have such these level of pro.
Hi Mohafattal, at some point on any photoshoot or anything you need to have the right tools for the job. A dentist, a carpenter, a plumber etc none of them will be able to do their job properly. But there are different level of tools if you think about what you really need. For example in this shoot I was using the very best broncolor lighting but I could have also been using Siros lighting or even Godox lighting but to do this particular job I would have at least needed lighting with a fast flash duration otherwise it would not have been possible to freeze the action in the same way, although it could have still been a pleasing shot. If you watch some of my earlier paint splash product shoots you will see that some of those I managed to achieve with just speed-lites.
Incredible! Great all around module, from concept to execution! Love that chaotic blast at the end! 🙂
Thanks Peter.
could you put English subtitles please?
tks!
There will be soon. Our small team work hard to keep up with adding subtitles to all our courses.
Woooowwww!!!! What a show!! I loved the whole thing. The editing made it easier to watch and follow (well done Ben).
The final shot is superb.
Cheers from Buenos Aires.
Jorge.
Thank you.
Loved getting to see the set up on this. Great work.
Thanks Heulwyn, also don’t forget to send me your portfolio when ready 🙂
Quite brilliant! From Anna’s concept to Karl’s rig and lighting design; Tim’s hole cutting expertise (and always his camerawork) and with everyone else chipping in working to make a stunning shot. As I say. Quite brilliant!
Thanks Ted.
Such an amazing setup loved it. Thanks for this.
Thank you Sumit.
That was just out standing set up . lots of info and the final shot was great
thanks so much to you and your team very well done
looking forward to photoshop section
Thanks Frank
Hello Karl, did you check with Ben? Can’t wait for this to go live
Next Friday apparently 🙂
Cant wait for this one to go live. When can we expect this to be up Karl?
Very intriguing thumbnail.. looking forward..
Hi Karl, when can we expect this tutorial to go live?
I’ll check with Ben our video editor