

Flying Tea Food Shoot
Elevate your food photography with this deliciously creative class.
In this food photography class, you’ll learn how to create an eye-catching flying tea image. All it takes is a dash of knowledge, a pinch of ingenuity, and a healthy serving of creativity – plus two experienced professional instructors in the form of Karl Taylor and Anna Pustynnikova!
As Karl and Anna guide you through each stage of the planning, preparation and lighting, you’ll learn how to create your own version of this explosive and exciting photograph. You’ll learn about problem solving and creative thinking, how to control lighting and why fast flash duration is crucial when photographing flying objects.
In this class:
- How to photograph flying food shots
- How to use pre-visualisation as part of your planning
- Lighting setups for food photography
- How to suspend items for photography
- How to freeze motion using flash
To watch the retouching and editing process that followed the shoot, check out Flying Tea Post-Production.
Questions? Please post them in the comments section below.
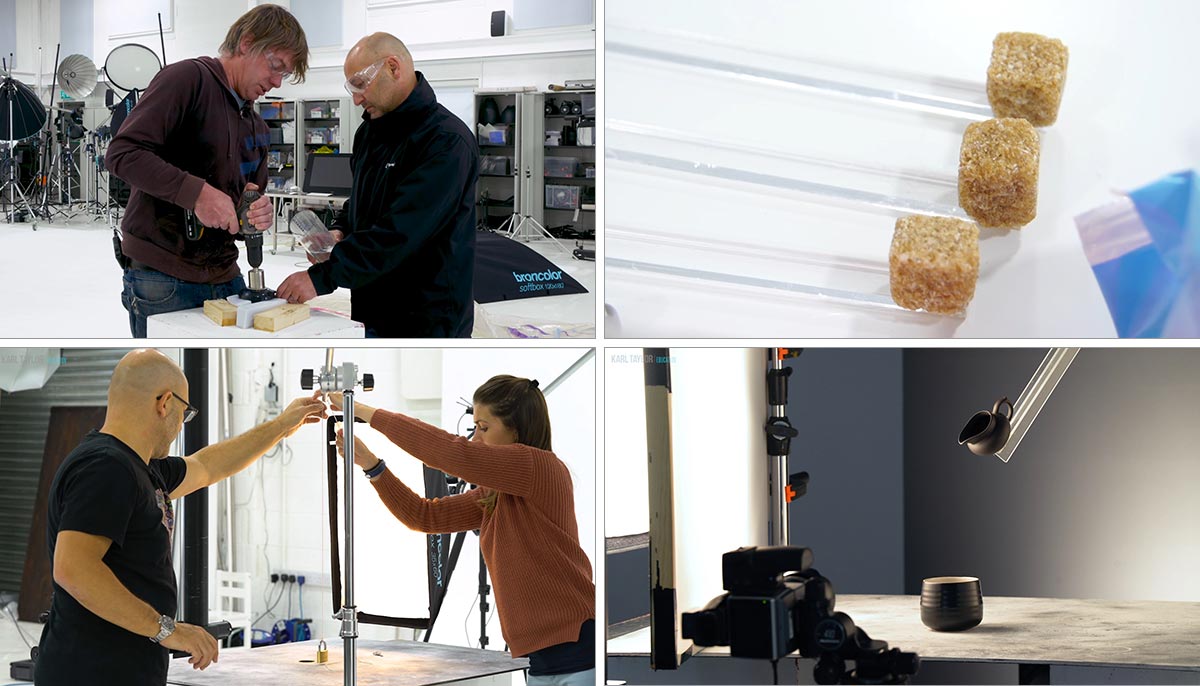
Photography often requires creativity and problem solving to realise your creative ideas.
Anna and Karl wanted to create an image of a cup with rose bud tea and sugar cubes exploding out of it and a floating milk jug above, pouring milk. Guided by Karl’s pre-visualisation, the pair were able to identify a number of challenges that they’d have to overcome to get the final result. These included:
- Create a realistic explosion of rose bud tea
- Include sugar cubes to add depth to explosion
- Create floating milk jug with pouring milk
- A lighting setup suitable for the cup, milk jug and exploding objects
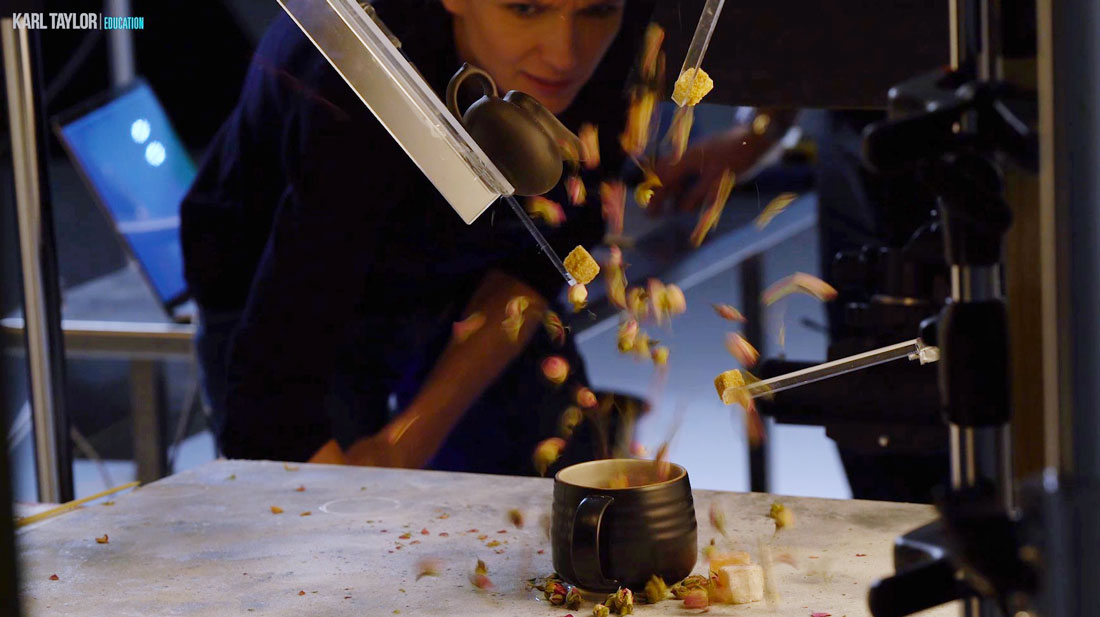
Freezing the fast moving rosebud tea was just one of the challenges Karl and Anna had to overcome.
Together, through a combination of DIY, acrylic rods and fast flash duration, they overcame each of these problems. The setup, although it looks complicated, required only four lights with simple modifiers.
In the end, this shoot proved that it is possible to bring any creative idea to life — all you need is careful planning and the right knowledge.

The final flying tea image.
Comments
I saw your YouTube episode of this and caused me sign up. Way beyond my skill levels but absolutely fascinating. I’m hooked!
Thanks for joining and I’m sure we’ll have plenty more content that you will enjoy across all levels. If you have any questions just let me know. Cheers Karl.
Of that I have no question! Just watched the perfume bottle in water… I’m a total beginner and the lighting concepts you’ve shown are just… eye opening
Thank you, glad you are enjoying them!
Hi Carl. Love this one so much!! Can you recommend a place that has props similar to what you were using to suspend the cubes in the air?
Thanks
Hi GDN, in the UK this is called clear acrylic, in other countries it is known as Plexiglass, Makralon, Perspex. It’s available in larger orders from Plastic manufactures or supply companies but the easiest place to get it from is Sign Service companies as many signs for companies door plates etc are made of this stuff and they have the cutting devices to cut to your size shape etc. I cover it and mention it in many of the other courses and all of the ones I’ve got are just cut to order. Cheers Karl.
Another fabulous tutorial. I watched the shoot and post processing and it is very inspiring.
My photography is improving with every tutorial. The next big step is to tackle photoshop. My PS skills are quite limited so I know how I will be spending my March and April lockdown time.
Thanks for another terrific session.
Thanks Derrick, my Photoshop for Photographers course is the place to start and nice and easy to follow. There are also some workalong files available to download to practise some elements simultaneously. After that course then move on to the ‘individual photoshop tools’ classes. Do not attempt the class with Viktor and I until you’ve completed the others and feel comfortable with PS. Cheers Karl.
Well… i ended this tutorial with a smile.
yes, the end was funny – when the all set messed. but later i was translate to my self in the head – what made me really enjoy this tutorial – it’s you Karl Taylor. you and your staff.
your abilty to explain everything in aunderstandable, clear, simple and pleasant way.
your patience and culm during all the process, and the good collaboration with other people surround you – makes the learning a good experience.
I just love watching your tutorials !!!
thank you very much.
Thank you so much for your kind words, much appreciated. I will also relay to the team. Cheers Karl.
I love the end results but I am surprised you use too many types of equipment. As beginner, I don’t have them. how I manage to control lights. please share your thoughts
Hi Muhammad, some shots do require a lot of kit and as you will see in many of our other food tutorials sometimes they only need one light. Many of our product tutorials where we use multiple lights I also try and explain how it can be simplified.
Very informative video. Thanks a lot
Thanks
Hello Karl,
I think the picture is really fantastic. I liked it so much that I tried to imitate it. I learned a lot from it. Thanks for that. You only realize what an enormous effort it is when you do it yourself.
Well, I don’t know about copyright law. Now I want to ask you if I can also publish my flying tea picture on my website, Instagram, etc.?
Best Regards.
André
Hi Devron, you can publish it on Instagram if you state it was inspired by ‘…………’ etc etc. Cheers.
All right. Thank you!
Classic Karl. Simple clear step by step instruction. Really love this tutorial. Great to see the problem solving. I often use a compressor with a sound trigger, find this works for me to make small incremental changes to the shutter release with my speed stuff. Beautifully elegant end image.
Very teachable lesson. Thanks a lot for sharing!
Thank you
Hey Karl, very funny episode to watch! What was the shutter speed on camera?
Hi Diego, I think it was 1/250th but remember the shutter speed has nothing to do with freezing the moving items in this type of shoot. That is all down to the fast duration of the flash – please see this chapter: https://visualeducation.com/class/understanding-flash-duration/
Hallo Karl, ich bin seit 1 Monate Mitglied bei Euch. Die Kurse sind einfach nur genial gemacht.Hier sieht man wirklich, dass alles sehr gut durchdacht und geplant ist.
Ich werde bei freier Zeit, mal versuchen dies nachzustellen.
Es ist sehr Schade, dass es keine deutschen Untertitel gibt.ich weiß das diese Extrem teuer sind, aber wenn ich alles verstehen würde, wäre es noch effektiver.
Ich freue mich auf jeden Fall, dass ich diese Plattform durch Zufall im Internet gefunden habe und jetzt dabei sein kann.
Ein rießiges Daumen hoch an dich und dein Team und natürlich auch an Anna, ihr seit Klasse.
Beste Grüße Maik
Thank you 🙂
I am so happy to be back to your courses! thank you!
You guys must just have the best job ever over there at KTE. Thanks to everyone there for making this possible for us. This is just getting better and better.
Cheers JC, we have some fun that’s for sure but crazy busy!
hi karl,
thank you for this very well made and really inspiring video! i will try to do a similar project soon. one question (as i can’t find those items in germany) : those white “studio blocks” where can you get them? selfmade or bought? and the t-shaped acrylic glass rod which holds the jug?
looking forward to more content like this, especially post in photoshop, too. thank you !
Hi, the blocks are selfmade (by a carpenter) from MDF and are painted. Some studio suppliers sell something similar. Acrylic rods made by plastic sign service company.
Great shoot and excellent team work. I enjoyed the step by step process of how this was done. if a scuba air tank cannot be accessed any other way of getting a blast of air or controlled air to do what was done?
Also since I use Profoto I’m assuming I would need to turn on HSS to increase the flash duration, is this correct?
Hi, thank you. Your first question has already been answered below in one of the other comments. For your second question yes you would need to switch to whichever mode gave you the fastest exposure time.