


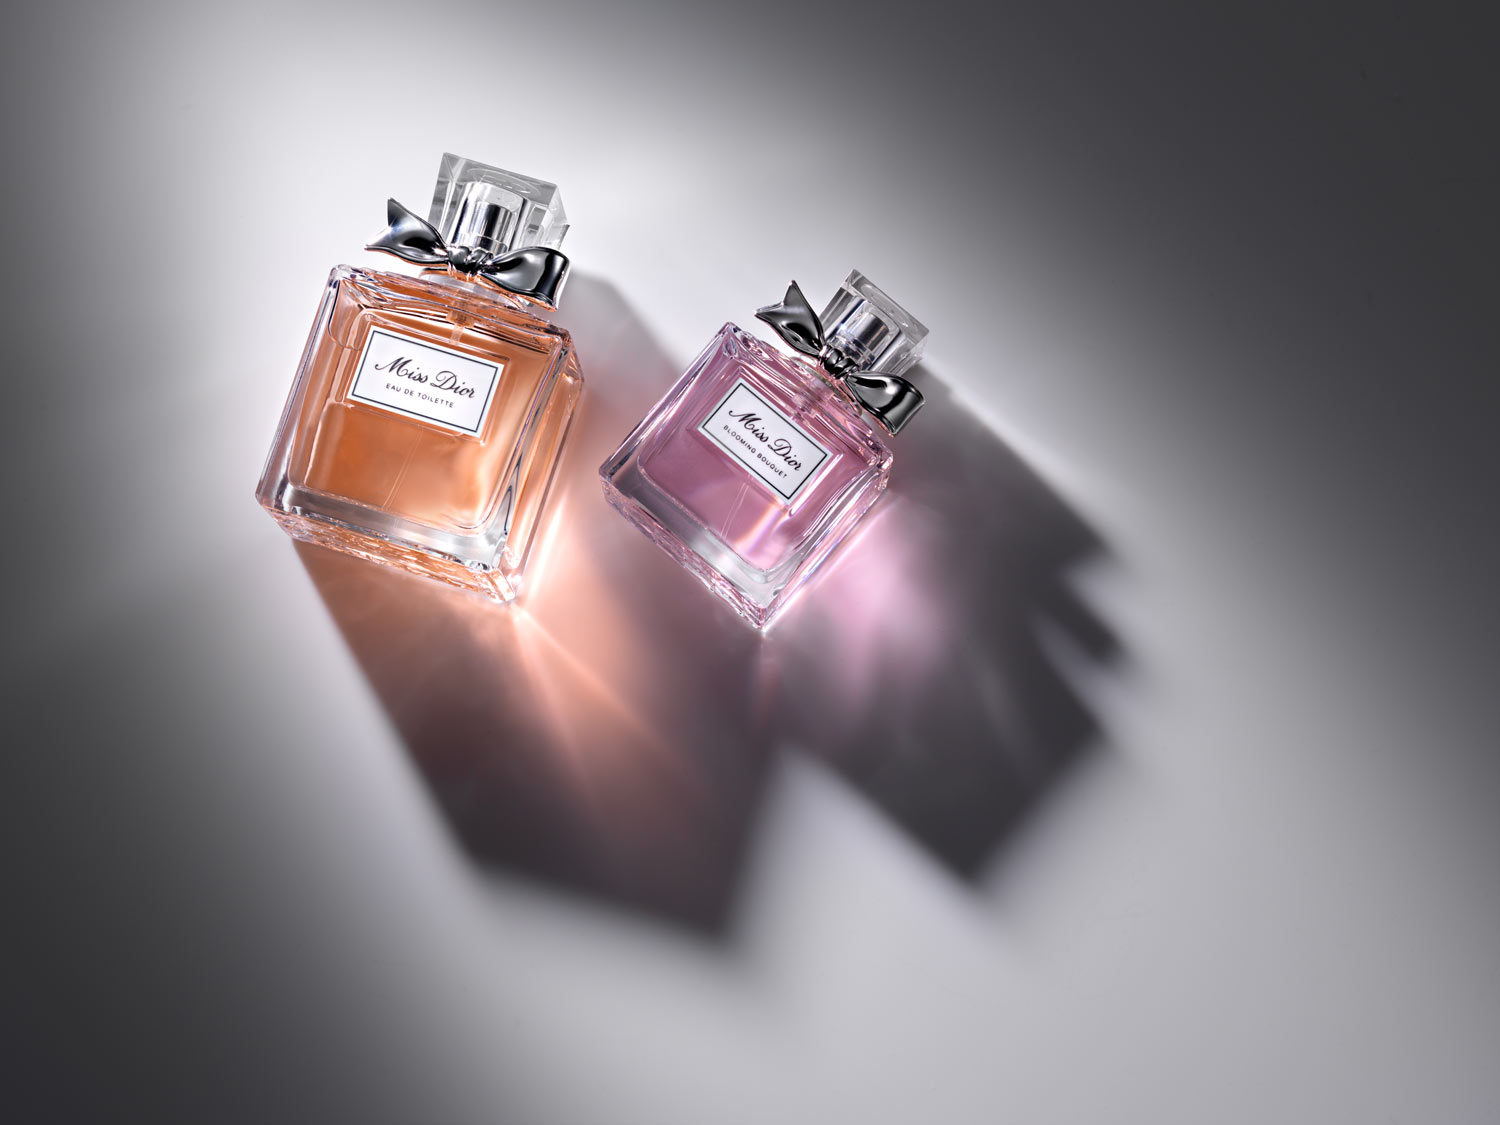
Dior Perfume Bottle Photography
In this product photography class, Karl uses refraction through two Dior perfume bottles to create this lovely fresh product image.
As he works, Karl highlights common problems – lighting the chrome details on the bottle, the transparent bottle tops and achieving the right amount of refraction.
This photography tutorial is an uncut version of from a “How To” video available on YouTube, but we believe our members should see every step of the process that went into capturing this luxurious shot.
Watch as Karl and Urs Recher tackle each challenge, clearly explaining and demonstrating the solution to each. At the end of the shoot, Karl experiments with a number of alternative lighting modifiers and shows how each produces a slightly different result.
In this class:
- Product photography: How to photograph perfume bottles
- How to create refraction
- How to photograph chrome objects
- How to photograph transparent objects
- Lighting modifier comparison and results
To see how Karl retouches this image, check out Dior Perfume Bottle Photography | Post-Production.
Comments
would there be benefit to use a grid with the snoot?
and would like to add – i don’t have a fresnel (have godox ad 400 pro flash and can´t find one) – what would you say is the best alternative? Thanks again
Hi, the best and most budget version of a fresnel would be a snoot with grid.
Hi, a grid with the snoot would narrow the beam but it would also lose some of the ability of the light to refract as sparkly through the bottles.
Hi Karl.
Wouldn’t solve the problem of the “ribbon” of caps using a reflector with a hole to take the picuture throuhgt it? Using it the shadows would be less hard, I know, but maybe the difference of the shadows do really worth this reflector instead than a double exposuere.
Hi, that is an option but it will also fill extra light back on to other areas of the product, I felt I had more control this way on this one. However the method you describe was used in this one https://visualeducation.com/class/clinique-style-advertising-photography-2/ where I wanted to have a version with the Chrome letters looking shiny silver.
Great work! In love with those colourful reflections! I struggle with them and can’t 100% understand what type of light better to use for such flash light effects inside objects shadows. Is it possible to get them with strobe light or it’s necessary to have continuous light for such purposes?
Thank you and your team for all classes!
Hi and thank you. Continuous light or flash it doesn’t matter, what matters is the modifier type on the light source.
thanks million Karl, I liked using Dulling spray to reduce refraction & that’s very good
Hey
Is the background surface matte frosted acrylic or gloss?
Thanks
Hi Pippin, this one was a white matt acrylic.
Hi Karl,
Regarding the silver tape you use on the lids, is it just normal silver duct tape or is it something more specialised?
Hi I think it was silver electrical tape. Most electric tape is black, white or red, brown, blue etc but there are also some interesting ones like this silver one too.
Hi Karl,
I’ve been trying to experiment with doing a refraction shot like that but on a gloss black background but can’t get it to work – I can get a reflection of the bottle but not the pass through light. Is it even possible or is the black too dark to show the refraction?
Hi Squiggle, it wouldn’t be possible on gloss black, you might get something on matt black.
wonderful technique, after few years of photography still I can see your videos for hours passionately. thanks dear Karl.
couldn’t you have done it with a snoot with a diffusor in front of it, to soften the light a bit?
Hi yes but it would have probably have spread the ‘beam’ of light to wide but this would depend on the size and distance of the snoot, also for the refraction to work through the bottles it is better with a harder light which the fresnel still provides
Thanks again. Learning a ton.
Hi Karl, yes it is. thanks
Great tutorial, very professional, thanks for that. Please Karl, can you spell for me the thing that sounds to me like FINAL…I am after the thing that you have used on your main light source. So it’s not the honeycomb, not the snoot, nor the grid….
Hi Luigi, I think you mean ‘Fresnel’ but if you can give me the time in the video I can double check.
what is dulling spray???? and where is it available? cheers mate..
Hi Mark, It is a photographers/filmakers effect spray, you should find it online from studio suppliers.
Great shot and techniques as ever. It is so good to hear the supportive banter between you both. And Oh! Dulling sprays. In the ‘old’ days before any compressed air sprays existed we still needed to dull some surfaces like glass, wood and metal. We used to dab fresh window putty to the area. It worked a treat. It was a little disconcerting however for a male actor to have a ball of putty rolled over their shiny pate to achieve the same effect. It wouldn’t do in today’s world would it Karl?
Ha Ha Ted, I’ll keep the ball of putty trick in mind for my own head! 🙂
I see Picolites on the horizon!