
02. What Is Exposure in Photography?
When it comes to photography, ‘exposure’ is a term you’ll hear often. Quite simply, exposure refers to the brightness or darkness level of an image.
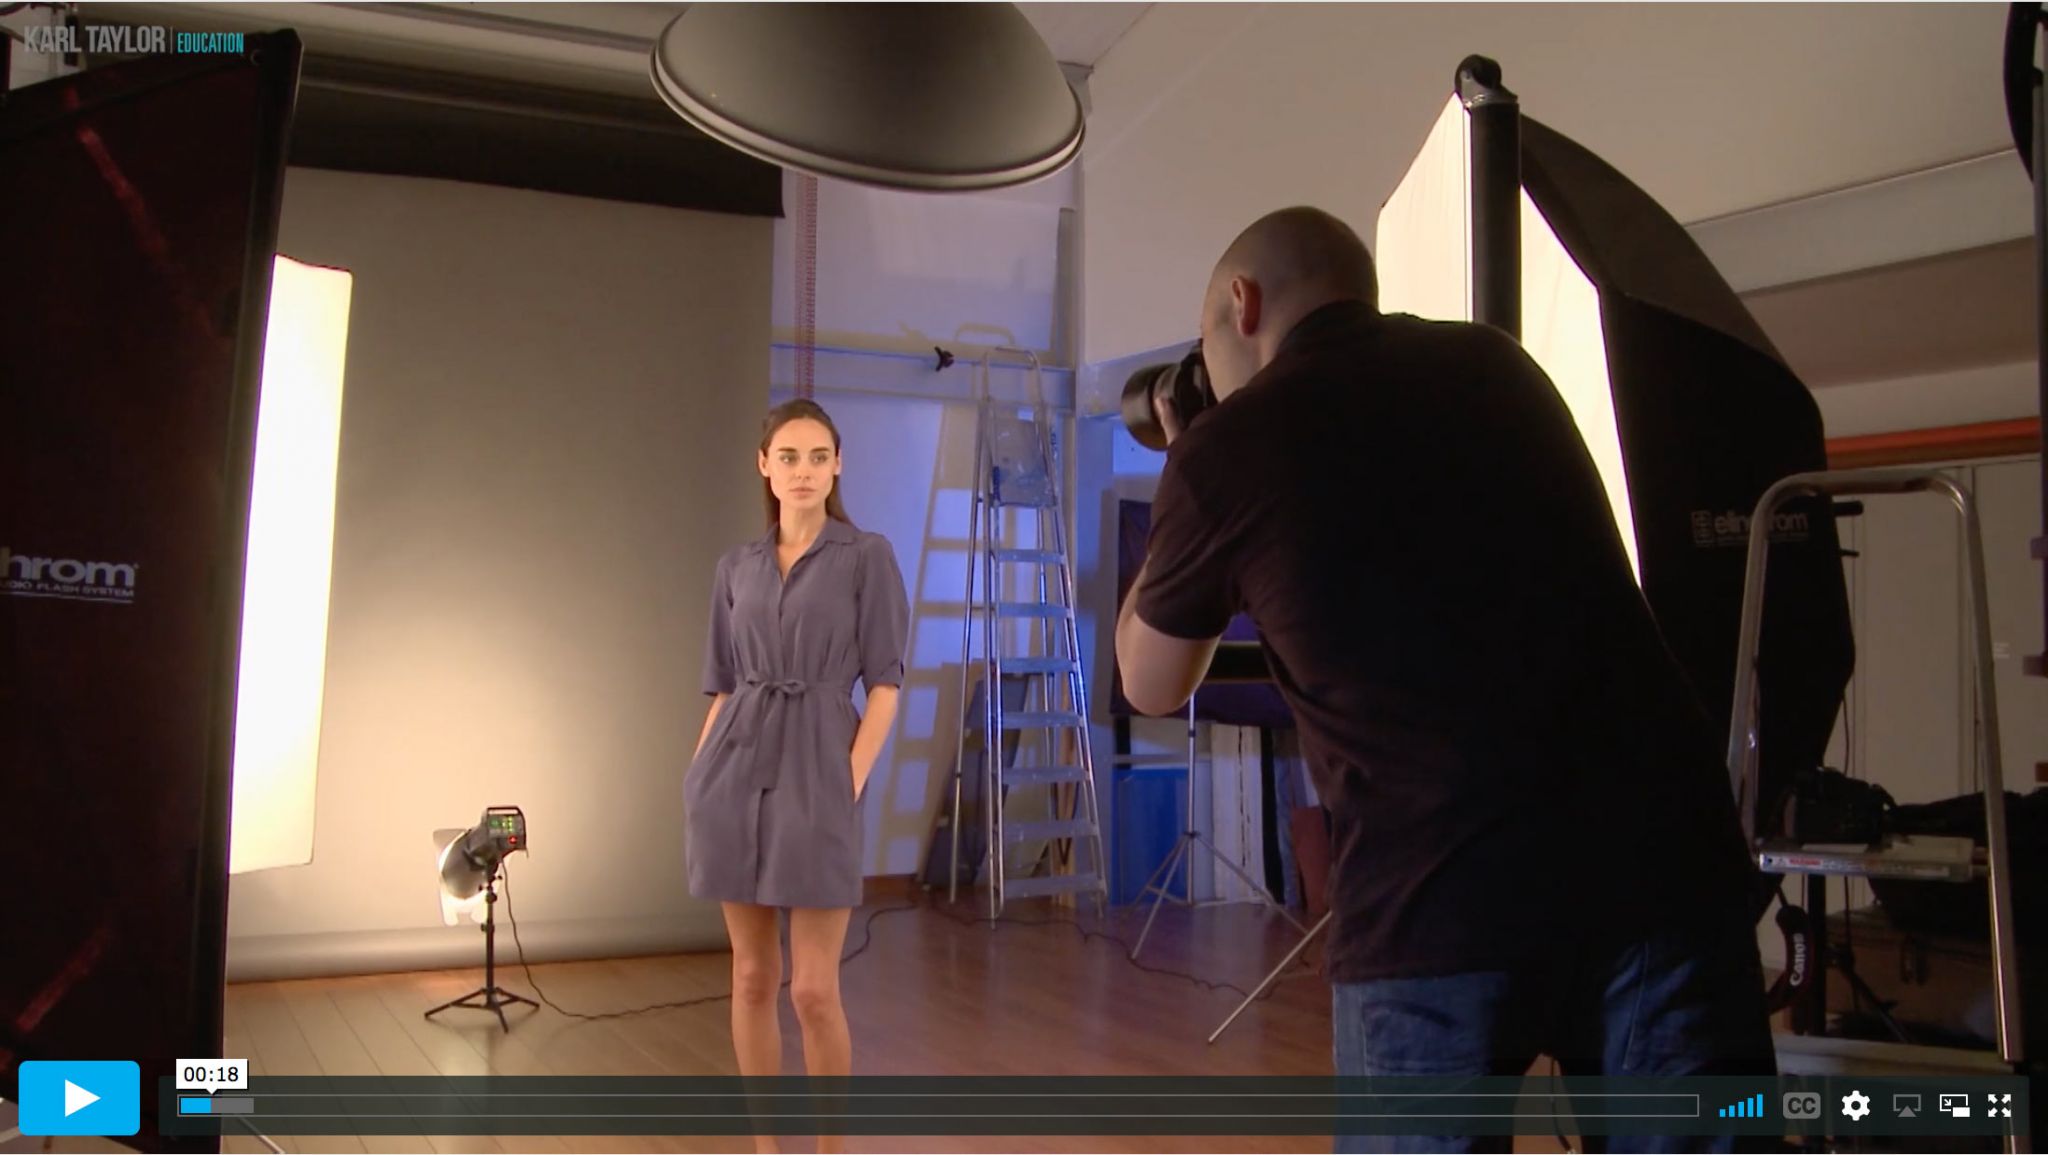
We can control the exposure of an image using the two main mechanical functions of a camera: shutter speed and aperture. Using these two functions, either individually or in combination, allows us to control the amount of light that reaches the sensor to record an image, as you see me demonstrate in this video.
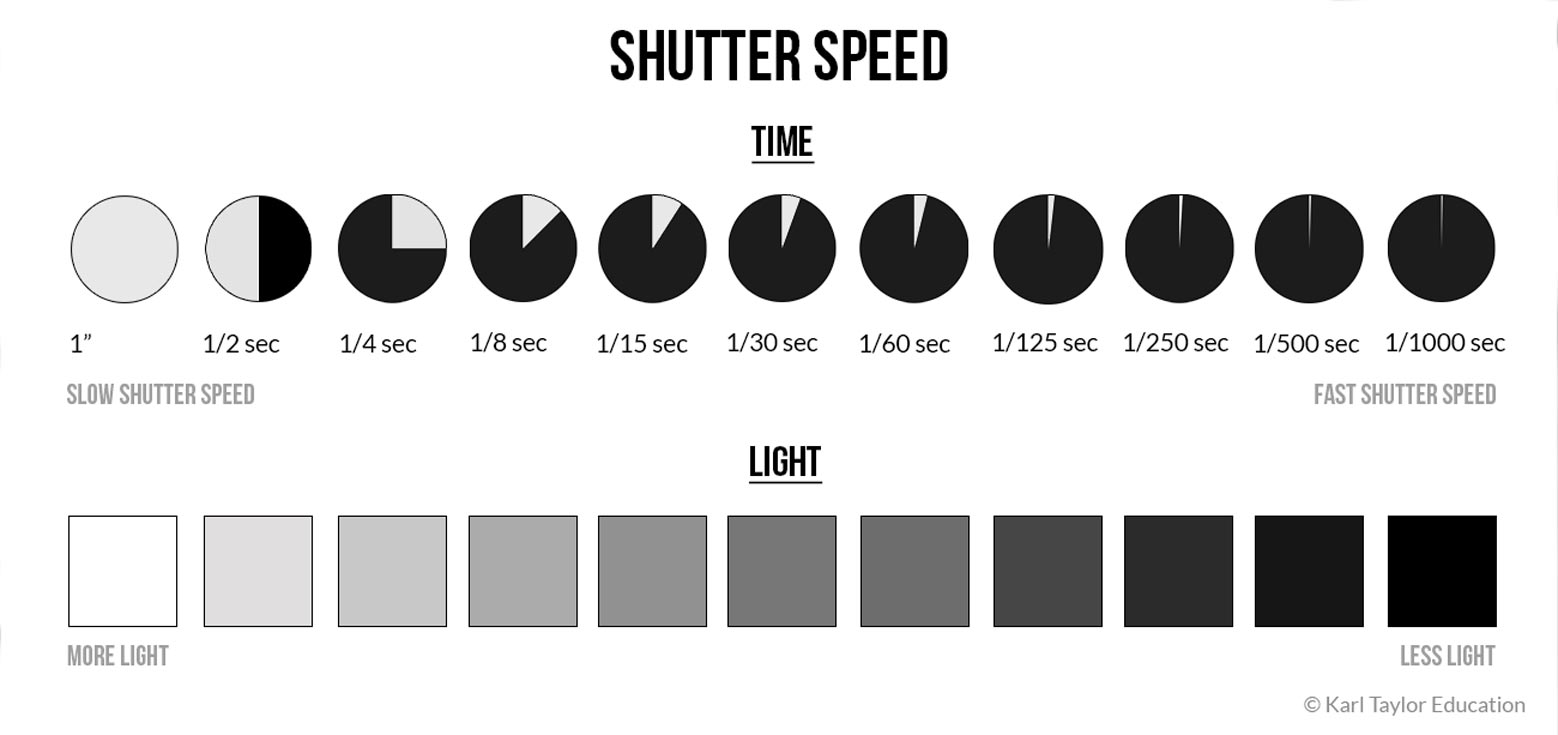
Shutter speed
Shutter speed refers to the length of time the shutter remains open when recording an image. The slower the shutter speed, the longer the shutter stays open, allowing more light to reach the recording medium. Faster shutter speeds mean the shutter stays open for a shorter duration and less light is recorded.
Aperture
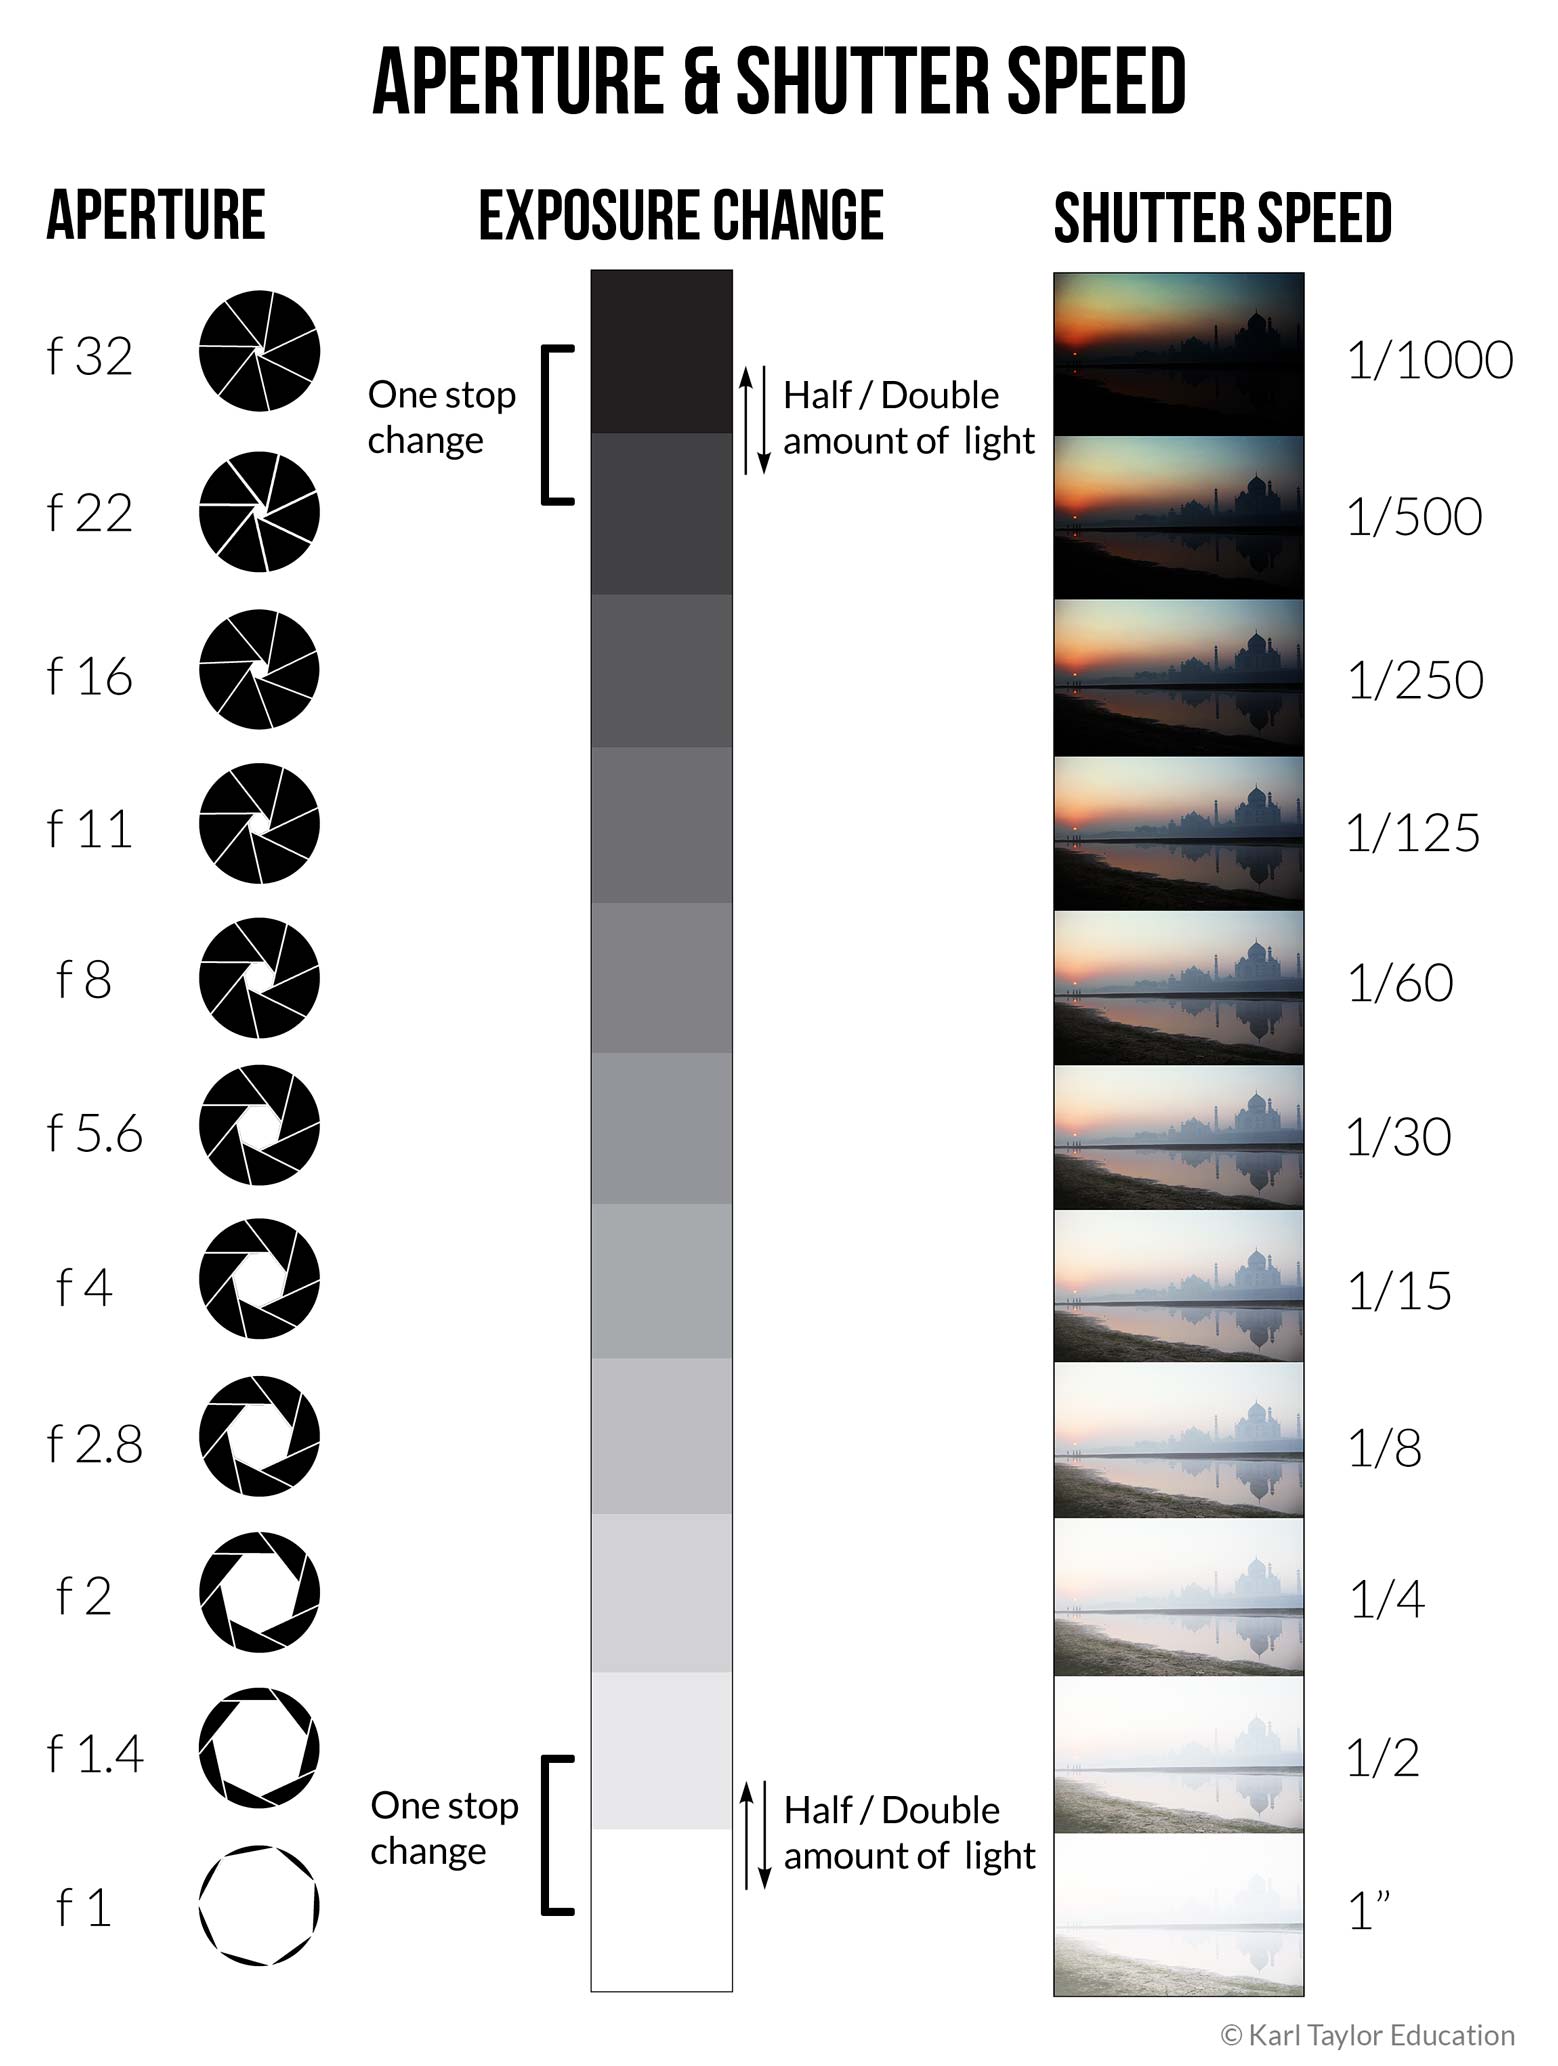
Aperture refers to the opening in a lens through which light passes before reaching the recording medium. The greater the size of the hole, the more light passes through, and vice versa. Aperture is recorded in f-stops and shown as f1.2, f5.6, f16 etc. The lower the number, the larger the aperture and the more light that can be recorded.
To correctly expose an image, you need to find a balance between both shutter speed and aperture, which you can do by using your camera in Manual mode while referring to the built in light meter (as you would have seen in the video above).
We can add or subtract stops of light by changing the aperture or shutter speed. A change in any setting that doubles or halves the amount of recorded light is known as a one stop change. For example, a change from 1/125 to 1/250 will decrease the exposure by one stop. Opening the aperture from f16 to f8 will result in a two-stop increase.
By controlling these settings yourself using Manual mode, you’ll have the greatest amount of control over what your final image looks like.
The exposure seesaw
When it comes to adjusting your settings, try to think about exposure as a seesaw. If you change either shutter speed or aperture, the other will have to be adjusted accordingly to maintain that balance. For example, if you increased your shutter speed by two stops, you would have to open your aperture by the same amount.

Let’s take an example of photographing on a hazy day, where the correct exposure is at 1/125, f8. This is equal to 1/250, f5.6, because the shutter speed has been increased by one stop, but the aperture has also been opened by the same amount. The faster shutter speed cuts out more light, but the larger aperture allows in more light. This ensures the exposure remains the same.
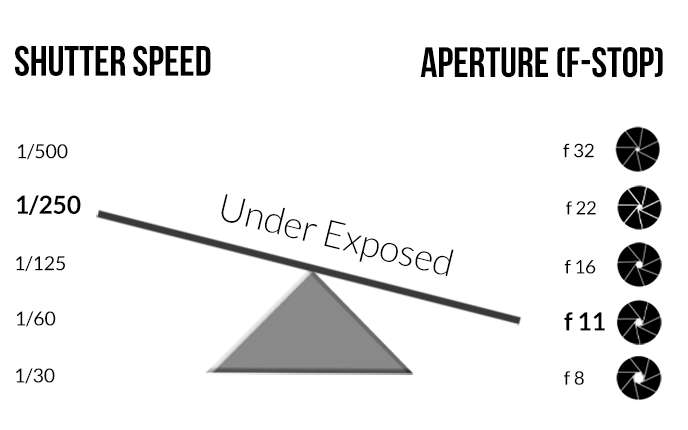
In the same conditions, the combination of 1/250, f11 would result in an underexposed image. This is because the shutter speed has been increased by one stop and the aperture has been closed by one stop. Both changes result in a reduction of one stop of light each, darkening the image by two stops in total.
To maintain the correct exposure, if the shutter speed was increased by one stop, the aperture should have been opened by one stop.
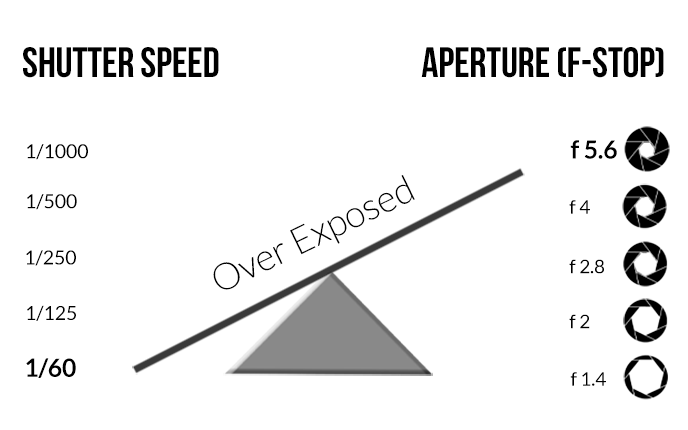
Also in the same conditions, the combination of 1/60, f5.6 would result in an overexposed image. This is because the shutter speed has been slowed by one stop and the aperture has been opened by one stop. Both of these changes allow for more light and result in an overall two-stop increase in exposure.
To maintain the correct exposure, if the shutter speed was decreased by one stop, the aperture should have been closed by one stop.
Determining the correct exposure
Once you’ve understood aperture, shutter speed and one-stop changes, the next thing to understand is how to get the right exposure. This is a question that comes up a lot and is something many photographers struggle with.
There are a couple of technical ways that can help guide you with achieving the best exposure, but essentially you should determine exposure based on the creative look you’re going for.
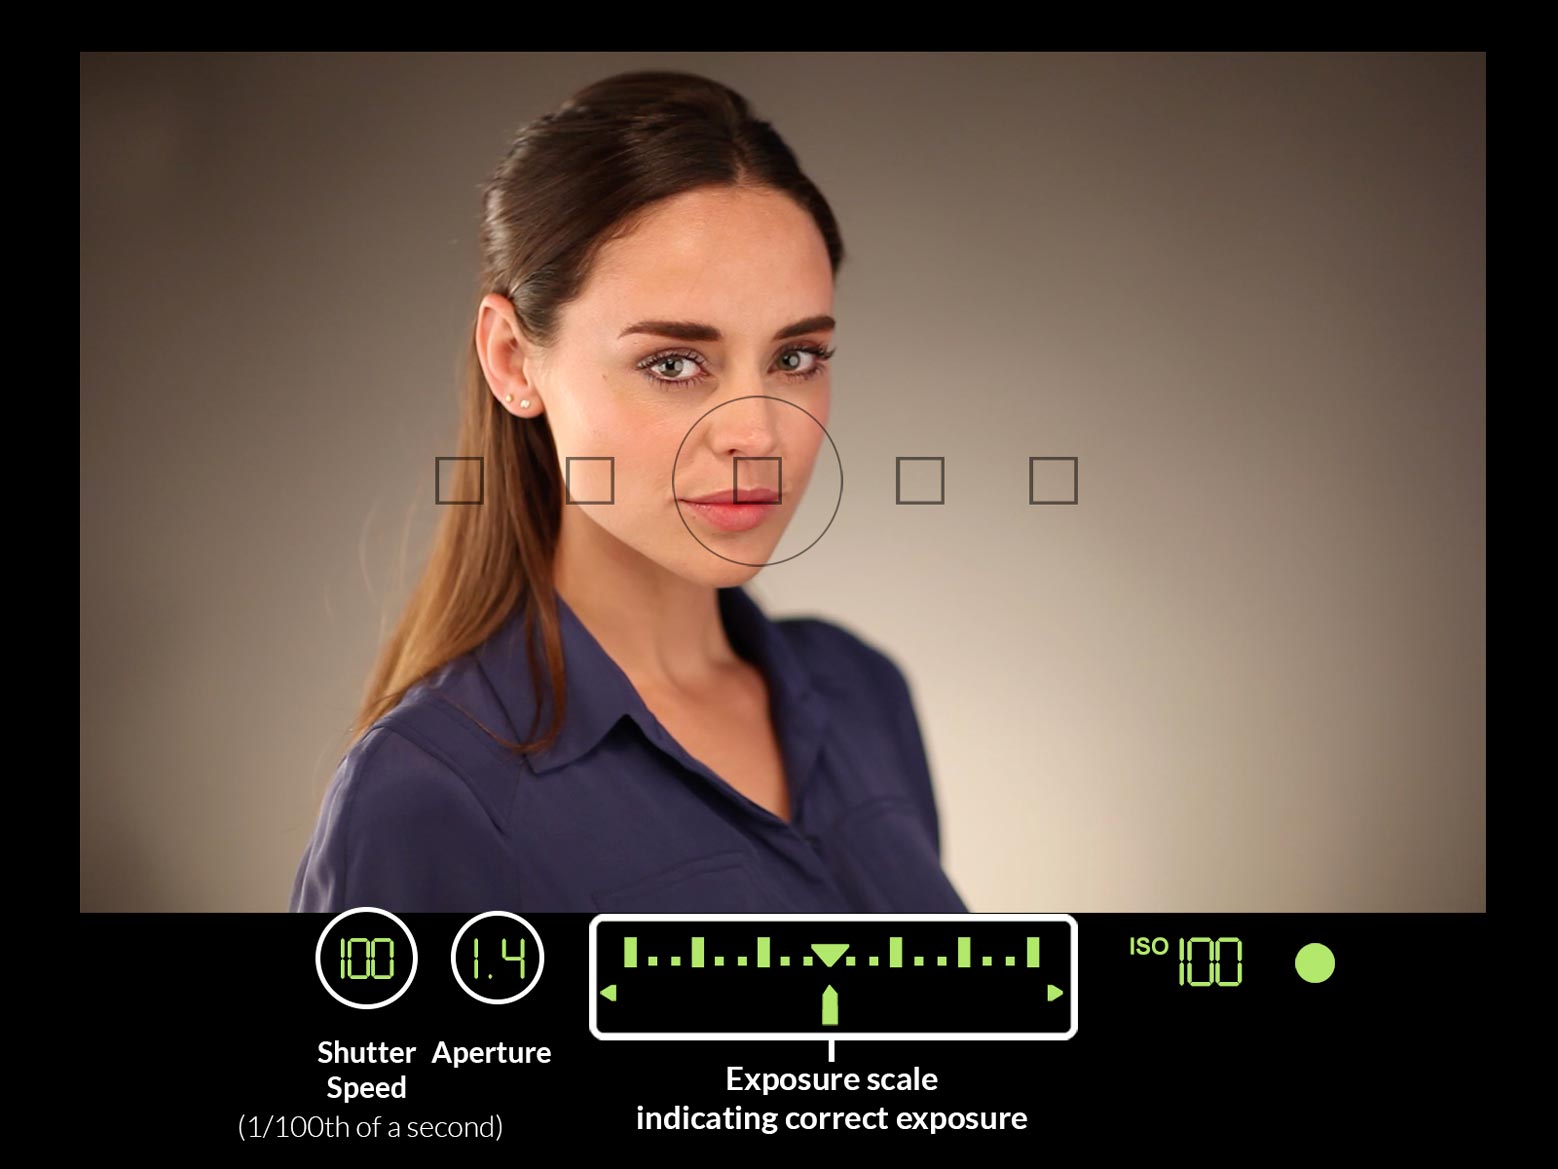
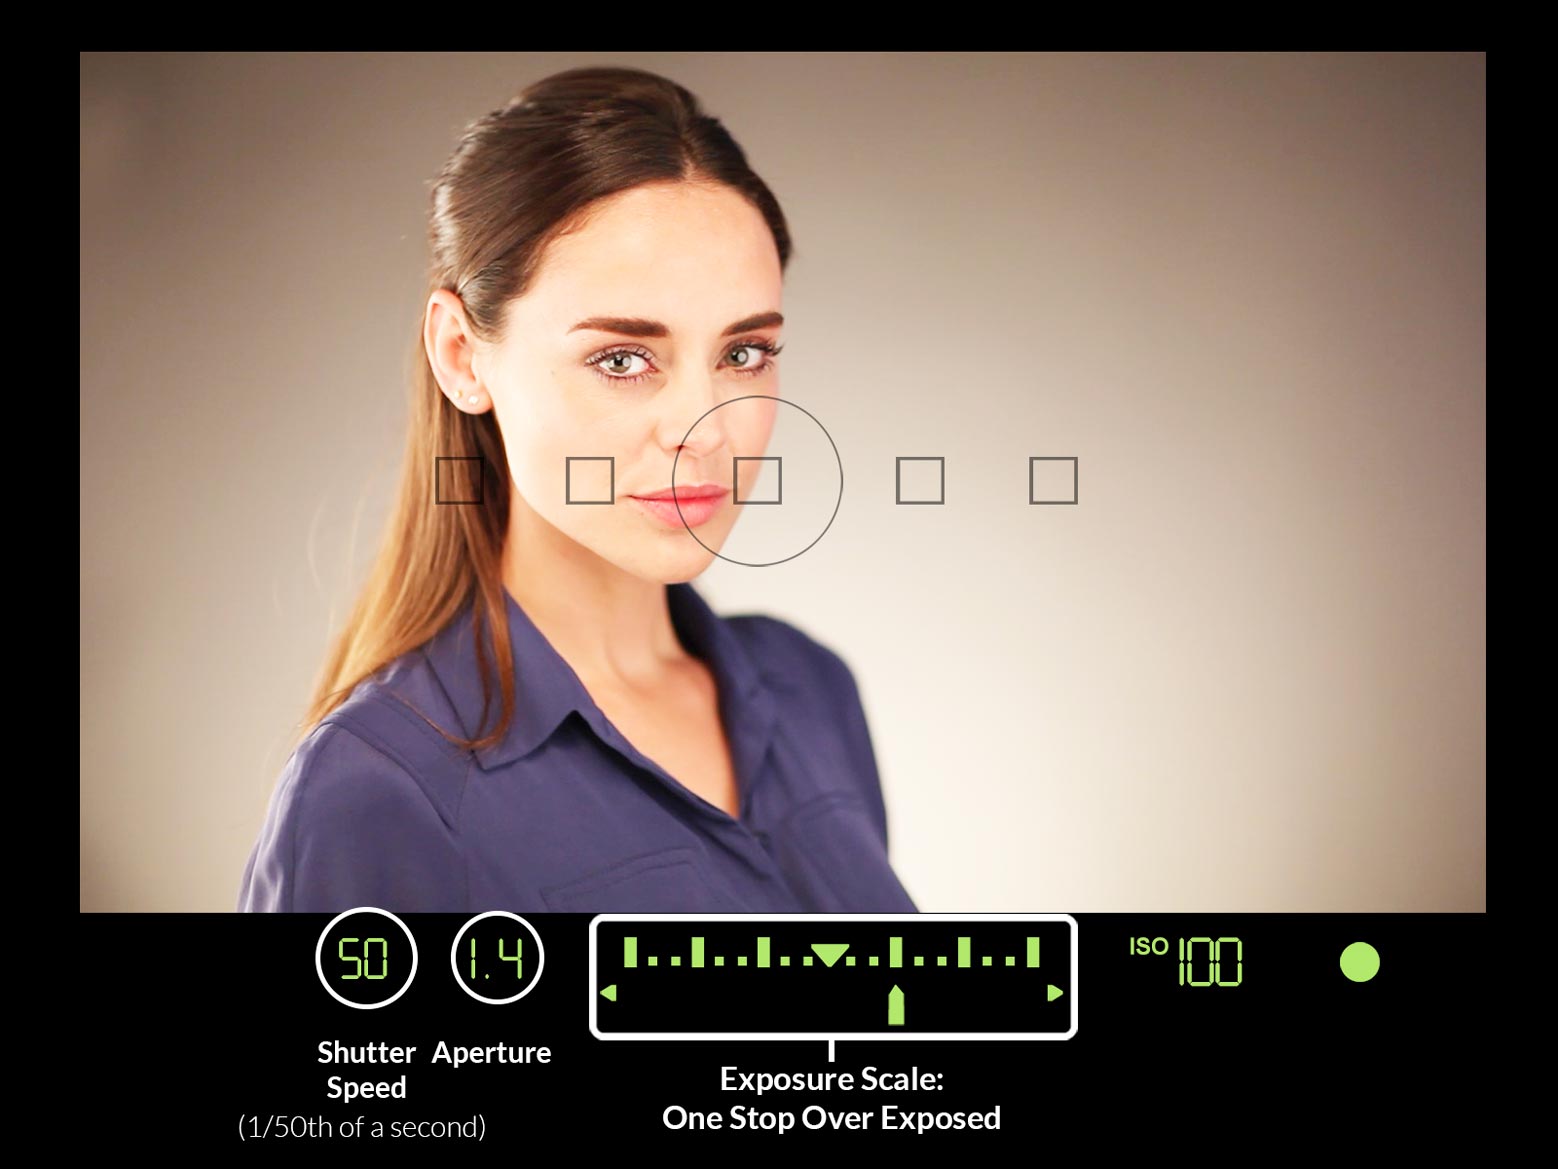
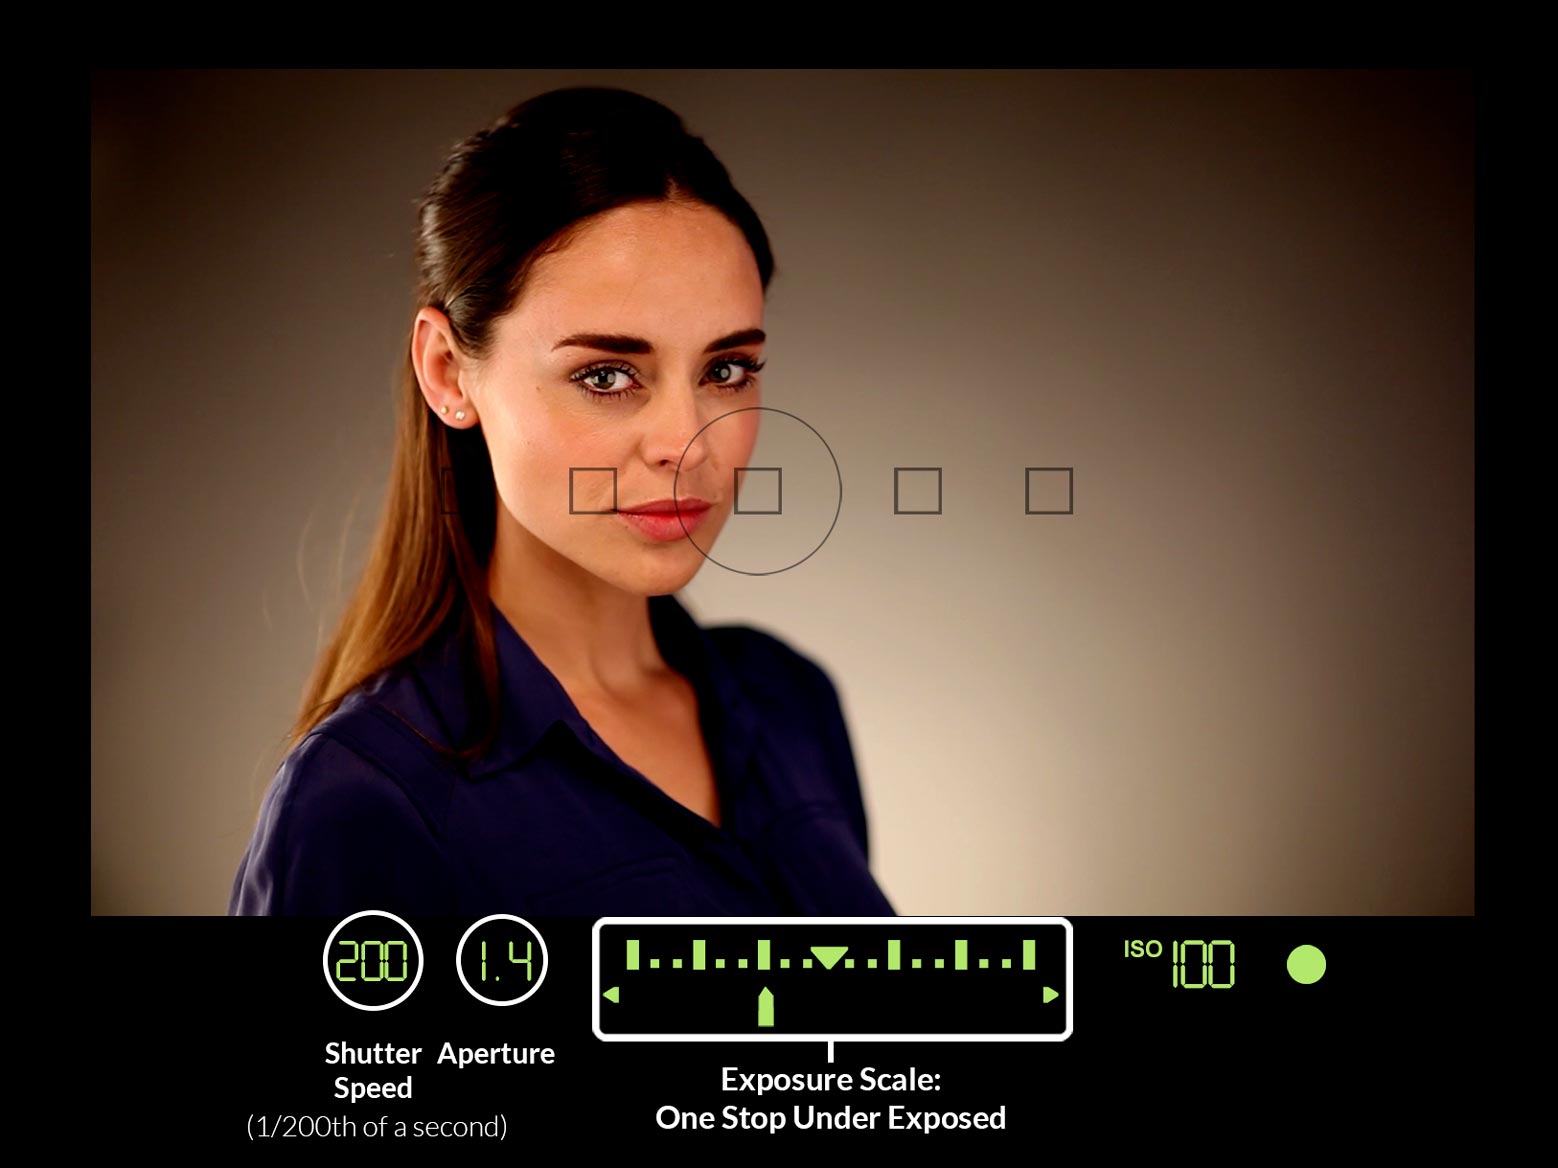
One of the features you can use to help you is your camera’s built in light meter, which you can see through your viewfinder. Most cameras have a meter from -3 to +3 stops, with 0 indicating the ‘correct’ exposure (this is according to your camera). Anything to the left of 0 (in the minus) is considered to be under-exposed and anything to the right (in the plus) is considered to be over-exposed.
Light meters in different camera brands can look slightly different, but essentially they all tell you the same thing. For more examples of in-camera light meters, please see the complimentary e-book.
The histogram is another way to judge exposure, but unlike your camera’s light meter, you can only use this after you’ve taken your picture. A well exposed image will have a histogram that is evenly spread from edge to edge without any gaps. The left side of the histogram represents the blacks and shadows in an image and the right side represents the whites and highlights.
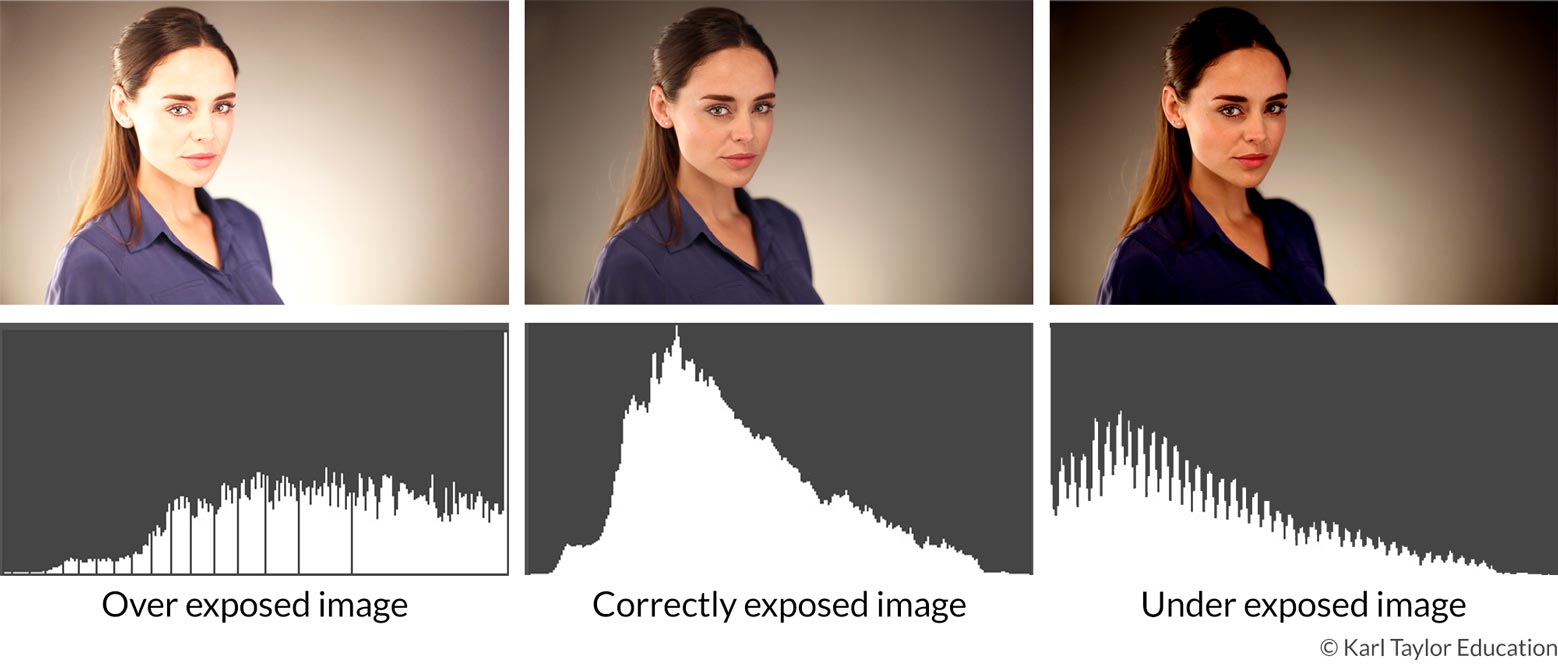
You can view the histogram for an image on your camera or in photo editing software.
Here you can see a histogram on the back of a camera.
It is important that you don’t get too caught up in what your light meter or histogram are telling you as often the scene you’re photographing can confuse your camera. For example, your camera might think a shot of a white cat in the snow is overexposed and overcompensate until you have a grey cat on grey snow, the same way it might also struggle with something like a black dog on a black blanket and try to increase the exposure until you have a grey dog and grey blanket.
Remember that it’s your image and you should make the creative decisions, not the camera. Over time, with practice, you’ll be able to better judge what exposure you want and how to achieve it.
All content © Copyright Karl Taylor Education.
Get the e-book!
Introduction To Photography
To get your copy of this 90 page e-book click the download button below.
Comments
So my lens won’t go to f1.4 so how do I compensate for that?
Hi Brian, different lenses have different maximum apertures. As you progress through this course you will realise there are two other ways to compensate for the exposure other than the aperture; shutter speed and ISO. Give me a shout again at the end of this course if you still have any questions. Regards Karl.
Hey Karl i just bought a nikon D3100 so i’m starting.
I have one question, when i’m shooting can I trust the light-meter?
Thanks, Cheers from Paris !
Hi Filipe, you trust it to get your test shots and get you in the ball park and then you look at the results on the screen in combination with the histogram and then make a decision from there in manual mode on where you would like the picture to go. You will learn more on this as you progress through our courses.
Hi Karl, Brand new subscriber to your site and liking what I’ve found so far. I am going to work through all the videos, but is there one that specifically addresses effective use of the histogram to judge exposure? Just getting started so forgive me if the questions seems impatient…:). Regards, RJ
Hi Rory, thanks for joining us. You will find various information on this in a number of chapters but you may find this free video I did for Youtube useful as a basic guide to histograms https://youtu.be/DfQM7nZ2IN4 cheers Karl.
Hi Karl and thanks. Your unbridled passion is what sold me on joining. It is my plan to learn and grow.
Thanks Eric.
Great video-I cant help thinking that in this tutorial the image that you state is the ‘correct’ exposure to my eyes looks a little bright, whereas the image taken at 1/200 looks a little more moody and natural. What are you deeming a correct exposure here? What you go for as a photographer, the light meter reading or a histogram reading?
Thanks, Mike
Hi Michael, if i’m not shooting tethered (which is not often in the studio) then i’d look at the histogram in combination with the image on screen, that would allow me to interpret the histogram in correlation with the image. When I shoot tethered then I’m linked to a properly calibrated monitor and can trust what I’m seeing as well as take measurements of RGB values from key points on the image.
Hi Karl, I am kind of brand new in photography, even I have been passionate about it all my life. My question is, how do you know when is the right exposure, is there any way besides having a light meter, does the histogram will help? cause if you use a 1/125 won’t make a big difference but how you will know 1/100 is the right one? hope I explain myself. Thanks
its more about what you are trying to achieve rather than a set exposure, Karl always just takes a shot, looks at it and then adjusts the exposure to what he wants it to be
Hi Luz, the look and feel of the picture has a lot do with it. Does it look how you wanted it too? If not why not? What is causing it not to look like that? The second thing is the Historgram that can give you a lot of factual information based on the expected content of the image, you will find more information on Histograms in another module. Cheers Karl.
Karl, I have been a professional photographer for over 20yrs and this was the best translation of exposure using film camera vs. digital regarding exposure I have every seen! Very well explained! Thank you!
Thank you Bruce.
You mention using the in-camera meter as a way to get the exposure right. I often find, though, that taking a picture at the zero point ends up in an overexposure (i.e., with lots of blown highlights), so I’ve been taking my shots slightly “underexposed” (according to the camera), but which have less overblown highlights. Would be interested in your comments on this.
Hi David, I only ever use the camera’s light-meter to get it in the ballpark, after that it’s manual decisions all the way by looking at the preview image and the histogram. Cheers Karl.
Hi Karl,what are the setting for this shot?
Hi Edward you can see the settings for each shot on the back of the camera and in the simulated viewfinder for each shot.
Hi Karl, at one point in the video I see you are using “AI servo mode” on the older DSLR.
Would that be your preferred choice over “One Shot AF” in this kind of portrait situation?
Thanks!
Hi Dirk, I actually mostly use manual focus as that was what I was use to from the ‘old’ days before digital! Then I’d say I use one shot AF and only servo if the subject is moving towards or away at a manageable speed.
At 0.24 the Tilting movement, what is it for?? Is it focusing center to the eye with “One Shot AF” then move back to the center of the image and take the shot?
Hi Michael, yes although on many modern cameras you can select a focus point off to one side instead. Some now I think even have eye recognition to know where you are looking.
Karl…..you just clear that big mystery on the f-stops and speed for me in 15mins than many many hours on youtube and bloggers. I am SO GLAD I signed up!
You are a genius!
Shane
Thank you Shane.
You are brilliant , i have seen 100ds of hours of toutourals on youtube and this is the clearest of the bacics. thanks Karl.
Thanks Agnar
I am so glad I joined … I love the way you teach!
Thank you Bridget
Karl hi where is the new course you was saying about it I am still new so please let me know how to start thx sr I want to learn from you as much as I can thx teacher.
Hi Gabriel, our newest course is Light Source, you can find it under the portrait tab at the top, if its the latest live show Karl was talking about, you can find that by clicking the live button at the top of the site and then scroll down to the archived shows, hope this helps
Hi Gabriel, our new course on portrait photography with studio lighting is on the ‘portrait’ page. There is also a course on natural light portraiture there too. This link may also help you decide on where to go first https://visualeducation.com/how-to-use-our-courses/ Thanks Karl.
Karl, can I please ask you what’s the best practical video camera you would recommend for behind the scene shooting …?
Hi Tony, we use the Sony Rx100 mk3 but there are new models out since. I like this camera because it has great video quality and is quick and easy to get out the bag and has a flip up screen for selfie behind the scenes video too.