

Whisky Product Shoot
You can take pro-quality bottle shots – and here’s the proof…
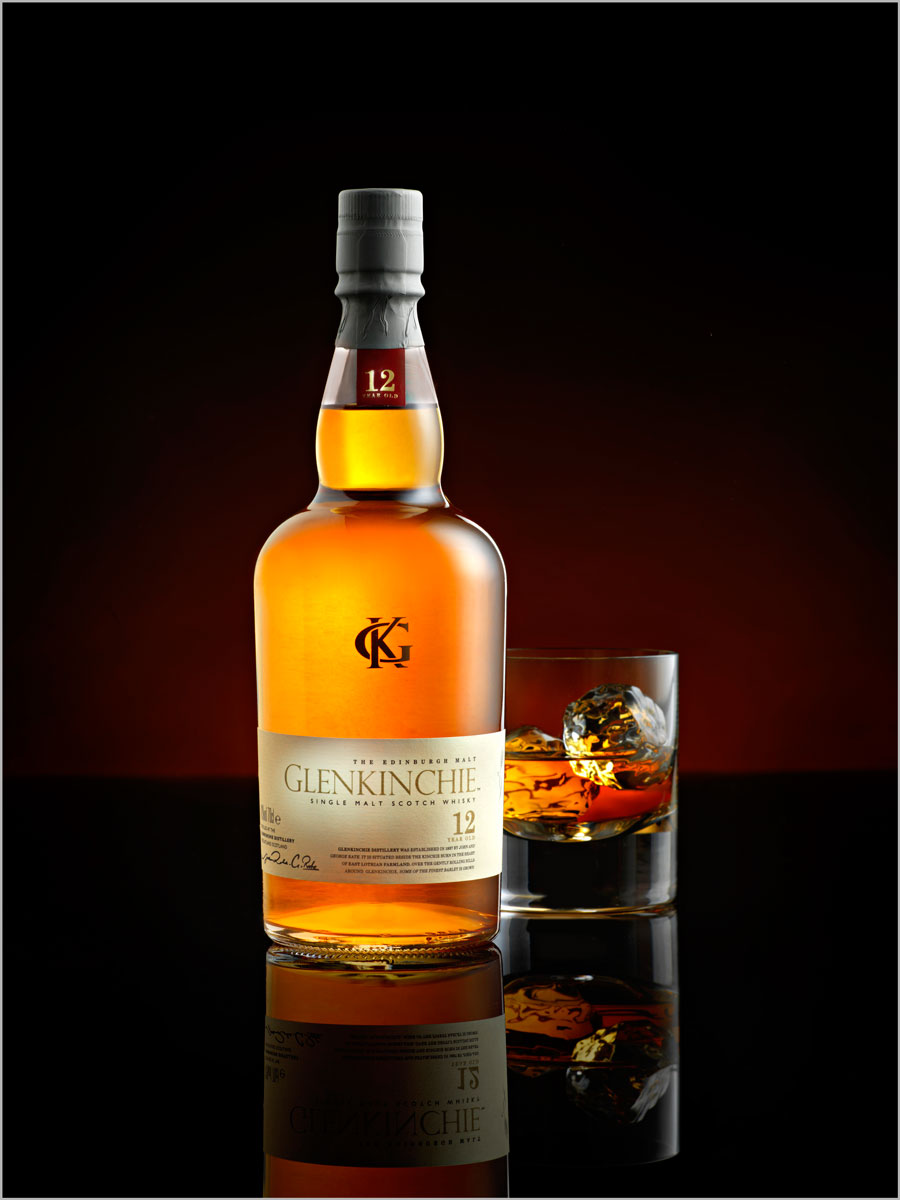
Glass bottles present a challenge for photographers. But they can be key to successful advertising and product photography careers. The techniques for shooting glass and liquids require a certain discipline and knowledge that, once acquired, will help you understand a variety of other similarly difficult lighting situations.
In this class, Karl outlines the most important things to consider when shooting these subjects, including the lighting on the bottle, the vibrancy of the liquid, and what glass and ice cubes to use.
He also explains why and how to use gradient lighting, how to control reflections in glass, and how to light details like the label.
In this class:
- How to photograph glass bottles
- Lighting setups for beverage photography
- How to create gradient lighting
- Controlling reflections in glass surfaces
- Techniques for lighting liquids
To see how Karl retouches this image, check out Whisky Product Retouching.
If you enjoy this class, you might also like to watch Whisky Photography.
Questions? Please post them in the comments section below.
© Karl Taylor
Comments
Just signed up and went straight for this video… What can I say? Absoluteley brilliant!
Thank you Thomas. However I would recommend watching the modules in the numbered order as they are designed to pick up bits of information along the way as you progress through. Also do not discount the first 15 modules of the Portrait Lighting section as these have proved invaluable even for product photographers.
Great tutorial with valuable information. I really liked this one. It was interesting to see the part with the reflected light trough the bottle. I wouldn’t have guessed that you would go through the trouble of cutting it to size.
Hi Karl,
What did you use for the liquid in the glass, given that the whiskey bottle is closed. ?
If your shooting products like like this is it typical to get several bottles so that the actual product can be used or is using a fake substitute the norm ?
Thanks,
Niall
Hi Niall, I just use the cheaper stuff in the glass, but if I was shooting it for a client they would send several bottles so I would put their product in the glass.
Hi Karl, thanks for the video, more involved than I thought, certainly learned a lot.
Did you say you added light to a black background? I ask because I have a small home studio with very limited space and wanted to get a nice subtle background glow, but struggle to reduce the light on my mid grey background. Also, because of the lack of space, reducing spill is a little more challenging so I tend to use grids on everything – quite successfully.
Do you think a black background could be used to better effect to counter these issues?
Hi Andrew, yes adding coloured light on black paper backgrounds can work well, you get very rich saturated colour that falls away quickly.
Fabulous !
Thank you Karl.
Fantastic tutorial Karl! You are providing solid value here and I’m already considering this one of the best investments for 2018. Thanks!
Thanks Jeremy.
I am loving these types of tutorials. . Love the comment about maybe being on the 2nd bottle. That was funny.
Hello Karl, used another free tutorial you had up on youtube. This was before you started this education platform. I love how “wealthy” (is that the right word?) your image looks. I think the red-velvet accent background light really works.
I had a stab at this when I had room to do the setup. Once again this was accomplished with three lights and reflectors.
https://flic.kr/p/UsxXNu
Just joined these tutorials and I’m very glad for my choice. As usual you, Karl, are very clear and your expertise in light managing, I’m sure will be extremely helpful for me. Thanks.
Thank you for the tutorial Karl.
I was wondering exactly where you got the textured ice cubes from. You mentioned it was a US based company but you weren’t very specific. I found some from Amazon but they’re not nicely textured like the ones you used.
Hi Kevin, try https://www.fakeplasticicecubes.com/
I’ve already found this company on internet, but unfortunately they don’t dispatch those cubes to Malaysia. I had to made do with a local supplier whose products are much less realistic…..
Thank you Karl for the great tutorial. I have had very good success after watching the video. Just fyi; I was able to purchase a duel fiber optic machine from a medical supply company for less than $200. It worked perfectly. I was able to light the label and reflector card at the same time. The fiber optic cables are 24″ (61cm) and will hole any position you put it. The dimmer control allows you to add or subtract light as you need. I just wanted to post this as an option to very pricey fiber optics. Thank you again: your educational programs are golden to me and The value I get is amazing for the subscription cost.
Hi Don, wow that medical fibre optic sounds great and like you say considerably less expensive too. Are you able to transmit a burst of flash down it or is it continuous light?
Hi Karl,
It is continuous light but it has a dimmer which allow light adjustment as I need.
I’m guessing it’s going to be tungsten balanced colour temperature, so you may need to put a blue gel on it if you want to use it in combination with flash unless of course the rest of your lighting is also tungsten. You may even find you can access with the projection lamp is an direct a studio light or speedlite at that point if you wanted flash, it should still fire down the fibre optic OK.
Wow! Amazing! This is much much harder than taking pictures of people. No kidding.
Hi Karl
What type of fibre optic cable is that and do you remember where you sourced it? I’m having mixed success with home made snoots and the optical snoots are either very expensive or dubious quality.
Cheers Layt
Hi Layton, these were actually some fibre optics that I picked up second hand from a shop display store and modified. I’ve also purchases second hand ones from medical supplies. I’d expect you could find something on ebay. To be hones I don’t think they are the best option anymore unless you need to get a small light up inside a product. I much prefer the picolites with the projection attachments as I can create and control the same look more easily but as you say some of these can be expensive.
Great tutorial Karl loved the information.
One thing i thought was should the bottle be opened as you had whiskey in the glass?
Hi Mark, It’s common in advertising shots to have the bottle closed simply to keep it looking tidy. You could be on your second bottle after all 😉