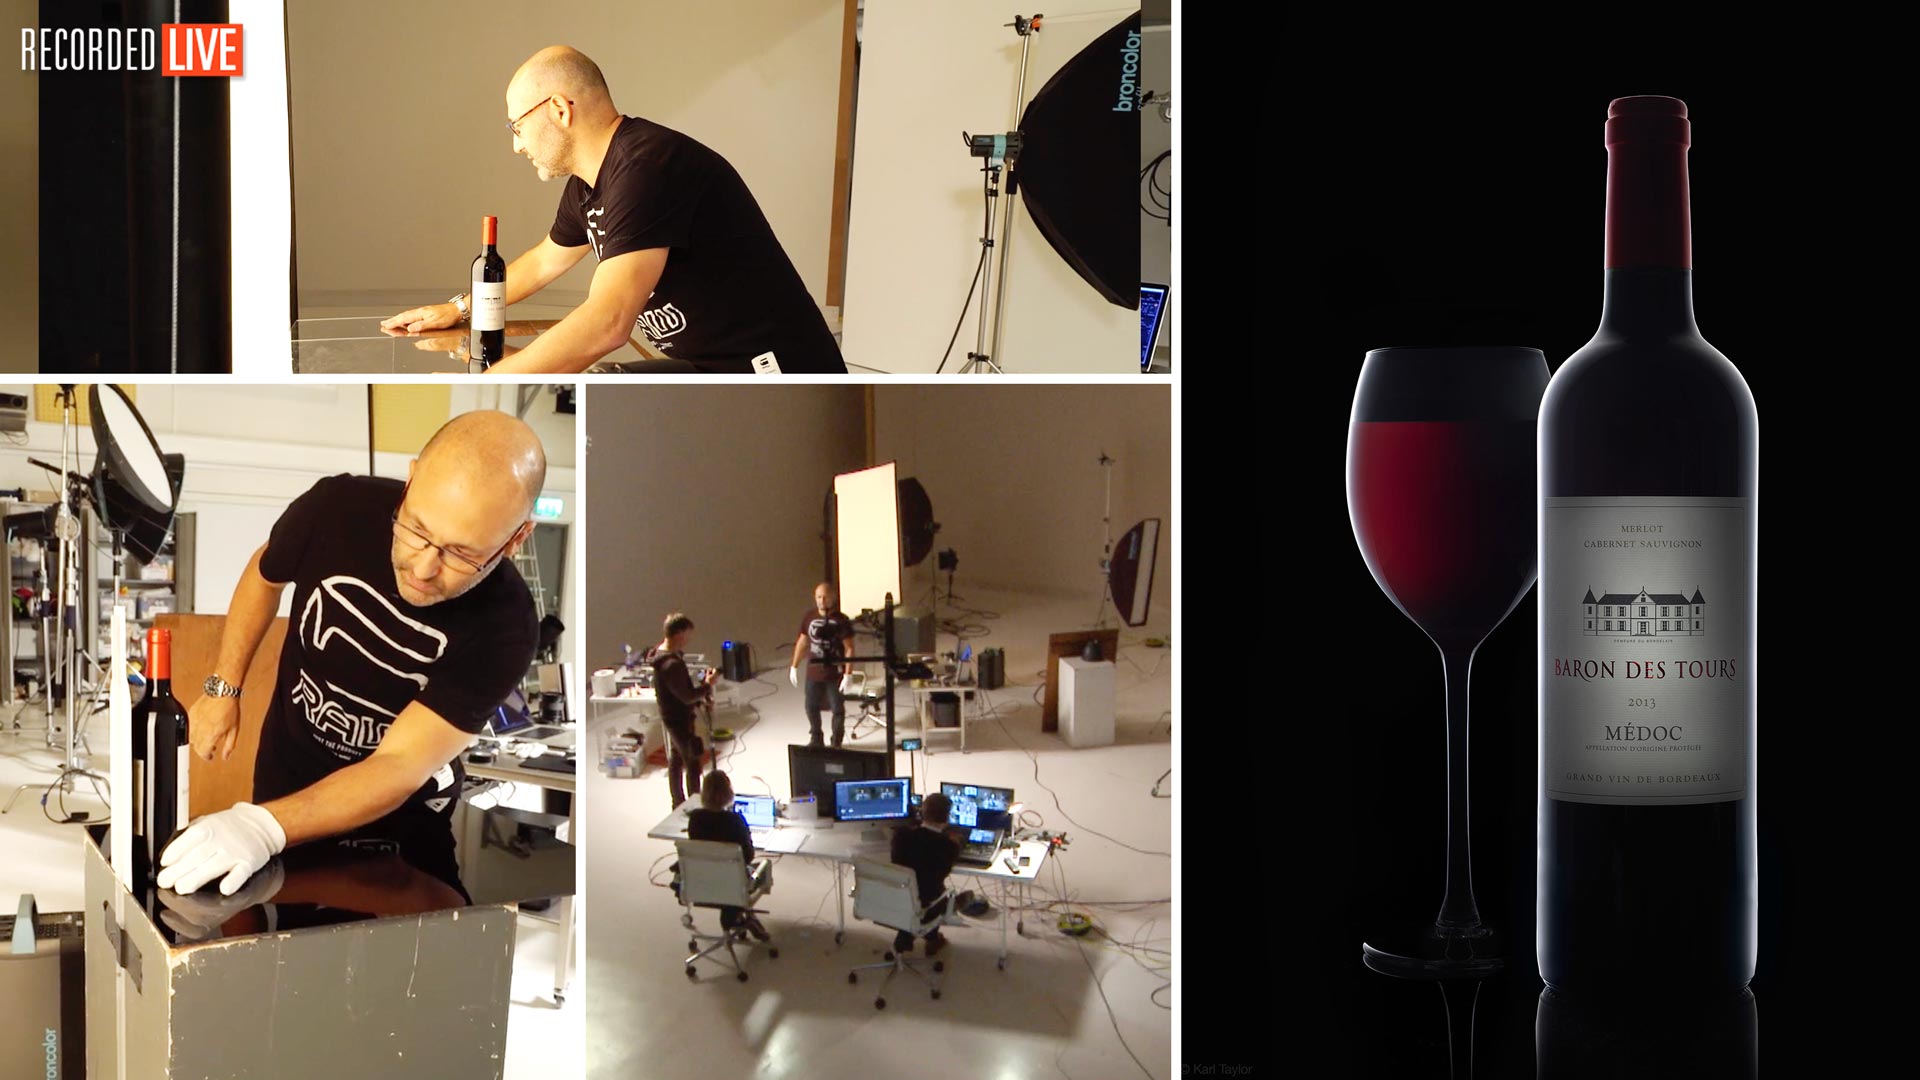

Wine Bottle Photography
Struggling to get your bottle shots right? Let Karl show you how to light them like a pro.
In this product photography workshop, recorded LIVE, you’ll watch Karl shoot a bottle of red wine. As he does so, he shares a host of useful techniques and tips to help you improve your own bottle photography.
Demonstrating two different lighting setups as he captures a variety of images, Karl explains the modifiers, background choices, lighting considerations and post-production requirements you need to replicate each one for yourself.
Learn from a pro and follow Karl step by step as he shows you how to achieve the perfect photograph of a bottle of red wine!
In this class:
- Product photography: How to photograph wine bottles
- Product photography tips
- Lighting modifiers for product photography
- Rim lighting techniques
- How to control reflections in bottles
- Working with composite images
- Correcting image distortion
- Photographing using coloured gels
If you enjoy this class, check out Whisky Photography or explore our huge Product Photography section.
Questions? Please post them in the comments section below.
Please note that we no longer sell diffusion material directly, but Visual Education subscribers are eligible to receive a wide range of discounts from top equipment suppliers.
Comments
Hi Karl,
as there are so many gels from LEE, what kind of gels do you recommend for all purpose? which orange, red, blue… thx for help
Hi please can you email that question in to Emma and she will give you a list of our most commonly used gels.
hey Karl,
At the minute : 24:44 of this video, your picolite reflects on the bottle. That happened to me when i was trying to use the snoot and I couldn’t get that headache away. Any solution?
thanksssss
Hi, a snoot will unfortunately stand out much more strongly as a reflection on a bottle than a projection attachment. The simple trick is to retouch the dot of light afterwards.
Hi Karl, since I use godox monolights could ambitful optical snoot do the same job of picolite with projection attachment? thanks
https://www.amazon.com/AMBITFUL-Focalize-Condenser-Cylinder-Photography/dp/B07L2NC6MW
Hi Yes that look like a similar device but you’ll have to make sure they fit your Godox light.
I’m always amazed how easy you make things look!
This is a great class! I can’t say that you’ve given a bad one to be honest! I used to be a member of Kelbyone training and I haven’t looked back since my swap!
You have helped me grow as a Photographer.
Hi Tiaan, thank you for being here and I’m glad you are enjoying it.
Absolutely brilliant, Karl. I’ve used this technique multiple times on dark bottles/objects and it works every time. Thank you so much for sharing your experience, your passion and your expertise! Love that passion!
Thank you very kind.
I’ll try it Karl. Thank you very much!
Hello Karl,
I built a big diffuser with savage translum and a wooden frame. Is it possible that the color of the wood frame affects my color temperature and makes it more yellow, warmer? If so, what face of the diffuser produces this effect: the one that touches the focus or the one that touches the bottle. (On the other side I also have a softox). Do I have to paint the white or black wood? Thank you so much!
Hi I’d be very surprised if the wooden frame has any affect. It’s most likely the colour of the Savage translum? You could try putting black tape over your wooden frame though to check.
in regards to Translum – it comest in three grades..
lightweight – (.127mm) thickness
medium – (.2mm) thickness
heavyweight – (.3429mm) thickness
Looking at LEE 216 – it’s made out of polyester, as is the lightweight Translum… logically then the lightweight Translum would be the option to choose for diffusing bottle shots?
At what point would one use the Medium (Polypropylene) and Heavyweight (Styrene) versions of Translum? for what purpose?
Thank you Karl! Learning immensely and at incredible speed with your courses!
Hi, the only other one I use is the LEE 400LUX it’s thicker and tougher but doesn’t seem to do anything different. To be honest I don’t tend to get into the minor variances with these things. If I can see it’s diffusing well and giving me a good gradient then I can work with it. We can get too caught up in the semantics it’s better to just get on with shooting.
Hi Karl,
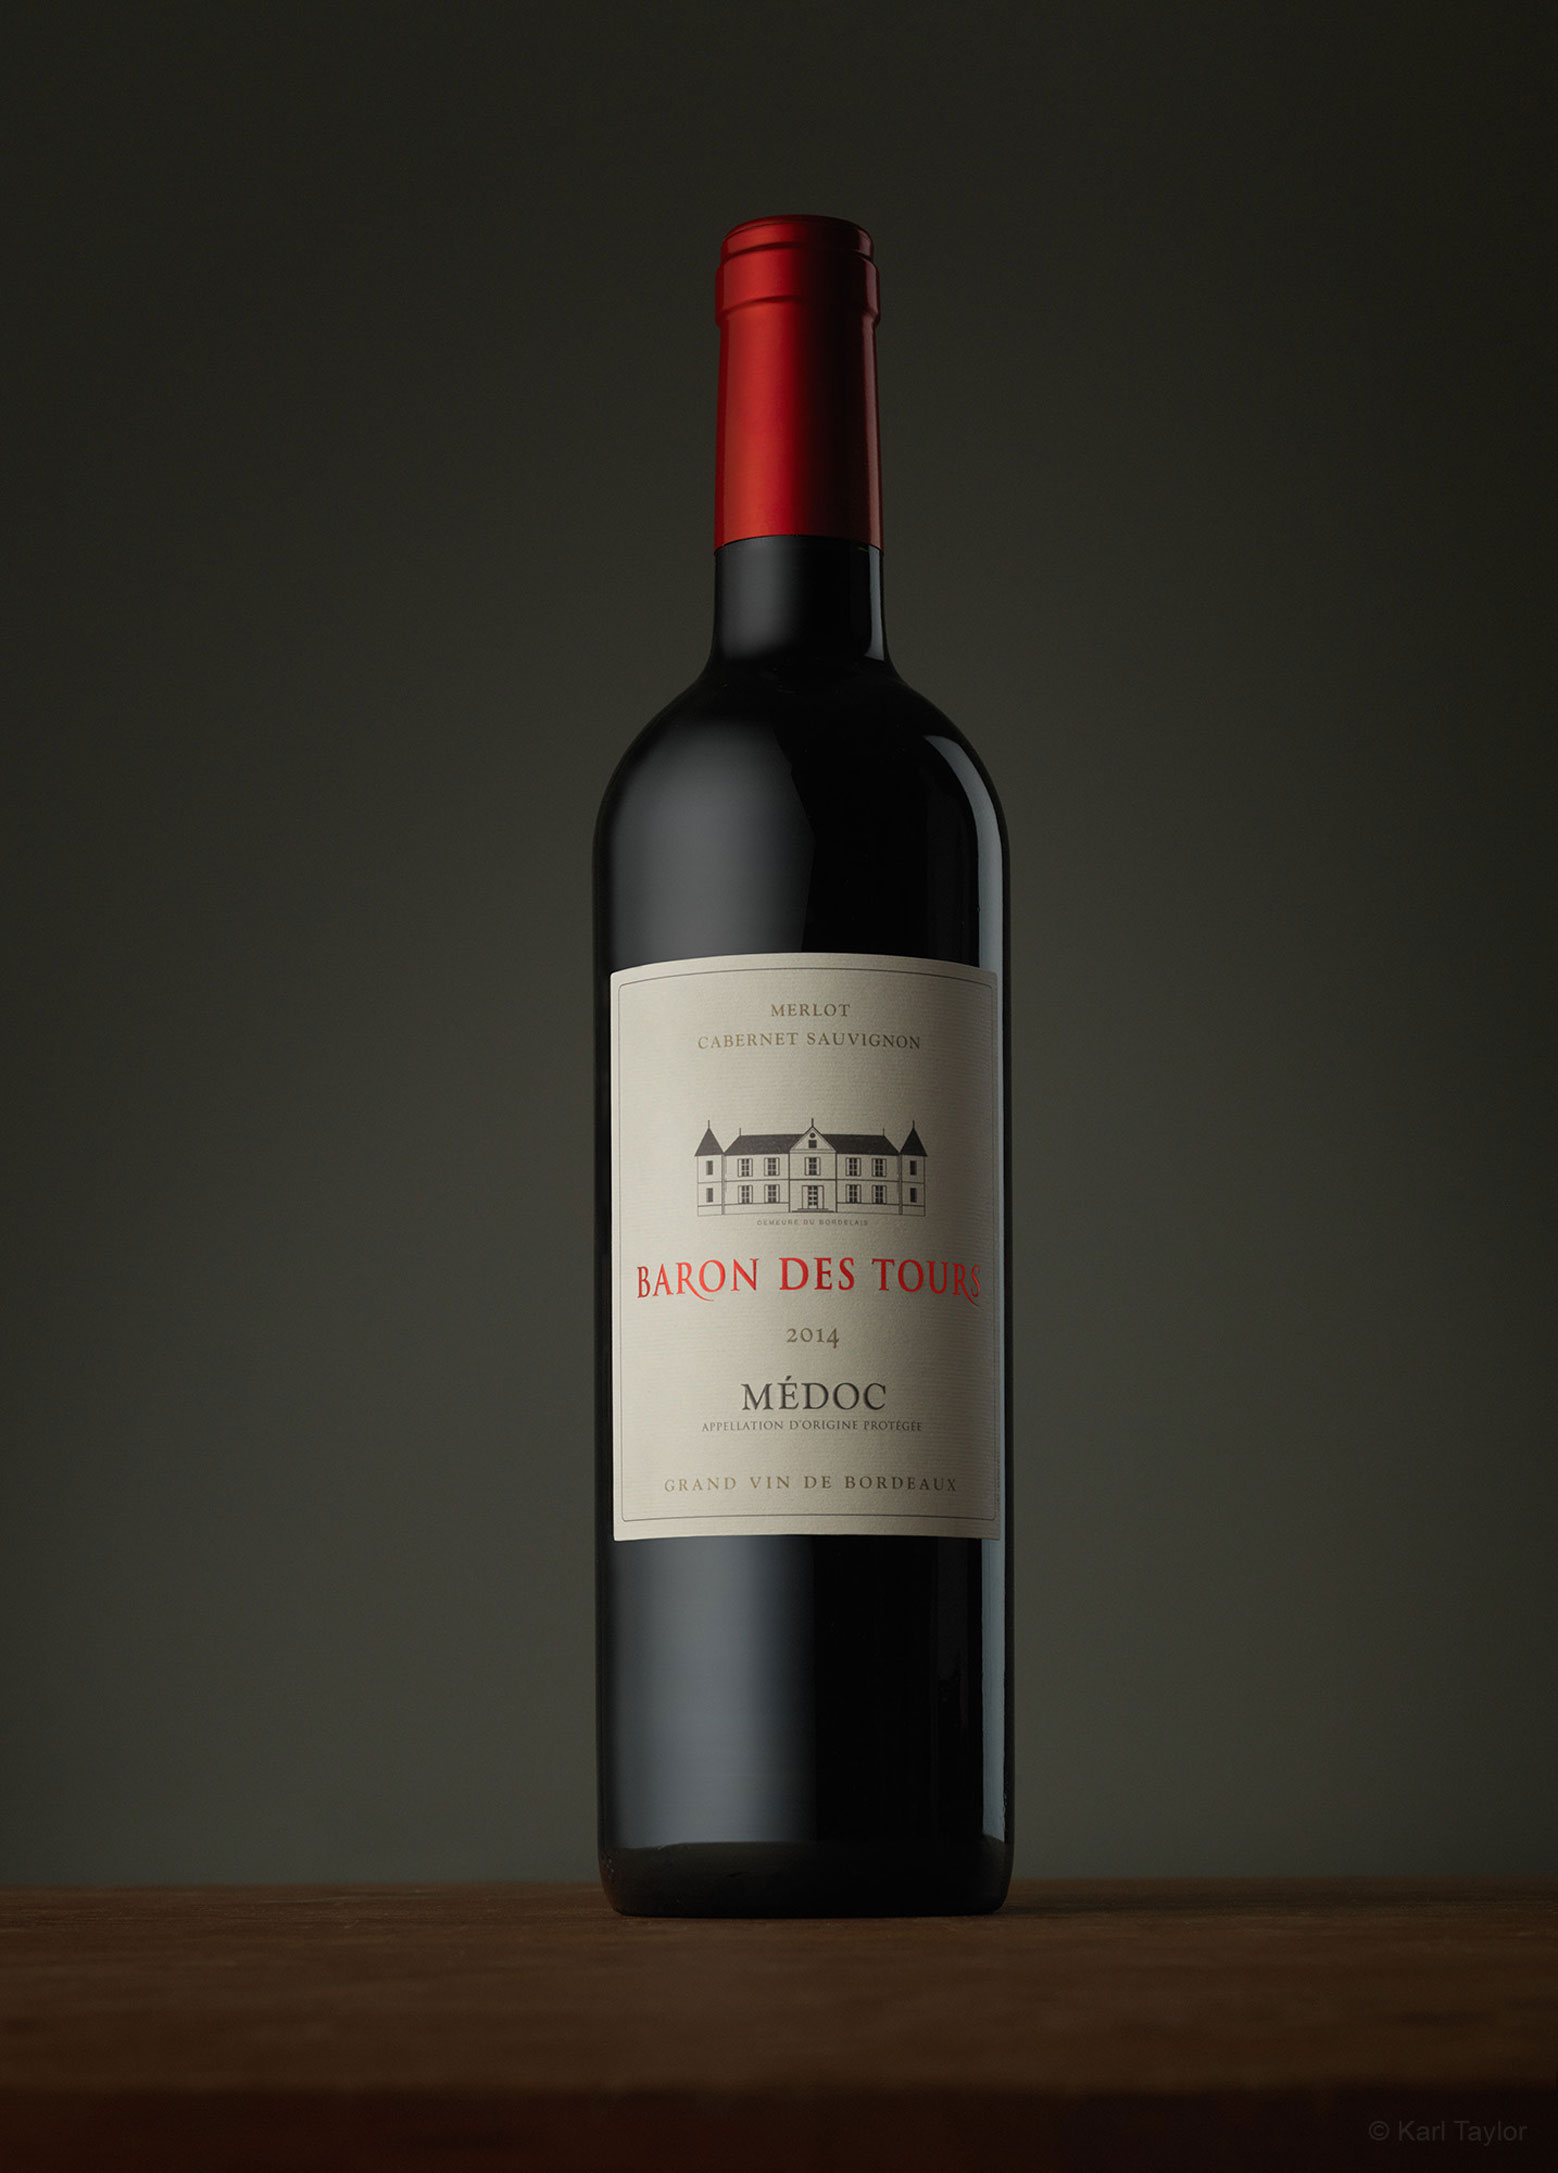
the final image in the video is different to the image shown on this site. Obviously the setting got optimized. What changes did you make?
Thanks!
Jens
Hi Jens, if you look at the image on screen at 1:12:28 it is slightly different at this point. If we examine the image shown on the page let’s break down where the differences could come from. First let’s start with the left side of the image and the bigger softbox, on the image at 1:12:28 the light is going all the way to the back of the bottle so the physics dictates that the light was further behind/back than in the shot shown, also in the shot shown below the video the light is more curving around the front of the bottle and label, so the same softbox is uses and diffusion they are just closer to the camera and slightly more in-front of the bottle. The same applies to the one on the right but I would also say that it is closer to the bottle as the reflection looks bigger. The wooden base is darker but that was simply darkened in post production. When the show finished, I looked at the shot with fresh eyes and without the distractions of presenting and shooting and then I decided to try both lights forwards a little to separate the reflections from the back sides of the bottle or alternatively I may have simply moved the bottle back a little further and lowered my shooting height a little, other than that the set up is the same. Neither one is necessarily preferable over the other it is simply choice on how you feel about it at the time. Cheers Karl.
Hi Karl,
thank you very much for your detailed answer and thoughts on that – that’s very helpful! Also you left the red color on the right side away.
It’s another good example of the importance of the so called fresh eyes.
(I guess the final image we look at here is shown at 1:32:28, if anyone wants to take a look again.)
superb tutorial Karl, thoroughly enjoyed it. Appreciate the way you teach, clear, concise you explain why it’s best to set lights up in the right way and the wrong way and seeing the results competes the jigsaw, will watch it again, thank you.
Kevin
Thanks Kevin.
Hi Karl, I have just one question. The reflection on the left hand side gets a bit rounded when it hits the label. I guess the reflection was selected and blured in photoshop and because there was a corner it got this rounded and doesen’t continue straight up. Is it for purpouse or a mistake? Thanks
Hi Stepan, I’m very happy to answer your question but I don’t quite understand where you mean in the picture (there was no photoshop blurring). Can you tell me exactly where in this picture you are referring to https://karltaylor.com/objects/9pkxqstb4t4bmd49bgkqlfcbu1h1yi
https://drive.google.com/open?id=1uUIzhJCu4UD08iHhGLIkmwtJSFxhHvIC
I just had a closer look and compared the final image with images in video and it’s something different… just forget what I said 🙂
No I think it is a valid point. I can’t see it happening on this one though https://karltaylor.com/objects/hfsjtz182sdvi2r96h5jrwy7x7g30y it wouldn’t happen on Vodka as the bottle is transparent so you are using mostly illumination through the bottle rather than on the bottle.
Hi Stepan, on my file I can see the top one but not the bottom. It may be your monitor not resolving all the tones on the top one. My guess would be that the scrim roll had curved away, this sometimes happens when it is not on a frame and it is just hanging on the roll from a grip arm. Thanks for pointing it out as I hadn’t noticed it before.
Good morning Karl, thanks for your reply.
I can see it correctly on my eizo There is a slight light fall of right under the label as well. At first I thought it was both caused by selecting and bluring the reflection but when I took a closer look I could see that on the top it’s the reflection itself that is not straight and on the bottom it’s probably some shadow from the label(it’s almost unnoticable but still can see it there…) anyway the question is whether it should be retouched to absolute technical perfection or just left more natural like this… Thanks for your time. I really like content of this website and it does’t cost an arm and leg 🙂
Hi Stepan, as explained I think it was caused from the diffusion material curling away and yes it should have been corrected or retouched. I haven’t checked the image on my Eizo only on my website on my macbook so I’ll sort it out when I get a chance. Glad you are enjoying KTE! 🙂
I have to agree. My second time watching this and things take time to stick.
Thanks again,
Jared
Hi Karl,
I have seen this tutorial twice already and each time I feel I get something new. Outstanding!!
Could you achieve similar results using a 140 cm octobox and a speed light? I am afraid that is the extent of my budget now.
Cheers,
Jorge.
Hi Jorge, as long as the speed light spreads well in the softbox then they work fine, the soft box must have an internal diffuser.
Perfect Karl. Understood. As a matter of fact, I got reasonable results.
Kind regards and happy Friday!!
Hi Karl, I went from having no idea about photographing bottles to being keen to have a go. I feel I’ve learnt a lot. Thank you.
So I grabbed from the wine cellar (ha!) – it came with a highly silvered badge. This caused me no end of problems. I guess the problems would exist with many bottles that have reflective text/graphics…
I tried to take several shots with a view to blending in PS, but even with many different attempts with different lights and diffusion modifiers, I still could not evenly illuminate the silver badge. My guess would be that silver writing would be harder still.
Perhaps I could try a dulling spray, but this would have to be very targeted. Would it be possible ?
Do you have any tips that might help, please, or is it just down to experimenting more with the lighting ?
Thanks for putting together this valuable resource.
I should have added that I’m using constant LED lighting …
Hi Barry, find the live whisky shoot with shiny label and you will get some good tips from that and also the recent one on pack shots I had to contend with shiny labels on some cosmetic bottles, you should find them all in the live shows replays section. Cheers Karl.
Thanks for a quick, reply, Karl.
I’ll take a look. I’ve only recently joined and have not yet worked through many courses. I’m trying to emulate your methods with smaller scale, continuous LED lighting. The journey begins …
Thank you Karl, you are a wonderful coach 🙂
Hi Karl. Thank you for this wonderful tutorial.
But I did not understand how to use that color palette.
Have you a tutorial for that?
Thanks!
Hi Micaela, we’ve had a few people asking about that so I’m going to produce a tutorial on that soon. Thanks Karl.
Can’t stress enough how much your shows and education program has been a breath of fresh air. So much knowledge is passed on, very clear to follow, and the techniques to get the results are amazing, could have spent hundreds on books and still wouldn’t get the education I do from your courses. Keep em coming, I am hooked 🙂
Thank you Lee… Tell the world! 🙂