
Fresh Fruit Food Photography
Keep your food photos looking fresh with these ‘berry’ useful techniques.
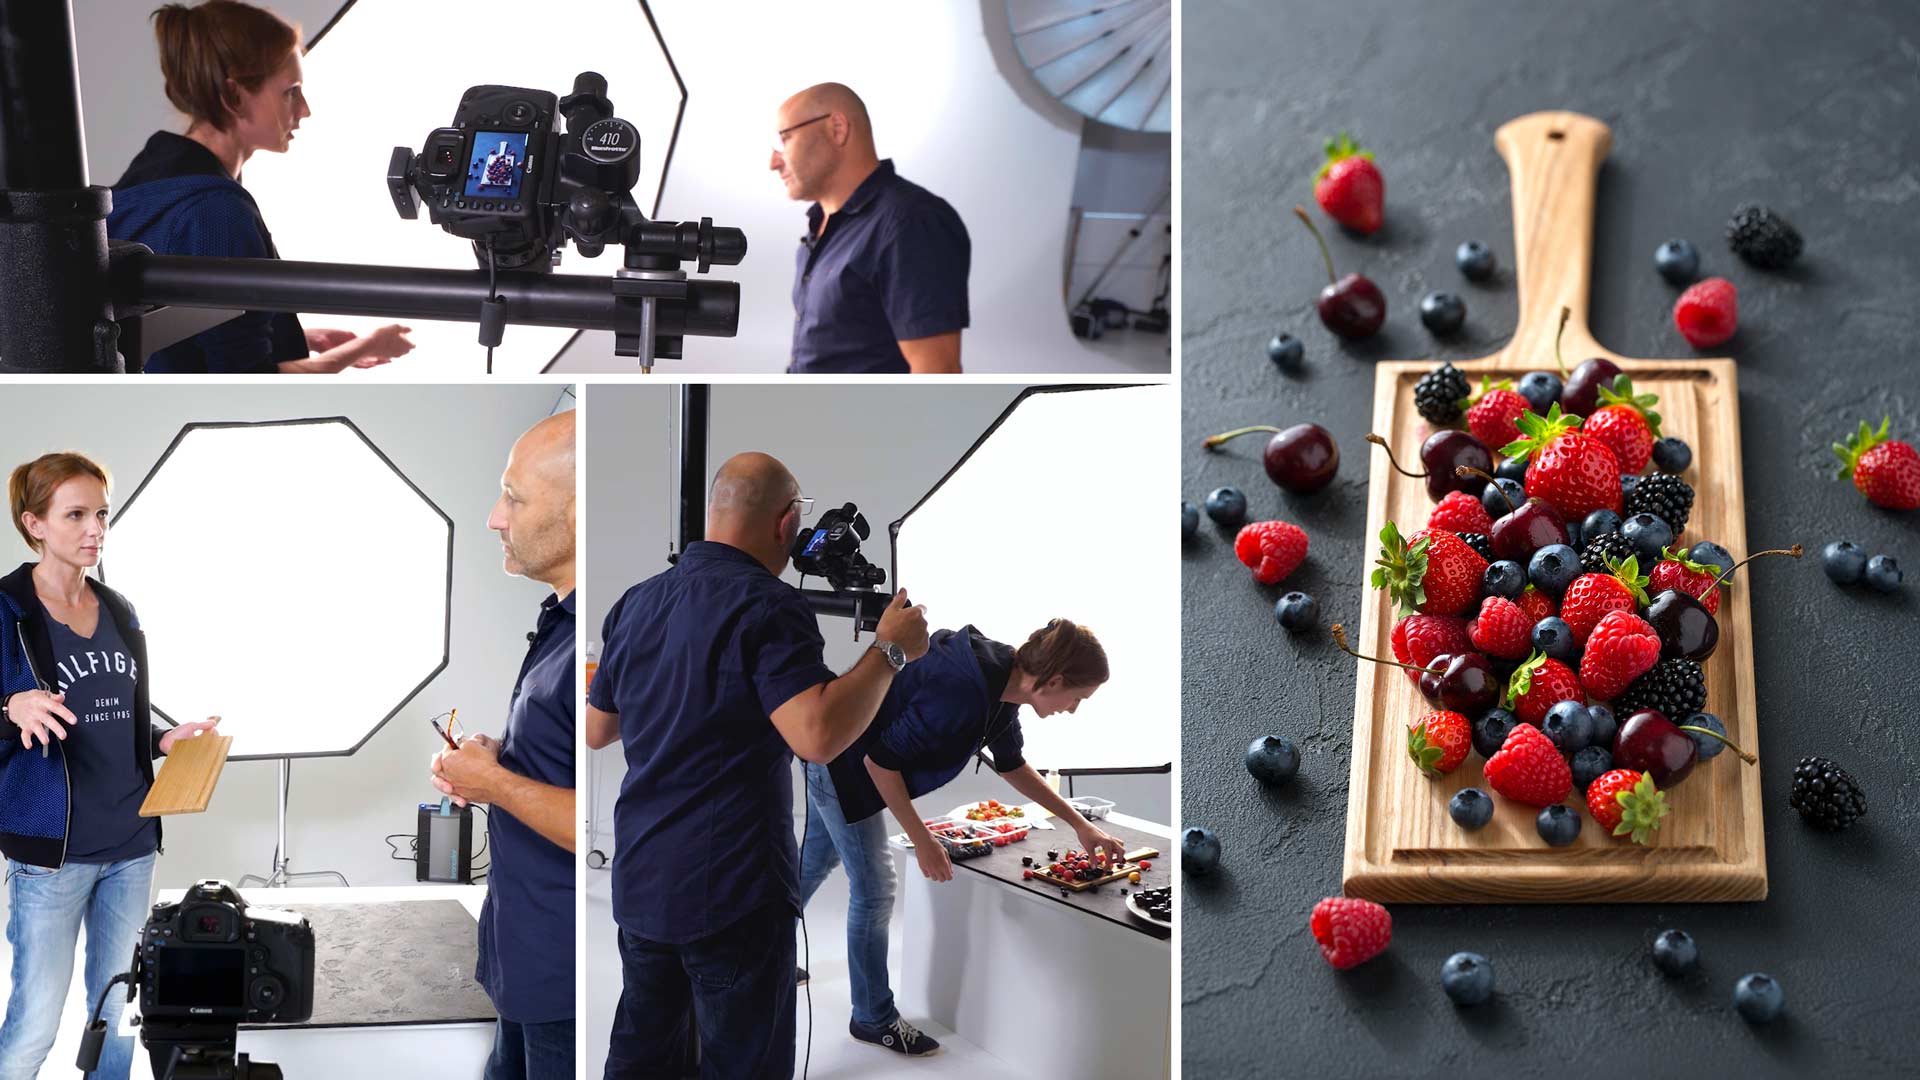
In this series of food photography classes, Karl teamed up with food photographer Anna Pustynnikova. Together they demonstrate essential preparation, styling and lighting techniques for eye-catching food photography.
Simplicity is key in this seemingly chaotic scene. Anna uses an assortment of fresh berries to create a beautiful, eye-catching image using just one studio light. She explains the preparation and styling required for this shot while Karl demonstrates a number of alternative lighting techniques that could be used to enhance the shot.

In this class:
- Product Photography: Food Photography
- How to store and prepare fresh berries for food photography
- Useful equipment for food styling
- Testing and selecting suitable backdrops and props
- Using color to enhance an image
- Suggested lighting modifiers for food photography
- Depth of field selection
- Alternative lighting setups
- Emulating natural light using studio lights
If you enjoyed this class, watch the replay of Anna’s LIVE food photography workshop.
Comments
Thank you for your reply Karl. You are a great pro and you often make me laugh 🙂
I am always happy to make people laugh (even myself) 🙂
Hi, is it possible to know where I could find the two sides background Anya uses I this video? Thank you a lot!
Hi Micaela, I beleive she has a woodwork shop make these for her. I often find old table tops from second hand furniture stores.
Thank you Karl and Anya. This is the best course I have ever seen. I’m Italian and I never found a good food photography course in Italian. You helped me to realize that I didn’t really know anything about food photography 🙁
Well you can now take these new skills learned and put them to the test 🙂
Great educational video. Any advice on picking the focus point.
Hi Larry, in product photography or food then it always has to be the hero point, so in this case the berries in the middle of the board. The depth of field is quite shallow but as you will see in the close up image at the end the DOF extends far enough that a good cluster of berries are sharp. In product photography (watches, cosmetics, etc) then usually the DOF is a lot more.
Karl where do you get your acrylic from?
Hi Christopher, your local sign manufacturers will have acrylic, in the US it’s called Makralon and it’s also available from wholesale plastic suppliers.
Great Tutorial. I’m loving all the courses. In special, what is the spray that Anya is using to clean the board and put some little water drops on the berries? Thank you.
its just water she put in a little spray bottle, you can find those spray bottles at most homeware or catering supply stores (maybe even gardening centres)
Hi Erik, that was just water, cheers Karl.
Hi Karl,
I really enjoyed watching this video. It’s great to see the process that both you and Anya go through to perfect this shot. Your teaching shows many different and unique ways to use studio lights to create some amazing looks. The lighting set-up to make soft and hard shadows that truly mimic sunlight was brilliant! Can’t wait to try this myself!
Thanks,
Bob
Cheers Bob.
How do you decide which side to light from? The left or right?
Hi, I generally light from left but it often depends on the subject material but the eye prefers to read an image from left to right.
Hi Karl lot to think about, would not have tried this type of shot, so I am going to see what
I could do , you got me thinking about it , need get bits together and we will see
thanks so much again
frank garvan
Good luck with it Frank.
Really good instructional video. You mentioned briefly that you could obtain similar effects from window light; having limited lighting options at the moment, do you have any tips on the natural light approach?
Thanks
Norman
Hi Norman, biggest north facing window you can find and place your subject close to it (north facing to avoid direct sunlight) if it’s south facing and cloudy that’s OK, or you can add diffusion over the window.
Hi Karl, thanks for the information, very much appreciated, glad I signed up, fabulous instructction
You are welcome, thanks for joining and please spread the word and we will keep working to bring you more and more! 🙂
That was Amazing Karl and Anya! Some of the best education on food photography I have ever seen. I love that you went through every little detail to showcase exactly what happens. Great Job!!!
Thanks David
Thanks . . . good skill we learned.
The pico light down was the special kick, well done, and thanks to Anya to share your knowledge.
Super! Thanks you both. Learning a lot.
Great video, thanks for posting 🙂
Is there any chance that you could attached any of high resolution hero shots so we can take a closer look at the results you were getting?
Hi Anthony you should get a good idea of the results in the zoomed in pan at the end of the video. If that’s not sufficient I’ll see if we can post a zoomed in crop of the shots on the page to show the detail achieved.
Thank you Karl, Ben & team. Thanks guys for uploading new videos. Yay!