


Coloured Gels Fashion Shoot
Bring some colour to your fashion photography with this simple trick.
Adding coloured gels to your lighting setup can result in some really eye-catching and interesting results. In this photography class, Karl teams up with Broncolor’s Urs Recher to show you how you can get creative with different lighting gels.
In the class:
- Fashion photography using coloured gels
- How to use reflectors for fashion photography
- Learn how to control shadows and add colour
- Different lighting modifiers for fashion photography
- Working with models and giving creative direction
For this shoot, I wanted to incorporate coloured lighting by using a combination of coloured gels and reflectors. In previous classes, you may have seen me use gels to add some subtle colour, but for this, I wanted something far more aggressive and dramatic.
To do this, I used a total of seven lights (five of which had gels on them) but it was important that I carefully control each light, it’s direction and power, if I was to achieve the shot I had imagined.
To create the coloured effect that I wanted I used blue and red gels to reflect colour into the shadows on my model and carefully blended my two background lights to create a more purple light.
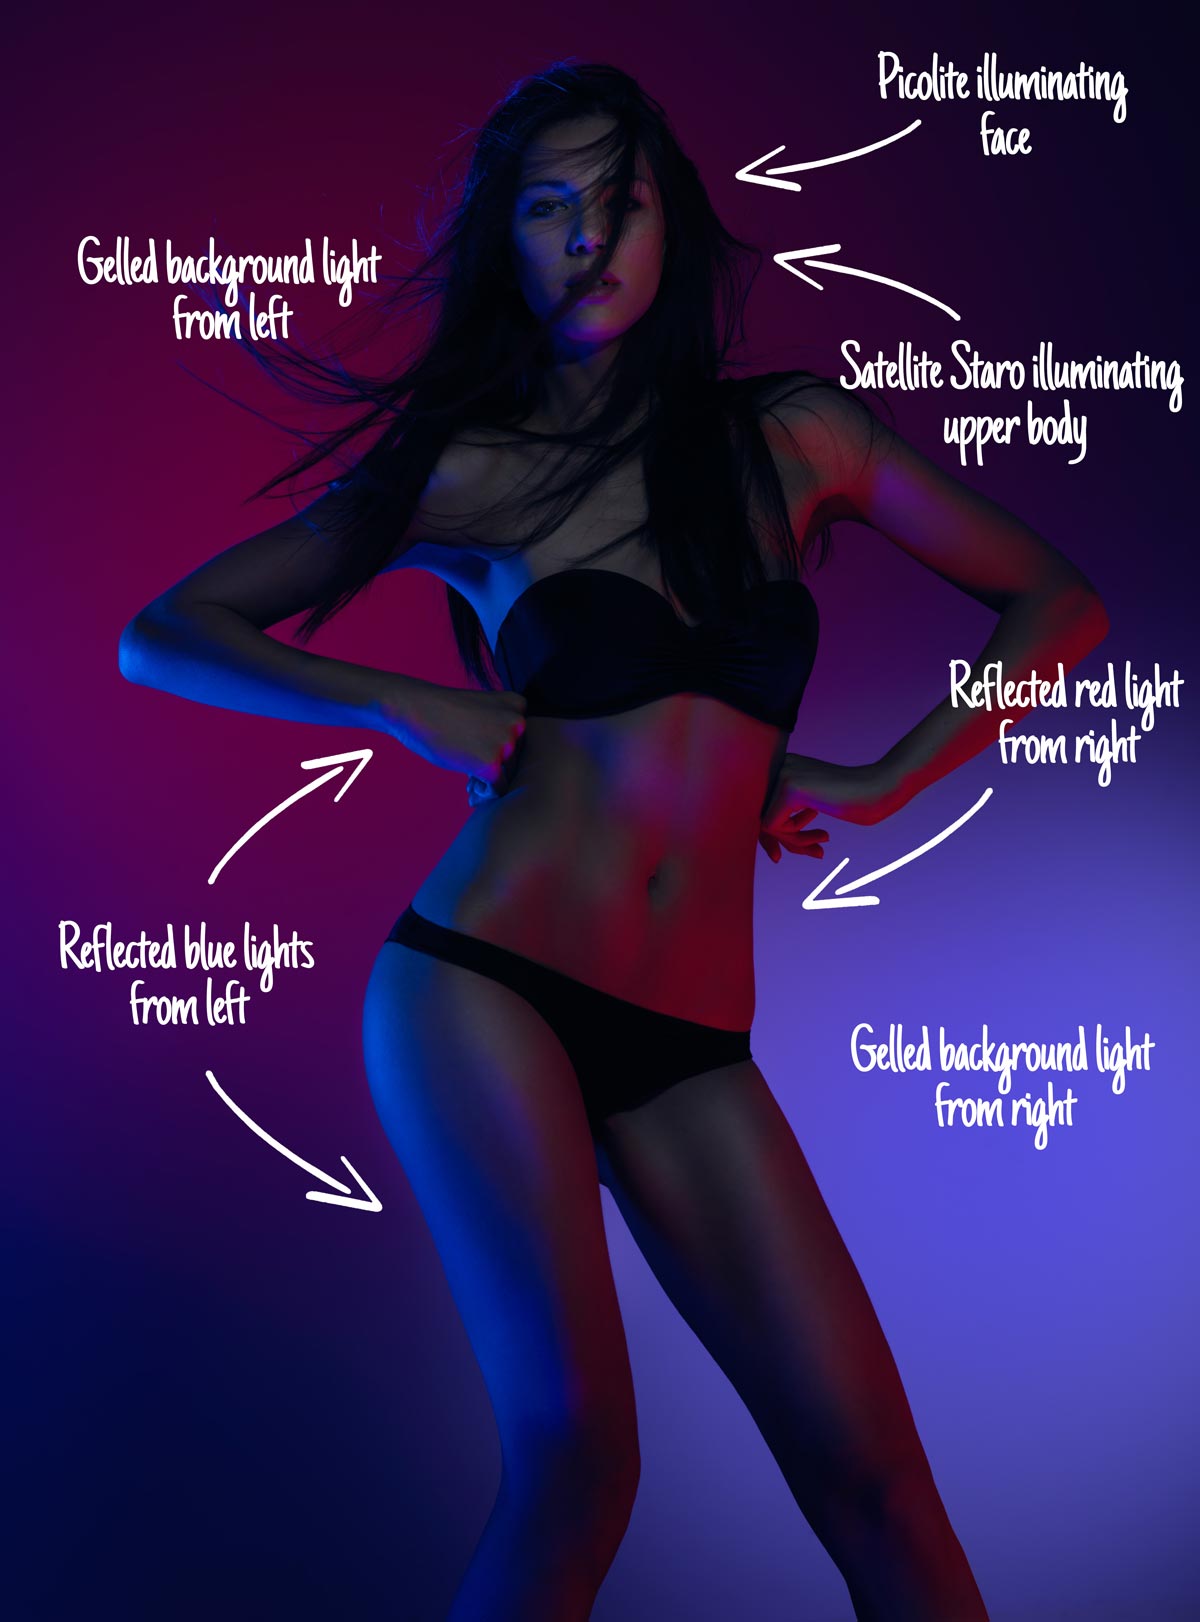
The lighting setup used for this fashion shoot.
Of the five lights used on the model, only two were direct light. I used the broncolor Satellite Staro as a gentle fill light for the face and shoulders and a picolite with a snoot as the key light on the face.
To add some colour and light into the shadow, I used carefully positioned reflectors with gelled lighting shining into them. I used two blue lights to the left of the model and one red one to the right.

We used reflectors and gels for this fashion shoot.
To control my light I used a variety of modifiers. I used fresnels, snoots, P70s and grids to shape my light and minimize the spread. These allowed me to create precise pockets of light and colour, allowing me to both blend and isolate particular colours.
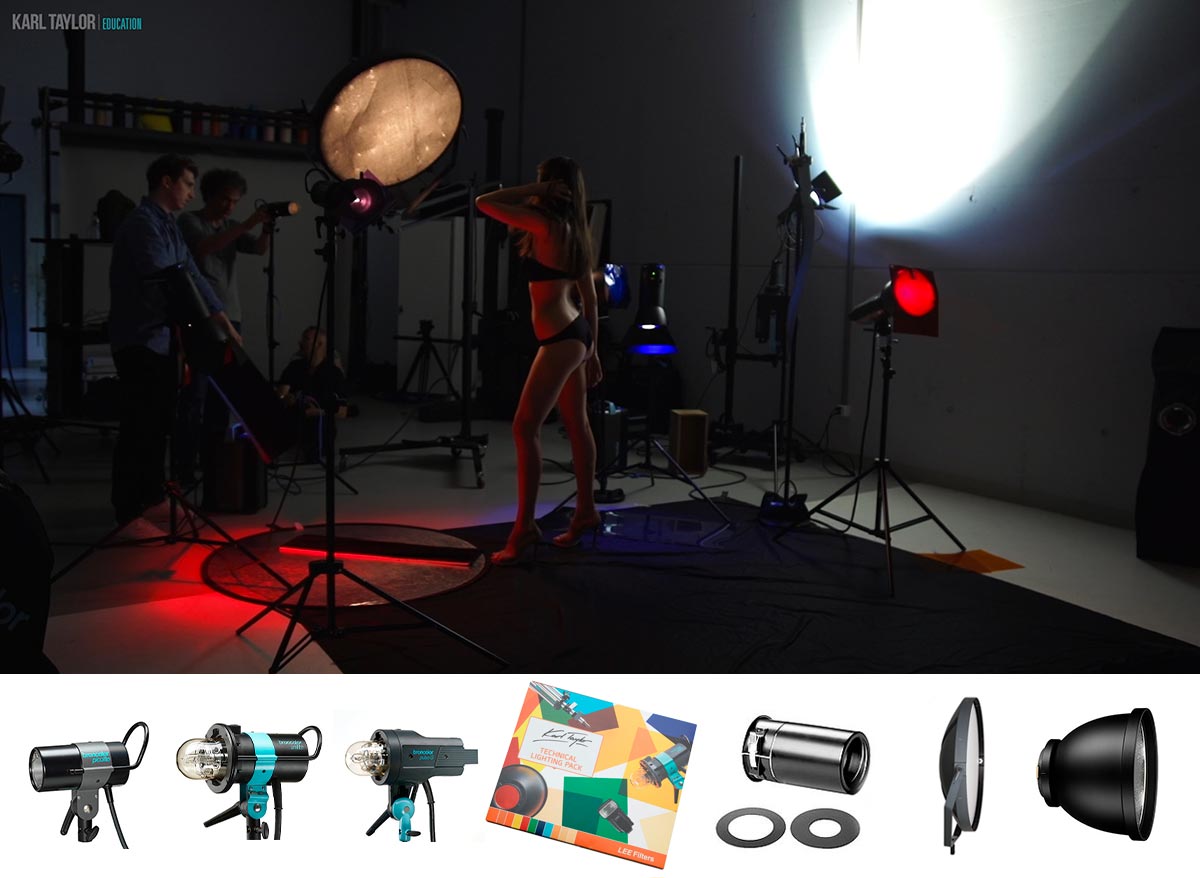
A selection of the lighting and modifiers used for the shoot.
Once I was happy with the lighting, I asked my model to run through a variety of poses — from hard, angled poses to fierce and angry or sexy and sultry — and added a ‘wind machine’ (in this case a large, handheld piece of card).
Although I used quite a few lights for this shoot, the effort and time it took to perfect everything was definitely worth it as we got some really interesting results.
The final image:
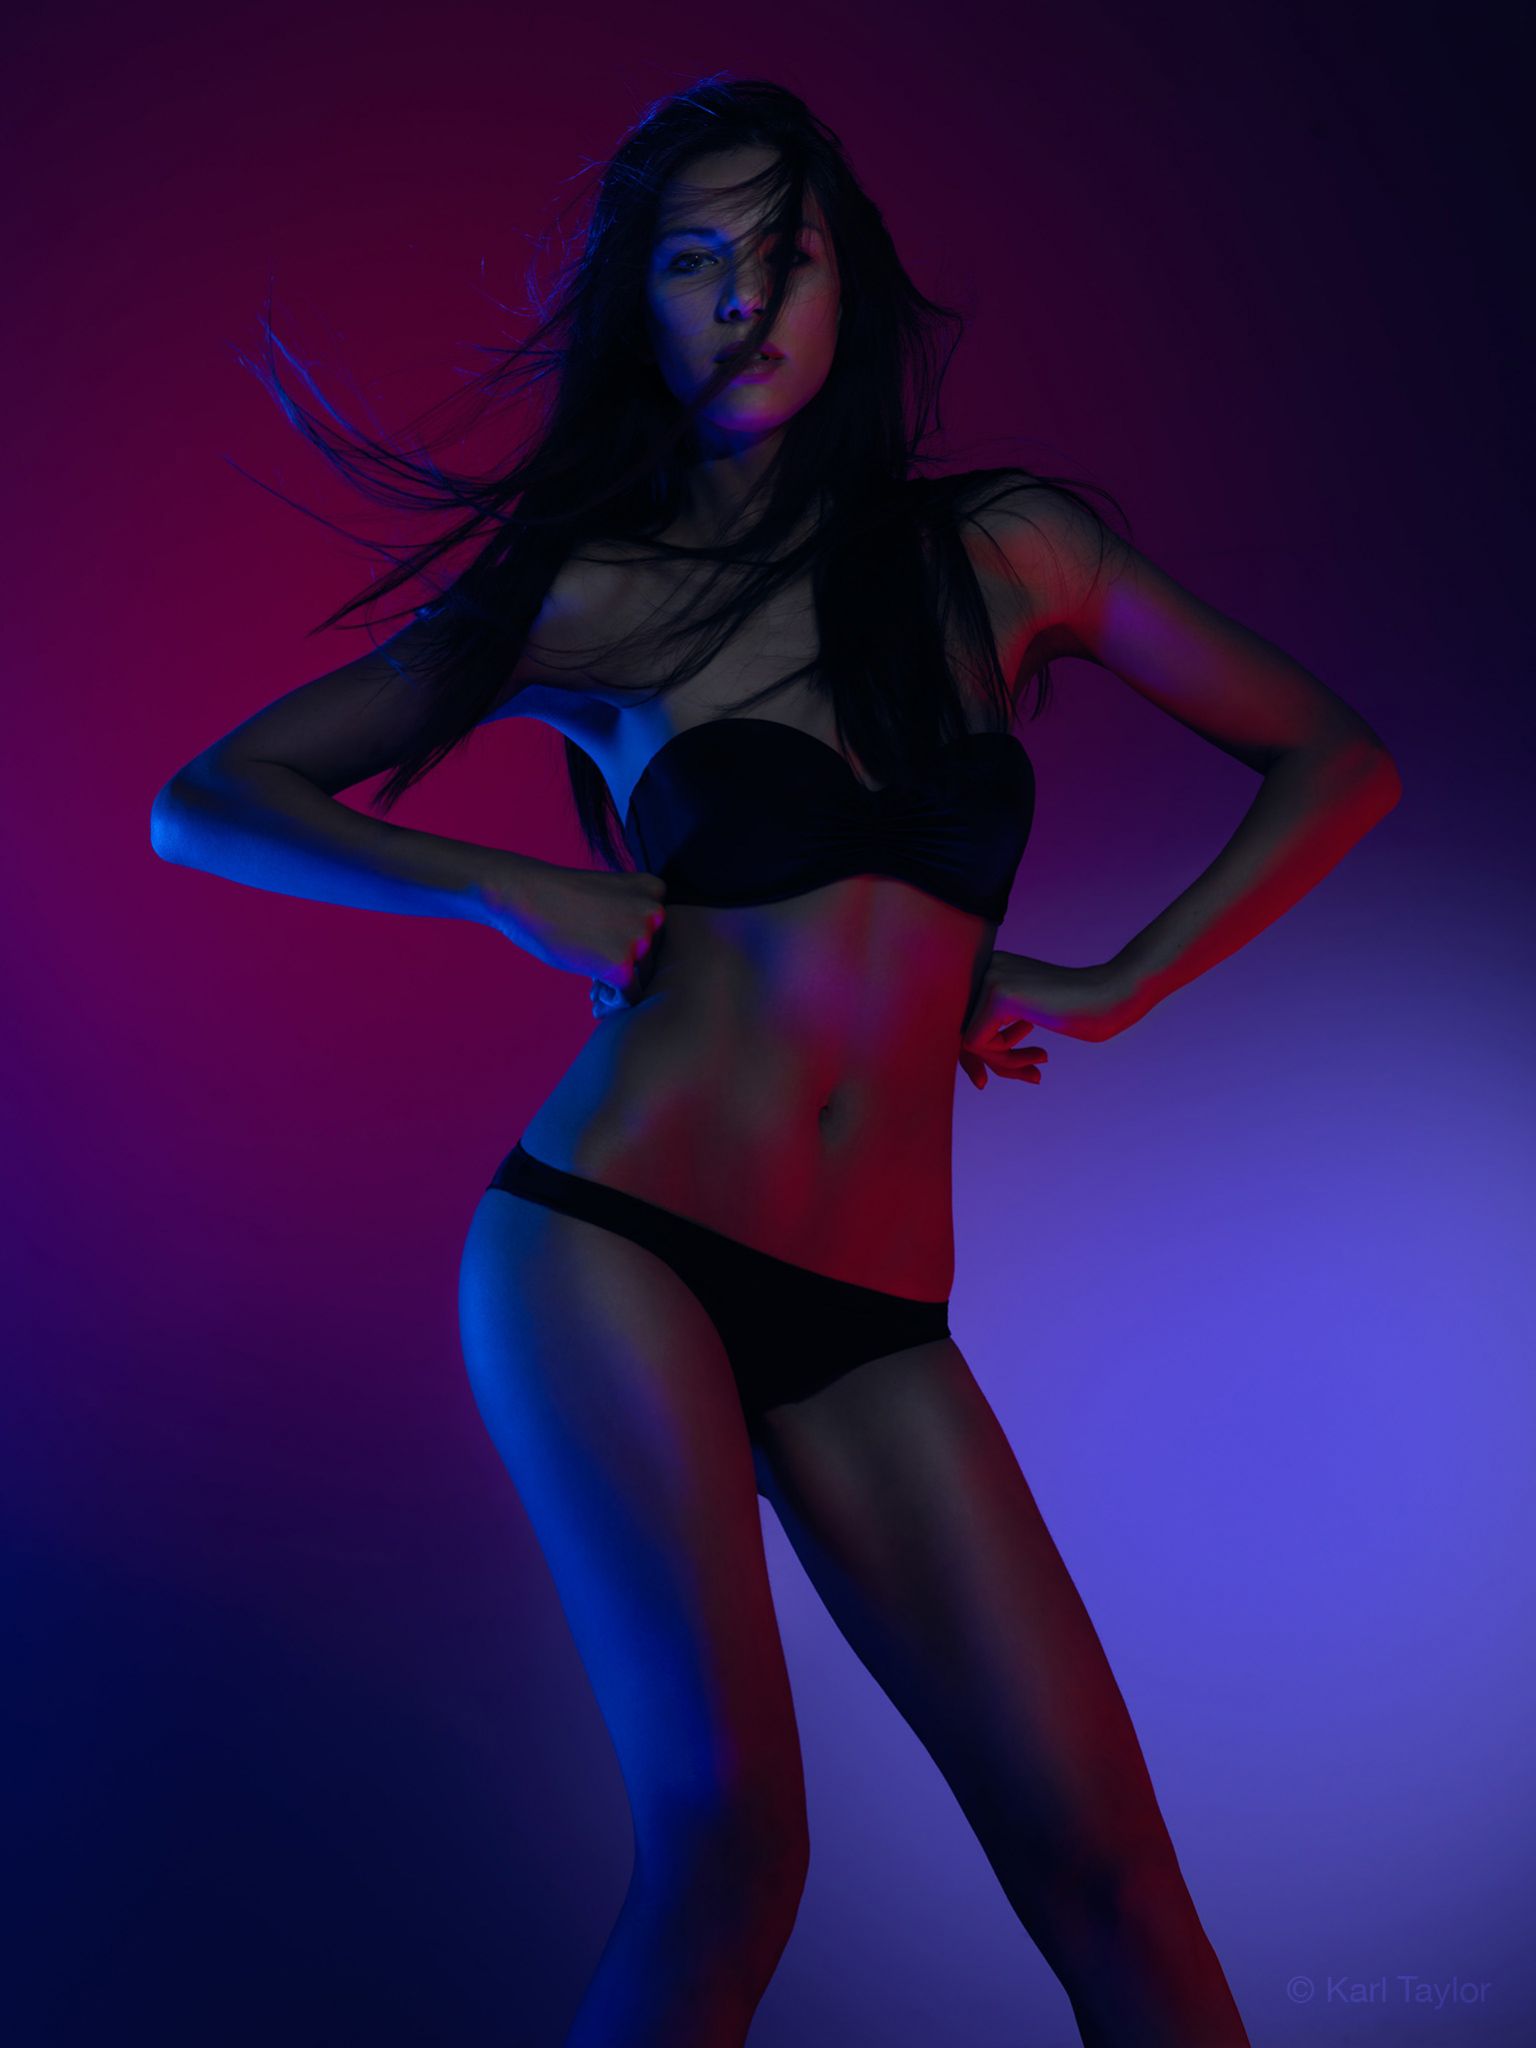
The final image from the coloured gels fashion shoot.
If you’d like to learn more about using coloured gels or fashion photography, visit our Portrait and Fashion sections for some inspiration and tips. I’ve also put together a list of other courses that you’ll find useful for understanding light and how to control it.
- Introduction and understanding light
- Understanding the emotion of light
- Lighting modifiers and their effects
- Warm and cold portrait
Questions? Please post them in the comments section below.
Comments
Hi Karl,
I watched this video and other videos too, I realized that you use coloured gels with barn doors for P70 or L40, and sometimes you use those gels without barn doors on P70 or L40. Is it different effect to use gels with barn doors or without barn doors ? thank you
Hi Zee, as long as the gel is blocking all of the escaping light then there is no difference with or without barn doors.
Does the Karl Taylor lee Color gels still exists or can we get a list of the gels that where included? Thx.
Hi, we don’t produce those any more but I can tell you what they were. We had two packs; a ‘Technical’ pack and an ‘Effects’ pack. The technical contained:
652 Urban Sodium
105 Orange
104 Deep Amber
026 Bright Red
139 Primary Green
120 Deep Blue
196 True Blue
020 Medium Amber
744 Dirty White
285 Three Quarter C.T. Orange
The ‘Effects’ pack contained:
704 Lily
343 Special Medium Lavender
354 Special Steel Blue
119 Dark Blue
068 Sky Blue
735 Velvet Green
124 Dark Green
650 Industry Sodium
113 Magenta
507 Madge
201 Full CT Blue
711 Cold Blue
105 Orange
1x Sheet of KTP Diffusion.
I wonder if you have a Pocket Wizard you can attach to the battery pack? Cool setup with gels and model.
Another great video – I like the short video style with little explanation (I also like the longer ones that go in-depth and the live shows) but these short ones are helpful as I have to figure some things out myself while watching. Thanks for another great video
Thanks Derrick.
Hi Karl, I’ve been practicing in a style called “dragging the shutter” with coloured gels.
Would you have some in depth tutorial or live in this style in the future?
I look forward if you could cause I’m sure you’d give us more new ideas that we didn’t know.
Thank you so much Karl.
Hi Aby, that’s another new terminology for an old technique of simply running a longer exposure whilst using flash to capture extra ambient lighting from the surroundings or capture a sense of motion. It’s relatively simple expose the flash shot on your subject correctly in manual mode and then change the shutter speed to about 1/4 to 1 second.
Yes Karl, I have shot so many portraits in this way but I thought if you do a video on this, you might approach it differently and give us more inspiration to widen our ideas about this technique.
Many thanks Karl
I love your work
Hi, this shot looks amazing! I’ve tried to recreate it and even though exposure seems to be pretty much the same not getting the colour effects (much much lighter colours). I’m thinking due to different version of red/blue gels – what specific colour codes are they since Lee have so many! ?
Hi Cameron they were the primary color gels. But don’t over light it aim for a little underexposure as that saturates the colours more and play with the RAW file settings a little. A bigger studio space or black surrounding walls will help.
Seven lights AND the new Broncolor human-powered wind machine… no problem! Great result.
Excellent session. I’ve just started using Gels. This gives me great ideas. Great look blending the two gels.
Thank you Karl, it was a very interesting class! I really like the result. It’s cool that your education classes cover such a variety of topics. Special thanks for the price. Will it be new Photo Critique series and if yes, how can I apply my photos?
Hi Yevhen, yes we will be doing lots more critiques in the coming months and we always notify our members by email.
It only takes one image to make all the effort worthwhile. The final image at the video end is a superb result. Everything in balance, and that’s what makes it stand out to me. I think you do great fashion work Karl. It’s your niche. You are truly in touch with it and that’s what makes the difference … keep it up.
John, thank you very much for your kind words. I very much enjoy beauty and fashion work and the concepts it makes a nice change from my usual work as a product/advertising photographer.
Great setup; I like the concept of using the gels to fill shadow, instead of straight on key lights. The results look to be great straight out of camera. Was there any extensive retouching required?
Hi Peter, thank you, hardly any retouching at all, a little bit of burn and dodge and that was about it.