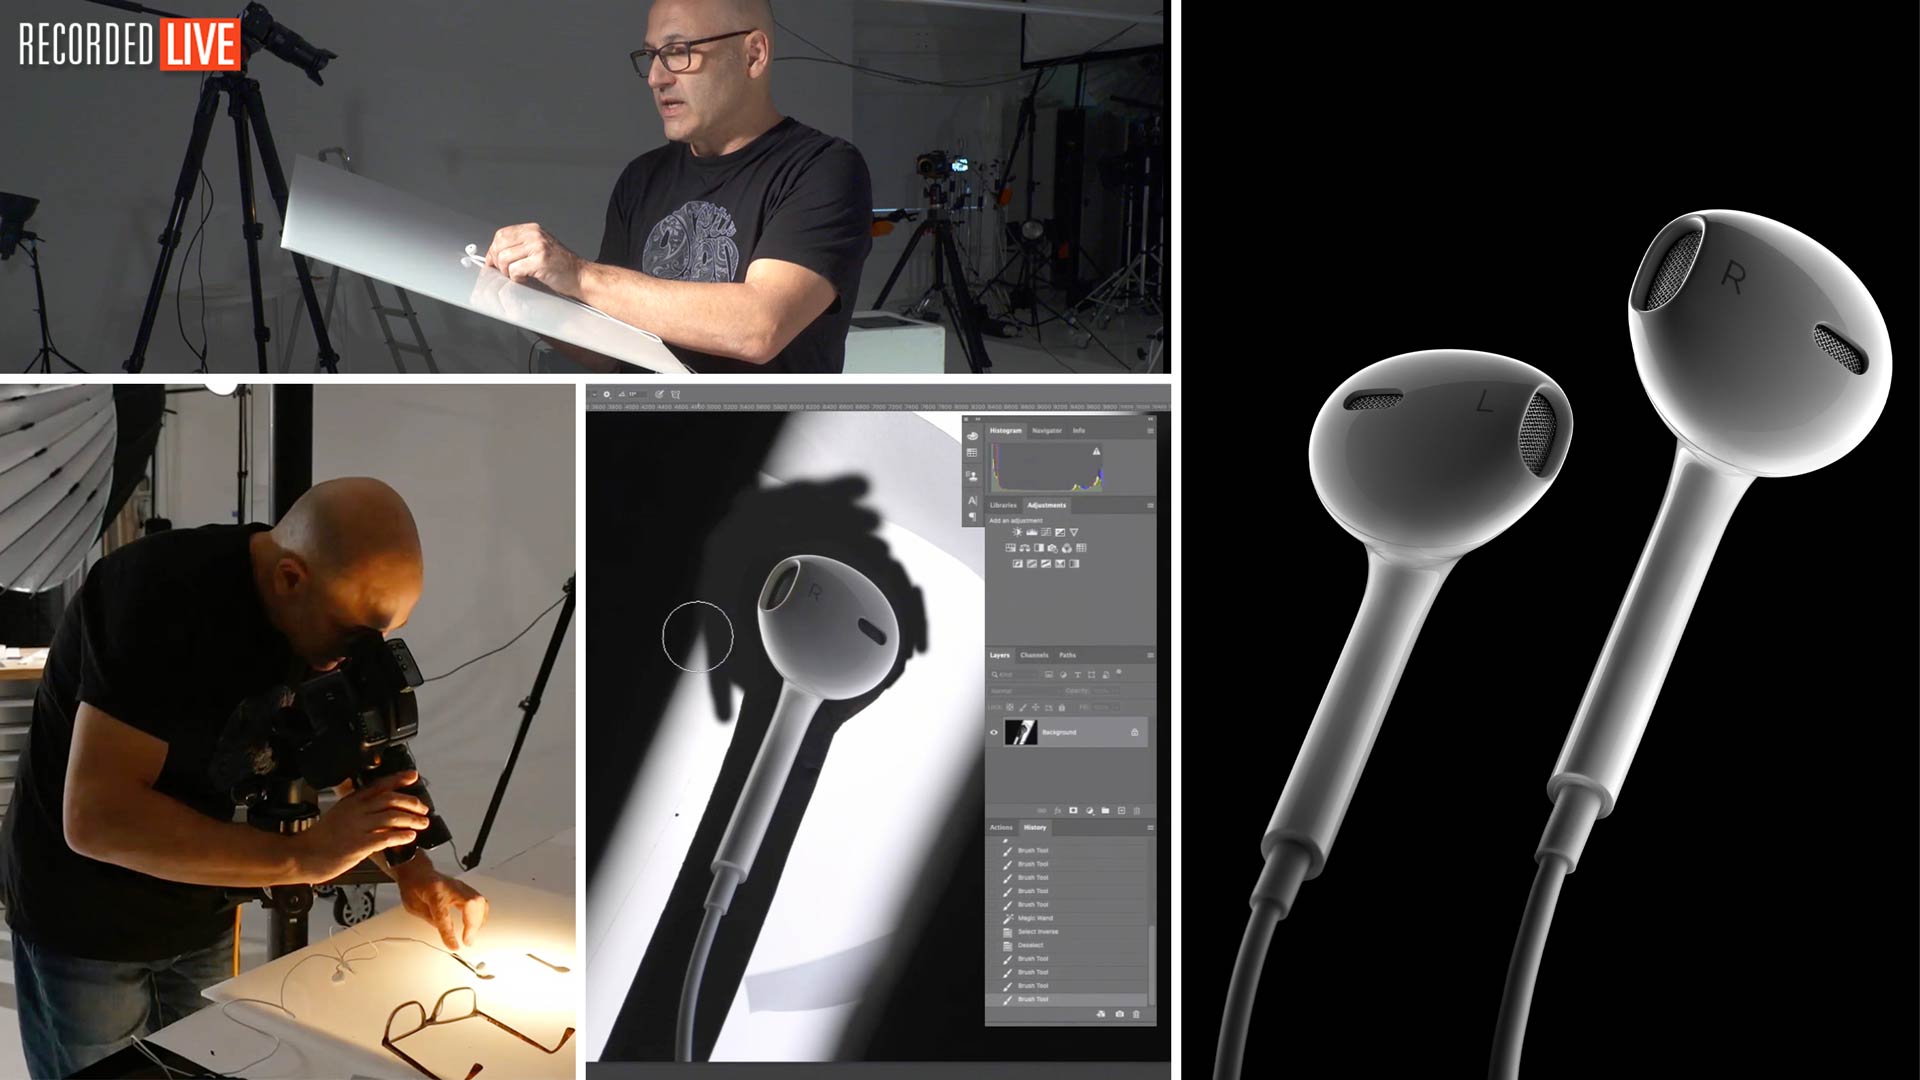

EarPods Product Shoot
Have you ever wondered how Apple make their products look so desirable in their ads? It’s all about the lighting – and this class shows you how.
Watch Karl take on our fourth ‘Working to a brief’ assignment as he teaches you how to photograph EarPods like a pro.
You’ll try and compare two different lighting setups — one with studio lights, one with speedlights – as you learn how to create the perfect rim and fill lighting.
You’ll discover how to create and control gorgeous gradients, as well as how to create perfect black backgrounds for product shots like this.
You’ll also learn how to achieve sufficient depth of field using focus stacking PLUS see Karl demonstrate the post-production work required to perfect the final image.
By the end, you’ll be ready to capture EarPod images good enough to grace a giant Apple billboard!
In this class:
- How to photograph EarPods
- Rim lighting for product photography
- Creating black backgrounds for product shots
- How to focus stack images
- Retouching techniques for product photography
- Rim lighting using speedlights
- Post-production techniques for product photography
If you enjoy this class, try Rim Lighting for Product Photography and Creative Product Photography with Speedlights.
Questions? Please post them in the comments section below.
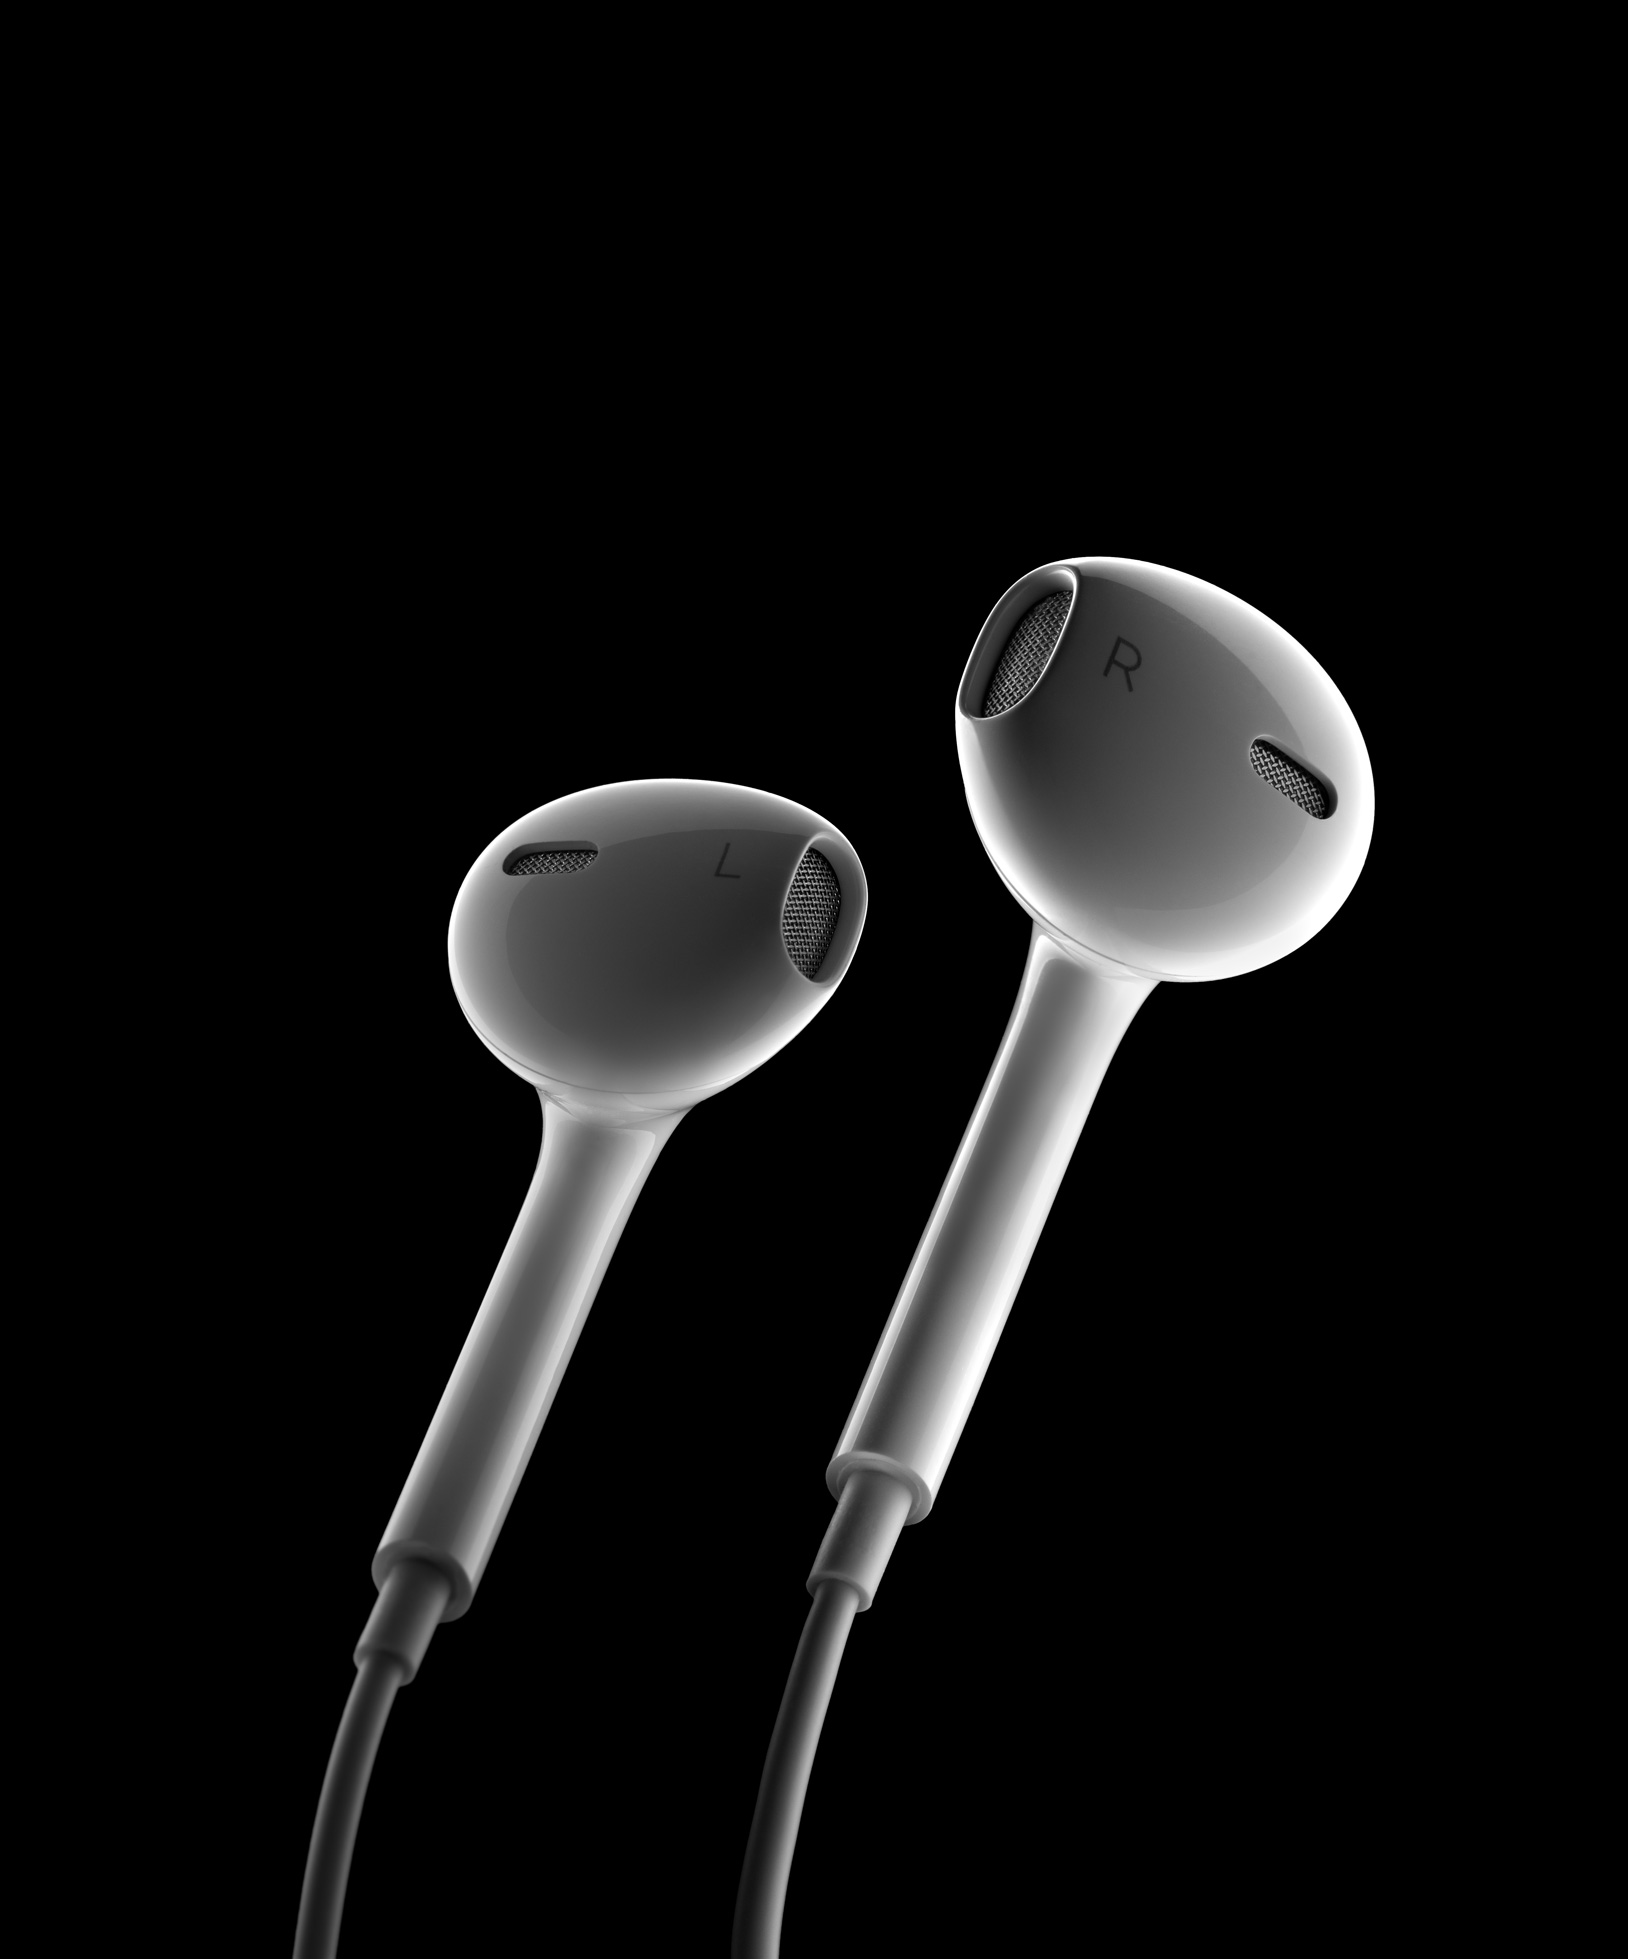
Final earphones product shot captured using speedlights.
Comments
Excellent insight into how to shoot this properly. As far as attaching the earphone to the card, have you heard of a product called tacky wax? It is more malleable than blue tack and much more sticky. Attaching your earphone to your card would have been so much easier.
Thanks for the tip, I’m going to look that up.
You can find it here;
https://www.amazon.co.uk/gp/product/B0047YOQHS/ref=ppx_yo_dt_b_search_asin_image?ie=UTF8&psc=1
Great thanks, I ordered it.
Excellent show Karl keep up the great work.
Thank you.
Thank you Karl, your explanations during the session contributed a lot to
my understanding of lighting.
Thank you.
Hey Karl,
One of the most interesting shoot in recent times. Great techniques for accomplishing a gloss finish. The X1Dii (and I believe the H6D also) has a feature called “Focus Bracketing” where the camera performs the incremental focus stacking for you. I wondered if you’ve ever used this feature.
Hi Bob, the X1Dii does have focus bracketing feature unfortunately the H6 does not.
I also wondered this because I use the X1DII, and have become comfortable with the focus bracketing. I do not own an Opaque acrylic. But I did learn a lot as usual when I observe.
Hi Karl,
A question, If you used the black window mask to block the flare, Will you lose image pixels which will lead to affecting the image quality after all? If yes. Does the 100 MP camera will handle it better that any 35mm cameras?
Thanks,
Hi Abdullah, I wouldn’t be losing any pixels that matter because I only blocked the area that wasn’t important. The pixels were still recorded they were just of the window mask rather than the product. This shot could easily be done with 35 and the camera could be in vertical format with the subject filling the frame more if you choose and in that situation you may not need the window mask or it wouldn’t need to be as tight.
Thanks Karl, that was a very enjoyable 2 hours and you did a superb job. I tried to photograph the earphones but my biggest problem was suspending them and eventually I gave up so I was amazed that you could do it with them on a flat surface. Even as a professional House & Product photographer I’m learning so much from your videos. Thanks, Tony Healy, Dublin Ireland.
Thanks Tony.
Amazing results for a “live” event – especially trying to put on a one-man show while performing in front of four cameras! Only thing that would have made it more impressive is if you strapped cymbals to your knees while beating a drum.
Ha Ha John thank you. I’ll do that on the next show!
Very interesting video tutorial as always, sadly I couldn’t participate in the challenge cause my computer died. It couldn’t be fixed at the end so I’m about to buy another one.. I was busy with work till the last week, then my plans went wrong. I’m happy for the guys who won, I’ll shoot this in the future as practice.
I’m proud of you guys and always say that you’re the best cause you give so much from your heart..
Keep it up.
Thank you Aby.
Thanks for the live show Karl, and KTE team. And thanks for this brief challenge, I really enjoyed. Despite the fact I ended up in folder 6, I am glad to see that I actually ended up using the same lighting setup (After several trials and after watching older videos several times). I am happy that actually I was able to learn the technique through KTE, and it means that I am getting to an understanding of how to use light even with minimum equipment, I used one speedlite and also used a cardboard setup around the earphones similar to how used the piece of paper strip. Mine for sure went bad in the post production which I need to work on and enhance my skills. 🙂 Really glad to be a member on this valuable platform.
Hi Arhkhalaf, thank you very much for your comments and it’s great to hear that you also figured out this technique. Thank also for taking part as this is the best learning experience and the team and I are glad to hear you are enjoying our platform. All the best Karl.
Asmall slit in the card for the cable worked a treat for me! I shot mine in very similar way but never even thought to use two lights underneath. I guess that comes with experience. Excellent stuff Karl
Thanks Peter for the tip and glad you enjoyed it.
Huge thanks to you and your team for persevering through all this and continuing to provide great instruction. I learned so much from watching the video and I really appreciate your clever manipulation of simple materials to create such beautiful images. A curled piece of printer paper…amazing!!!
Thanks James.
Nice one, Karl. Those extra tips are going to come in handy the next time I attempt to shoot something like this.
Great stuff Stephan!
Thanks Karl. Hoping you will post your final result on here soon. Definitely inspiring ideas and techniques!
Hi Karl,
I have a question regarding the flare. When I did this shot my flag was even closer to the lens, and still I had to add additional flags on the top and bottom part to control the flare. I used a bare bulb and a lastolite diffusor.
Do you think the flare in your shot is better under control due to the diffusion capability of the acrylic or am I missing something here? The alignment of the flash relative to the lens was roughly the same.
This was my first attempt for a product shot. Learnt a lot during my shot, and even more during this liveshow. Thanks to the entire team for providing this level of quality information under difficult conditions!
Tim
Thanks Tim, it may have been down to the focal length used and also the lens design. Sometimes the placement of each lens element relative to the next and the front of the lens, the aperture your using etc, there are many factors. The only thing to do though is test, check and test again until you’ve eliminated the flare.
Thanks Karl. Picked up some useful tips here. Excellent.
One question in regards to photoshopping the headphones at the bottom of the head where it wraps around – I’m guessing cloning and then smoothing in would work best here?
Cheers.
Mark
Hi Mark, yes and then sometimes you can actually paint your own new gloss hard edge lines in again with a brush tool and making a selection of the shape.