
Measuring Light and Achieving the Correct Exposure
Get the measure of light with this simple class.
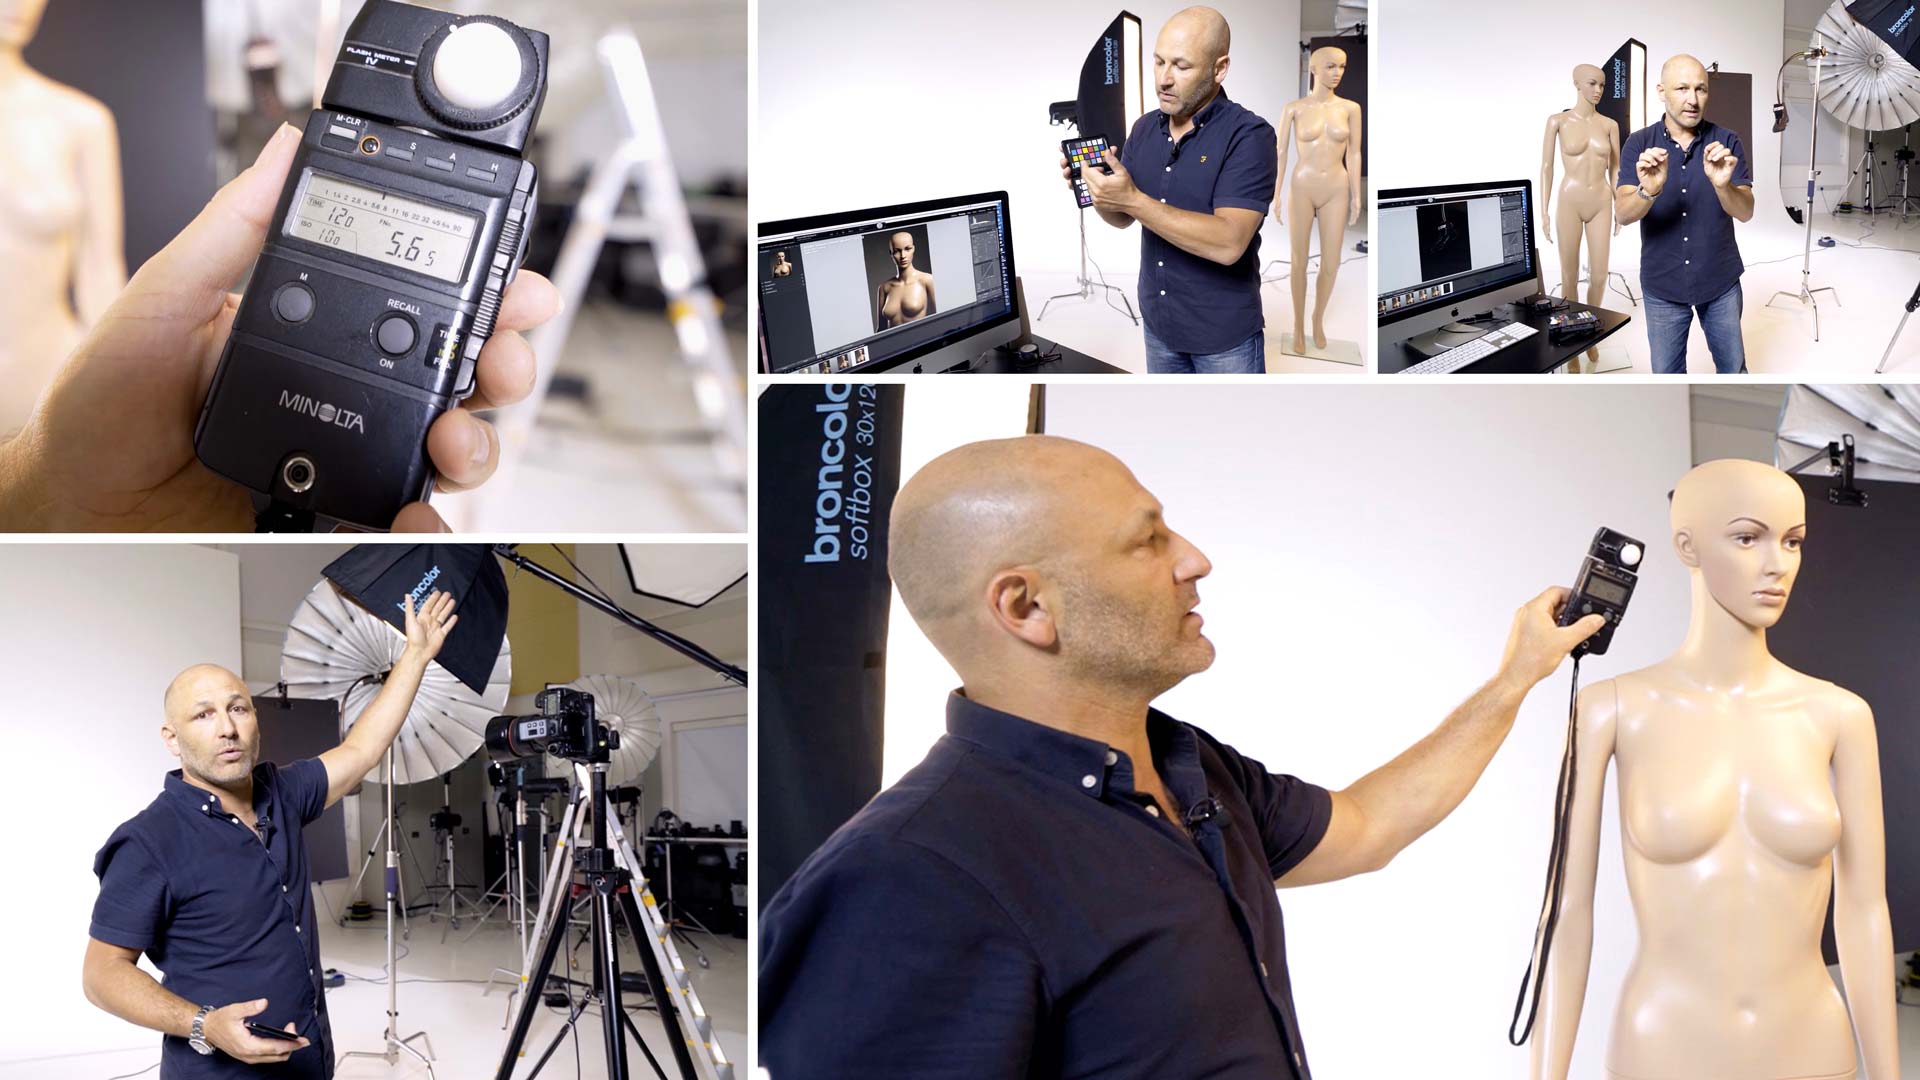
How do you measure the power of the light from your studio lighting to ensure perfect results? Do you apply visual, theoretical, histogram or light meter readings to achieve the best results?
Karl discusses the best ways to measure light and achieve the desired exposure as well as the limitations of the above methods and why it’s important to truly understand light if you want complete creative control.
In this class:
- Different methods for measuring light
- Light meters — what use are they in digital photography?
- Assessing exposure visually
- Combining aperture and shutter speed to achieve desired exposure
- Reading histograms
- Correctly exposing for different textures
Questions? Please post them below.
Comments
I bought a light meter a couple years back, i used it for about 2 weeks and stopped using it because i found it took me longer to get setup when using it, and the end photos were not what i wanted if i stuck with the settings the meter provided.
Well, you just saved me some money.
Hi Karl, as an art director I had a few battles with technically oriented photographers who had fixed ideas about exposure and other creative approaches to lighting. As you explained so well, lighting is subjective. Guitar distortion is technically bad, tell that to Jimmy Hendrix!
Exactly right Clive! 🙂
I’ve never really understood the concept of a ‘correct exposure’ as it all depends on what image you want to create and for that reason I never bothered with a light meter. This fab video has confirmed this view. The only problem i have noticed is the image preview on the back of my camera is generally brighter than the raw image once in Lightroom. So I think shooting tethered is the way to go when possible.
Hi Peter, I’m glad you see things in the same ‘light’ as for the image on your camera screen you can manually adjust the brightness of your screen on most DSLRs but yes in a studio environment tethered is the way to go.
Great explanation….now I realise why I struggle with my light meter to get the shots I want.
Wish I saw this before shelling out £350 on my Sekonic 478DR about a week ago :@
Sell it 🙂
Really impressed with the content so far Karl – the clarity of your tutorials is excellent. I’m just curious to know why you haven’t included ISO as a way of adjusting exposure alongside the other 3 approaches you mentioned. Or am I missing something?
Hi David, thank you for your kind comments and I’m glad you are enjoying our content. Our courses are designed to carry people through in a logical learning process and ISO is covered in an earlier module in the ‘Essentials’ section. In studio photography when you generally have all the light that you need then it makes more sense to work at the lowest or default ISO to reproduce the best quality image and simply adjust the power of the lights accordingly. When I wrote the script for this course I considered the level that people would be at given that they had moved to studio lighting and had to make the assumption that those using studio lights already understood ISO, depth of field and shutter speeds. Cheers Karl.
I shoot a lot of film and use a meter continuously as my old Mamiya’s have no built in meter. I find myself using the meter even with digital when the lighting is such that it could fool my camera’s built in meter (which looks at reflected light if I understand it correctly). I make adjustments after the initial shot if needed (as you mention – doesn’t cost anything with digital), but find a few seconds with the meter gets me very close most of the time and I generally don’t adjust much.
So the question for me is – wouldn’t using the meter in a reflected light mode fix many of the issues called out? Wouldn’t changing the position of the meter on the subject also help with quickly getting exposure correct?
Thanks for the great content. I am really enjoying the site and picking up a lot of useful information.
Hi Douglas, Of course there is nothing wrong with using a meter to get in the ‘ballpark’ and as you have experience shooting film you will of course need it that situation as I did. The purpose of this chapter though was to demonstrate how with a good screen tethered and looking at the histogram you don’t actually need one and in some cases they can set you off on the wrong path. The key thing is establishing in your mind what you want the shot to look like so that you arrive at that result and not one that a computer told you you should shoot.
Hello Karl. Thank you so much.!! You just saved me some $$$ a light meter was on my wish list. I totally get what you mean. Your approach is perfect for creating different looks using light. This is exactly what I need. I need to incorporate this type of thinking in my work for portraiture.
Yes, I agree. I was trying to see if this was yet another reason why light meters are no longer a necessity, or even reliable for the intended purpose.
That’s a nice and interesting clarification Karl! I wasn’t expecting the difference to be so significantly different, but it makes total sense what you said.
So, here is a question that relates this lesson with the previous one: can a light meter correctly measure the light output taking into consideration the possibility of a shutter speed that’s fast than t0.1? I mean, in the previous lesson we discussed that if the shutter speed is faster than the flash’s ability to output all its light, the flash could get cut off by the shutter speed, resulting in an under exposed image. Does a light meter use shutter speed settings as part of the measurement?
Hi Kryn, as far as I’m aware no. The light meter isn’t aware of each flash manufacturers flash durations long or short. Although I haven’t used a light meter for 12 years so they may have added this feature but I doubt it as flashes change all the time. The simple fact remains though, that if you experimented with different shutter speeds you’d see the resulting change on screen so you could figure out what was going in and make a note at which speed the full flash burst was captured.
Hi Karl,
I just spend quite a lot of money upgrading my gear, a seconic light meter was on my list, but I opted for a awesome lens instead, boy am I glad I did not buy it. I am really starting to understand light now a lot better than I thought I did. You are making me think like pro! I have spend a fortune on a diploma in photography, now I wonder why I bothered, I should have just found you a lot sooner. I am glad I am here 🙂
Thank you and glad you are enjoying the content.
The amount of money I just saved on the light meter I wanted just paid for 28.57 months of Karl Taylor Education…nice!
Hi Karl
I have a lot of your DVDs and very nearly didn’t bother signing up.
This video alone is worth it to me.
I’ve just bought a couple of Godox AD200’s and soft boxes and I am looking forward to trying some of what you have shown in this video.
Onwards and upwards
Cheers
Malcolm
Hi Malcom, thanks for signing up there is a lot more stuff to come and with our live shows, competitions and gear discounts we believe it really does make membership a bargain! Good like with your Godox and softbox tests. Cheers Karl.
This is so great! as a beginner i always wonder, what if i want another aperture? or if always going to use the same aperture just because the light meter say so?. A friend told me to buy one because it help to improve the depth of field or to reach a better subject in focus, is this true or it has nothing to do about it?
Your videos are amazing and makes me understand a lot of things.
Hi Daniel, no please don’t waste you money on a lightmeter. Just keep following this course as you are doing and practise what is being shown and it will all start to come together. Cheers Karl.