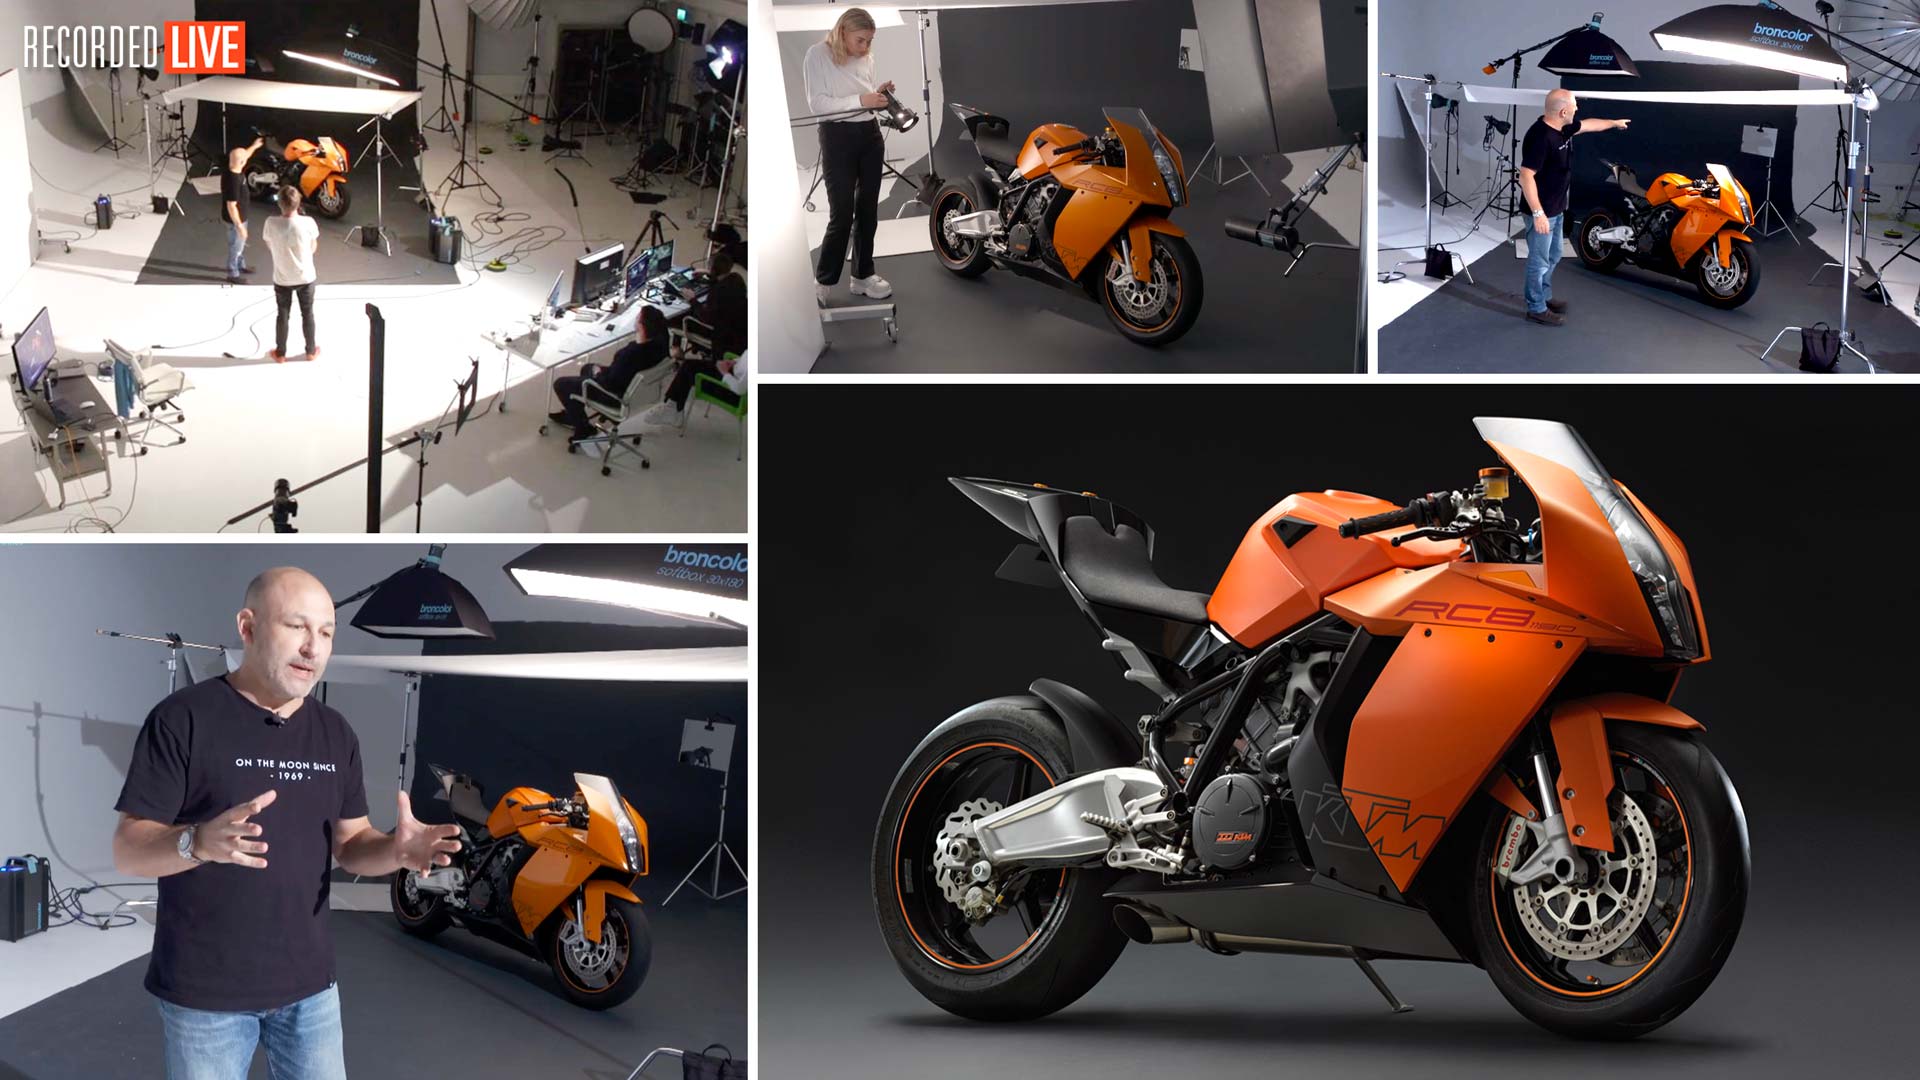

Motorcycle Photography
In this live motorcycle shoot, Karl demonstrates how he photographs a KTM RC8 sports bike.
A highly complex (yet equally enjoyable) shoot, Karl talks you through the entire process, explaining how to work with different lines, surface textures and lights to get the most aesthetically pleasing result. Throughout the shoot you’ll see what aspects Karl considers when it comes to the bike, the background, lighting and camera settings as he explains his thought process and workflow.
Starting with his key lights, Karl demonstrates how to create pockets of light to draw attention to the most important areas of the bike. He also demonstrates how to use accessories such as reflectors, flags and mirrors to precisely control the light to get the very best results.
This information-packed show covers valuable information pertaining to studio light and how to control it, which can easily be applied to numerous other products, including car photography.
In this photography workshop we cover the following:
- How to photograph a motorcycle
- Lighting setups for motorcycle photography
- How to photograph reflective surfaces
- Lens choice, equipment and camera settings for motorcycle photography
- Tips for controlling multiple studio lights
- How to recognise and prevent flare
- Using reflectors and flags for effective product photography
- What to charge for motorcycle photography

If you have any questions about this show, please post in the comment section below.
Read more in the accompanying ‘Motorbike Photo Shoot‘ blog post here.
Comments
Whenever I see you solve lighting problems like this, I think of how much time it really takes to figure it out and I must say that you work faster than I would possibly imagine. That is a great talent and lesson to learn from.
Thank you, this just comes with experience. The more you do something the more naturally the solutions come to you 🙂
Great Show Karl & Team
A motor bike is so intricate,
with lots & lots of nooks & crannies.
And you sure took the lighting all the way, bring
together, a super modern sports machine , & all done
in camera, amazing.
Thanks for another very informative & entertaining show
Wishing y’all, a very exciting & safe , New Year 2020
And I’m looking forward to the post production on this one too.
Thanks John Burnie
Thanks John, glad you enjoyed it.
As always, Karl, this is really inspiring (couple with a portion of intimidation). But I have a few questions for you: Given that you are a working photographer, do you ever find yourself conflicted between producing these educational videos and doing work for specific clients, given the time these videos take? Or are you able to couple both projects together at times? I don’t recall whether this one was for a client or specifically for the purpose of this tutorial. Finally, do you have a recommended tutorial where you use a light to pop/illuminate parts of a product for layers that you then blend in Photoshop? Thanks again for your helpful instruction and ample inspiration.
Hi Kevin, thank you for your kind words. This bike shoot was purely for the live show and our education channel, although if I say so myself I’ve not seen a better shot of this KTM in the studio so I will be contacting them and other bike manufacturers to see if they’d be interested in my services. I’ve got another tutorial coming on the Honda Fireblade further into 2020, that one we recorded so I can concentrate more on the content and important stuff in the edit and there will be a full post production run through too. I divide my time about 50 / 50 at the moment between the commercial work and the education platform. I wouldn’t say there is any conflict as I have the time for both as we are a team of 8 people in the studio and I have two very good assistants to choose from on any of the photography projects. The rest of the team take care of marketing, social media, website I take care of script writing, presenting, photography whether it’s commercial or for the education. I try to do as much in camera as possible but for other tutorials I think these might cover some of what you mentioned –
https://visualeducation.com/class/cheese-still-life/
https://visualeducation.com/class/product-photography-footwear/
Impressive as always mate.
What can I tell you..
I wish you a great new year as well as your family and the whole crew
Thank you Aby and to you too.
Hey Karl,
great show, you and your team did an impressive job. I am baffled by the complexity and the amount of work you put into making the bike look perfect in camera. I am a motorcycle photographer and I also try to make as much as possible in camera, but some things are easier to clean up in post than in camera if you don’t have the space, materials and crew available as you have.
Here’s my set of questions:
How much time did you (or the owner?) invest into cleaning the bike before the shoot?
How did you deal with dust on the bike? I saw you using compressed air once during the show, but usually dust settles immediately on the bike and is a hell of a problem on glossy surfaces. So I wonder why you did not have to clean the bike more often during the shoot.
Concerning the background: How many layers of white paint will it take to cover up the grey?
What kind of paint do you use, is it normal wall paint you would also use to paint a room?
Best regards,
Julian
Hi Julian, thank you for your comments. I’ve tried to answer your questions below:
Q: How much time did you (or the owner?) invest into cleaning the bike before the shoot?
A: I don’t know the owners did this but I believe they keep them in good condition, dry bikes only.
Q: How did you deal with dust on the bike? I saw you using compressed air once during the show, but usually dust settles immediately on the bike and is a hell of a problem on glossy surfaces. So I wonder why you did not have to clean the bike more often during the shoot.
A: The dust didn’t seem too much of a problem. I try to keep my studio as clean as possible, regular sweeping/vacum. But these bikes were ceramic coated treatment so very shiny and air can blew dust away easily.
Q: Concerning the background: How many layers of white paint will it take to cover up the grey?
A: It takes us 3 coats to get it back to white. It took 2 coats for a good grey
Q:What kind of paint do you use, is it normal wall paint you would also use to paint a room?
A Yes we use normal interior Matt Emulsion (waterbased) the same stuff you’d buy for painting interior walls but it must be Matt.
I hope to add subtitles, because my English is bad. I believe that a part of people have the same needs
Hi, yes we are adding new english subtitles to our courses all the time.
Hi Karl
great show as always , couple of questions,
– why not use bare bulbs instead of soft boxes atop the scrim
– why bounce the spot from the flooter of the wall for the ferring instead of lighting it up directly
thanks
amit
Hi Amit, I explained about the softboxes as the start, you must have missed it. Try to think logically about the shape of the object and then watch the start of the show again. You have seen other shows where I use bare bulb and I explain the type of gradient that this provides it should be clear why in this case that’s not going to be as effective but you will see near the start of the show. I also mention about the wall and a someone asked the question during the show which I know I answered in detail during the show.
Hi, Karl. Or I better should say “Hi, light magician” 😉
Thank you a lot. Merry Christmas.
Thanks Bogdan
Thank You! Money well spent. Enjoy the Holidays. You deserve it.
Thanks Gary
Excellent live show! Thank you.
Thank you Helena
Very nice live show,thank you
This live show is just a bang!!!!!!
Thank you Abdullah, I really enjoyed this one
Excellent session Karl. You demonstrated the fine details of the bike I never even thought of with solutions to the reflections and the shadow control. A wealth of knowledge gained here. Looking forward to the new course when it comes out.
Thanks Geoff I also enjoyed this one (I love bikes!)
Great Show! I didn’t get a chance to tune in to the live show and have a question about the floor which you will obviously do in post. Will you cut out the bike and put it on a gradient or use a different technique?
Thanks Bob, I thoroughly enjoyed shooting this one. We move the lights and stands back a bit, wash the floor and shoot a blank. If we can’t move all the stands they will be retouched but the background the bike was on will be the background in the final shot. There will be a post production tutorial in the new year.
Super live show, thank you
Thanks Raymond