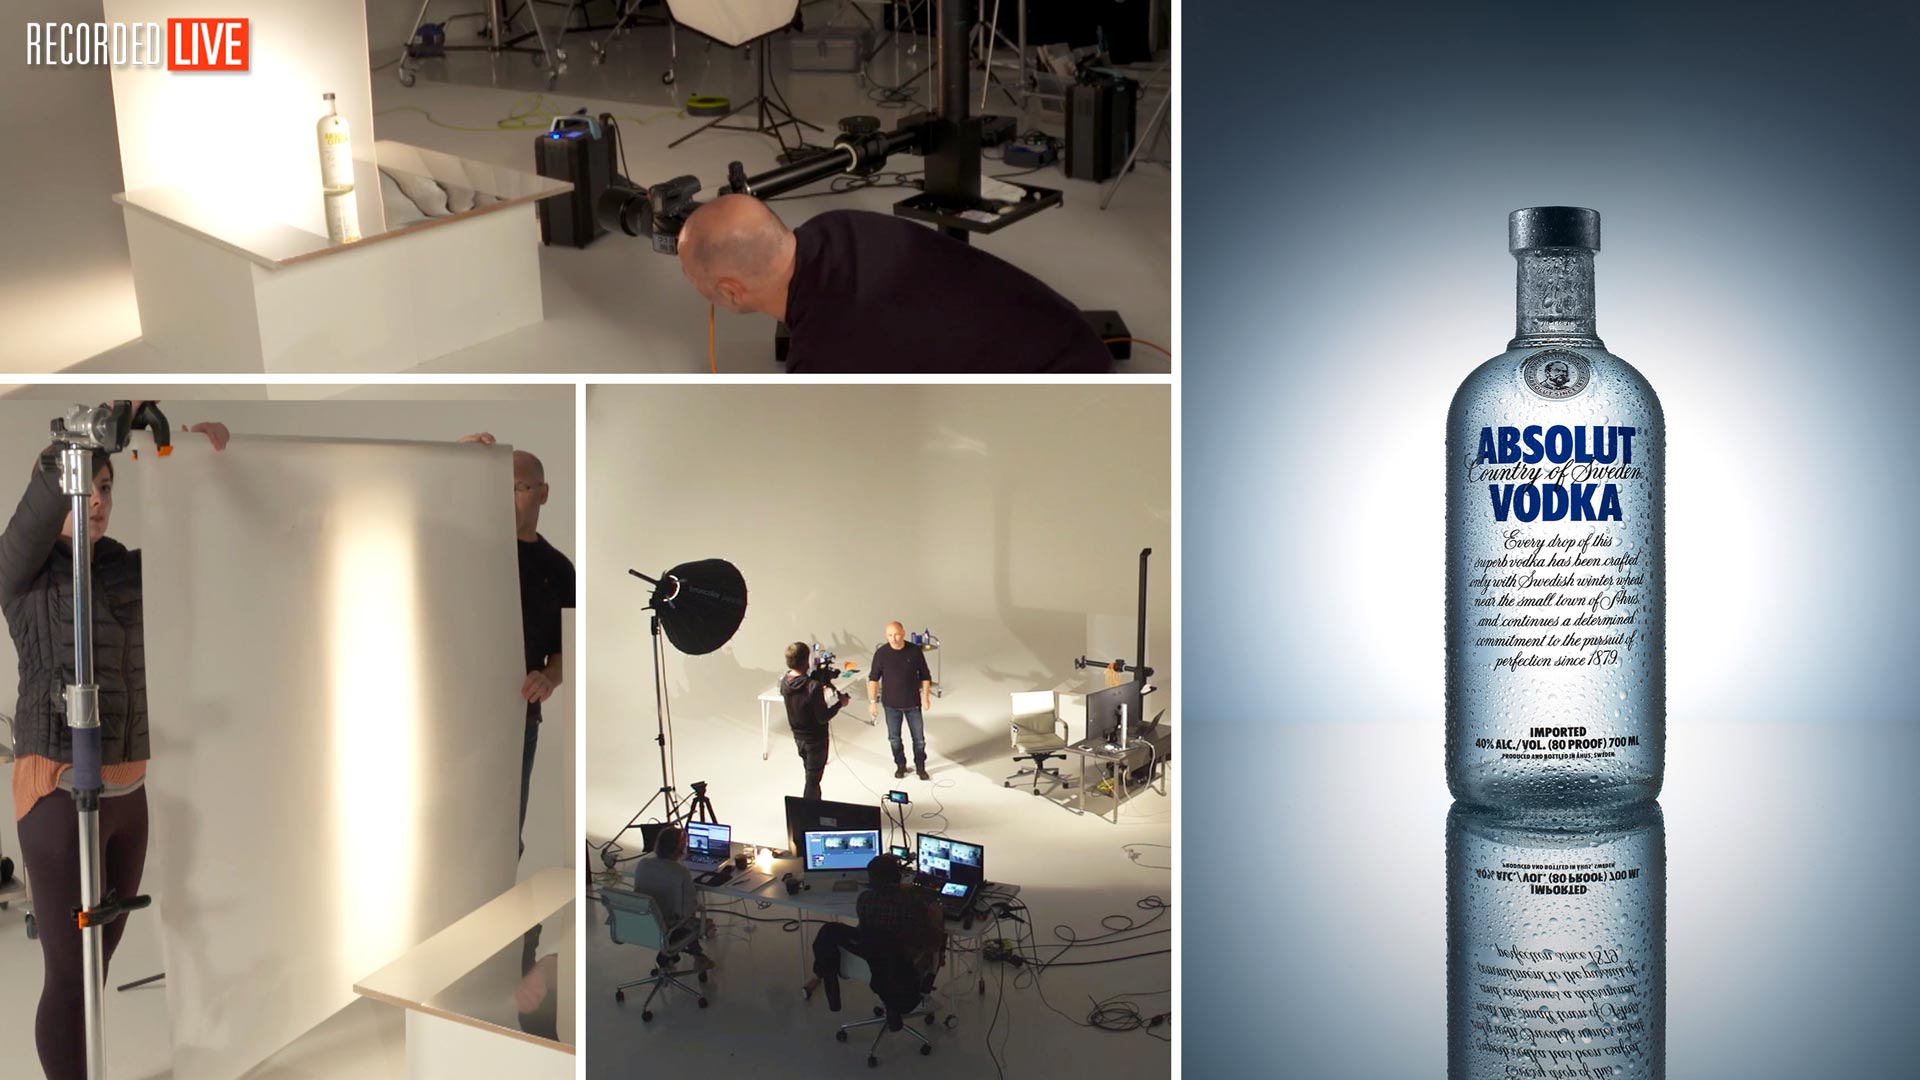

Photographing Clear Liquid Bottles (Gin/Vodka)
Wondering how to make bottles look beautiful? All will become clear…
Discover a host of clear bottle photography techniques that you can easily and effectively try out for yourself!
Learn from a pro as Karl shows you step-by-step how to light and photograph bottles of clear liquid such as gin or vodka.
You’ll discover how to achieve perfect condensation to create that cold, desirable look. Learn which backgrounds and base surfaces work best, and how to light the product beautifully using just two lights.
You’ll also learn how to incorporate additional lights to highlight the label and reduce unwanted shadows, further enhancing your shot.
Simple steps for photographing clear bottles:
- Prepare the bottle – This includes cleaning the bottle and creating controllable condensation
- Select the background and base surface – These will have a big impact on your overall image
- Light the product – This can be done using just a few lights with basic modifiers
- Photograph the bottle – Determine your composition and camera settings
If you enjoy this class, check out our Whisky Photography and Wine Bottle Photography classes. You can also find tips for creating your own perfect condensation in The Perfect Pint and Condensation Cold Look.
Questions? Please use the comments section below.
Comments
Karl,
Not relevant to this particular product photography, but is there chance that you would ever do clothing photography with mannequin or models? If not, some pointers would greatly help.
Thanks,
Sai
Hi, please see the shoots in our Fashion section.
Hi Karl, I noticed in some of the tutorials, that it seems you more often adjust the stops of light versus the aperture on the camera. When I did a short mentor program with a local photographer about 3 years ago, he seemed to have me do the opposite. So I guess my question would be, when do you adjust the aperture to bring in less or more light, versus adjusting the lights? (I hope I am making sense.) I just want to understand this. Thank you so much, and I am learning so much from you. I am glad you are doing all of this! Tamarah
Hi Tamarah, I would always adjust the light if you can. The reason being that the aperture also controls the depth of field and the look and feel of the shot. Therefore we should be deciding what aperture we want to use for a certain look and then adjusting the light to suit the aperture when possible.
That makes sense. Thank you Karl.
Karl,
I have always had a hard time making myself sit down and watch tutorials, to further my education and knowledge. I have found that since I have started watching yours, my creativity level has increased and I am excited about photography again! Thanks so much for all that you and your team are doing.
Thanks,
Sam from Texas
Thanks for your comments Sam much appreciated.
Hi Karl
Hello from Australia
Loved this. Product photography is one of the areas i want to get into. this is a great video to show how to light a product and the benefits of great lighting.
Thank you
Thank you.
Hi Karl
Dedolight (i believe its a German Mfg) has a lens projector attachment/gobo setup. One can spotlight an area as small as a headlamp of a toy car.
https://www.youtube.com/watch?v=LPgRhU8Kxdc
Unfortunately it works only with a Dedo Light
Thanks
Amit
Hey Karl,
I’ve been trying to find an equivalent to the projector attachment for the picolite. From what I gather is that the two specific characteristics are the ability to focus and the vilify to use 4 blades to shape the light pattern.
Do you know if a version exists for Bowen’s mount or profoto mount strobes? Perhaps from another brand?
Hi Kryn, yes it is a lens system that focus’s the light and before that are a set of 4 blades that you can create shapes with then you can use the lens to focus sharp or defocus as necessary. I’m afraid I don’t know of any other system other than some bigger ones in the broncolor range.
Hi Kryn! Karl already showed an alternative in one of his live sessions on portrait photography recently. I also had that problem to find one. Karl used in that live session a projection attachment branded with PixaPro. In UK you can find them at essentialphoto.com. Karl was not very happy with the PixaPro attachment because he complained about the missing adjustable blades.
The good news. There are blades available, but always out of stock at essentialphoto. In the mean time I own three of the projection attachments, one shutter blade insert, and one adjustable iris diaphragm, which is very useful as well.
One projection attachment I ordered at essentialphoto, two of them via ebay directly in China. Two more sets of shutter blades I ordered right now at AliExpress. The blades for the e-mount version of the attachment are actually difficult to find. Right now the only way to get them is at AliExpress.
Inserting the blades into its place in the projection attachment is a real pain. But once you manage to do so, it works. I can light things I could not before, for example labels on bottles. This helps really a lot.
I use it with my Profoto strobes. You need at least a 500 Ws strobe. Would not recommend using it with halogen modelling light, and if just for the short time of adjusting the blades.
If you want to use it on Profoto, I would recommend that you buy any mount you can get for a reasonable prize and buy the Profoto Adapter via Ebay directly in China. You have to buy the Profoto Adapter with an outer diameter of 135 mm.
All I ordered in China I got within 3-4 weeks.
Hope that helps. If you have any more questions, do not hesitate to contact me. Even if it is not the Picolight High End Gear, with the chinese stuff you can do things others cannot without having it.
Thanks Karl
Hi Karl, great tutorial as usual. Would you use this set up for white wine or the red wine set up from that recent tutorial?
Thanks
Derek
Hi Derek, yes this can work for white wine. If you used the red wine setup then you would need to use a reflector card as we did in the whisky.
Hi Karl & team!
I love your knitted pullover, Karl! 😉 Btw: Thx for the great show. As always, it was a pleasure to watch.
Greetings from Germany
Dieter
Thank Dieter, I don’t often wear jumpers but it was bit chilly 🙂
great info , loved the show .
thanks again Karl & team
Thanks Frank
Hi Karl,
New subscriber and I’m just starting with product photography (desktop, small items), do you have a list of what you would consider necessary items to have in one’s kit.
I also would like to know the number of strobes (I use Profoto lights) you would recommend as a starting point.
Thanks, really enjoying the lessons
Hi, if you work your way through our product tutorials you will figure out the key stuff that I use. If after that you have further questions come back to me cheers.
Hi Karl,
Great show again ?
You used a frosted bottle in this demonstration and I wondered if you had used a clear cylindrical bottle would the edges of the background have produced hard dark lines in the back of the bottle? And if so how would you eliminate them?
Cheers
Chris
Hi Chris, no it would have been very similar. This example was a clear bottle https://karltaylor.com/fnxjs8q3ju82d02iyoytj5munlvqjz
Great tutorial thank you. At the end you were talking about possibly making your own projection attachments, and I’ve actually made two different styles of of projection attachments to fit my Paul C. Buff lights. Very inexpensive but extremely effective. One is just simply a cheap third party snoot off amazon that I fixed lens extension tubes on to the end of it and simply attach any spare lens I have to it to focus and defocus the light. I’ve also made a projection attachment very similar to the picolite projection attachment with a lens fixed into a snoot but in between the snoot and the lens I made a section where I have aperture blades to control the shape of the light.
Great tutorial as usual Karl **thumbs up **
Thank you Kevin.
Great tutorial as usual. Thanks Karl for some really cool and enlightening tips in controlling light.
Cheers Danny.