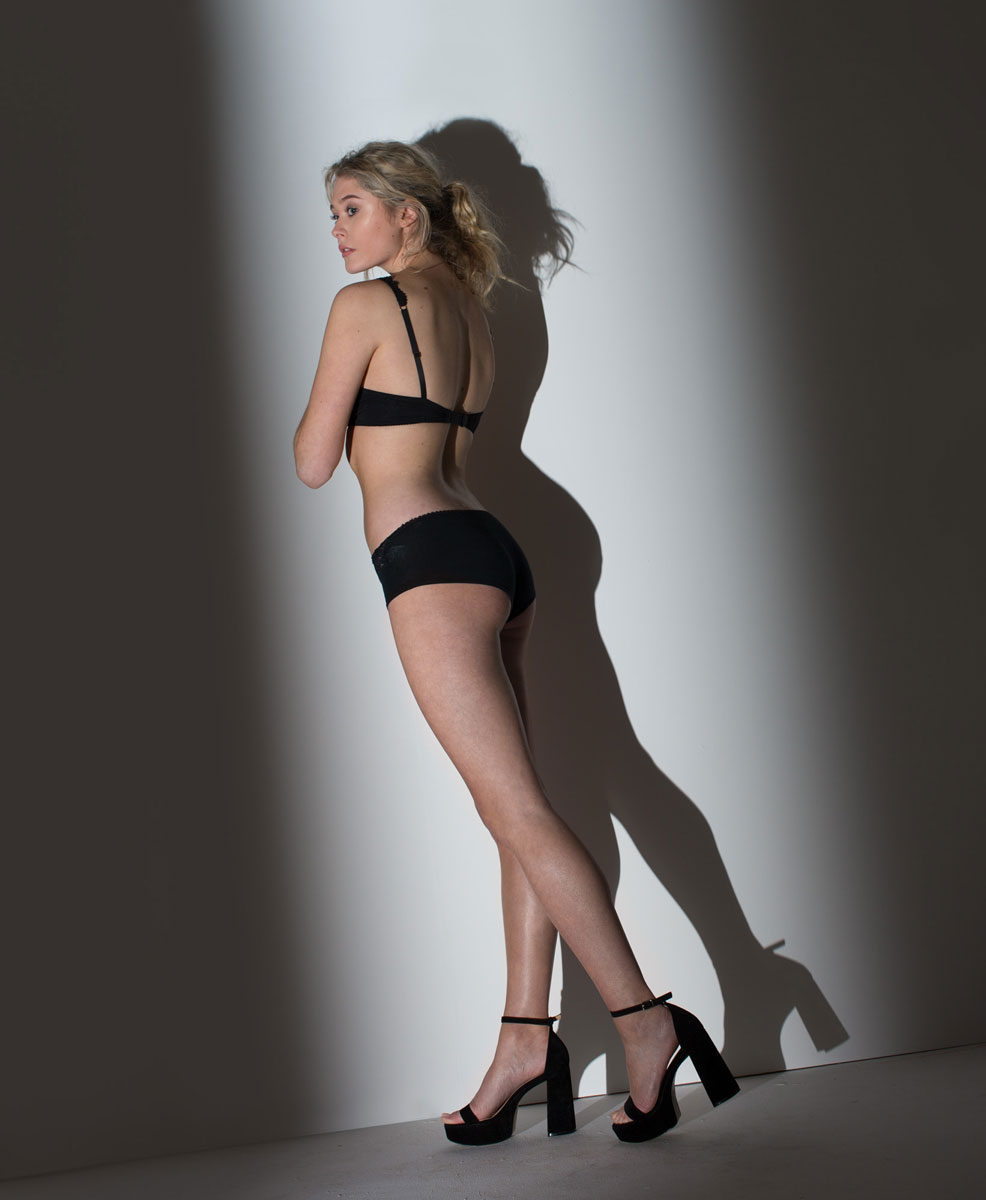
Dramatic Single-Light Portrait With Harsh Shadows
Dynamic and dramatic, with a stunning silhouette – and all with just one light.
For this dramatic lighting setup, Karl and Urs deviate from the normal conventions of portrait photography as they set out to achieve a full-length portrait using a single light source.
Using a single, bare bulb from a low angle they show how it’s possible to execute precise control of a light with just a few simple accessories. Starting from the very beginning, the pair demonstrate each result as they tweak the shot until they reach the final, dramatic result below.
Starting in the large studio, they go on to demonstrate how the same results are perfectly achievable in a small studio too.
In this class:
- Creative portraiture using a single light
- How to create hard light using a single light source
- How to control shadows
- Shooting from a low angle and how to make it work
- Creating soft shadows with a hard light source
- Photographing in a small studio
- How to control light in a small studio
Questions? Please post them in the comments section below.
Comments
If you tape the diffusion to the light there might be a chance it could catch fire. I wonder if you taped diffusion to the gap between the black panels would it have the same effect? Or would that soften the edges of the shadows cast from the cards?
Hi, thanks for joining our platform – I believe you may be new here, so just to assist you with help and support on any videos if you could please make a note of the time code in any video that you are referring to so that it is easier for us to check. As you can understand we have many videos so this just helps us to help you. In this instance yes you’re right if the diff had been on the card slit it would have affected the shadows, also the diff we use is made my LEE filters and is fire resistant, it will melt but shouldn’t catch fire. Tracing paper which some people use as diff does catch fire! Including me previously!
Hi Karl, Is it possible to shoot a shot like this using a projection attachment with a gobo mask?
Hi yes theoretically that should be easier to do than this option but you would need to defocus the lens a little to match the softer edges of the shadow. The only question would be the power of the lamp you were using as projection attachments/gobos suck up a lot of the power but you could always increase the ISO. See this class where I do something similar to make a door of light around the model: https://visualeducation.com/class/fantasy-fatale/
Fantastic work with the hard light setup! I was wondering though if it’s possible to replicate the black box with a small reflector dish (4″) modifier to the light source + barn door attachment?
Hi, I don’t think so as it is likely that too much light would escape from the unit that your overall illumination in the room would be too much.
Class act breakdown, thank you. I am wondering if this same idea would work in open shade outside? Perhaps it would require far too much power unless it was dusk? Secondly, I wonder if it was full night time with little ambient light coming in would you struggle with too much contrast?
Hi Miach, thank you, Urs did a great job on this one. In answer to your question 1. In open shade it might just be achievable as we can create a shadow from our key light but you’d probably need 3200J to acheive it so I think it would be difficult and getting towards evening would certainly help. 2. At full night time would be similar to doing the same shot in my studio but with all my walls painted black, the result would be no bounced light around the studio at all meaning all of the shadows cast my the model and the flags would be solid black. I hope this helps, all the best Karl.
Very Clever and something to think about in the studio. Just a quick question. Would I get a similar result with 30x30cm soft box without diffusion material ?
Hi Joseph, no you wouldn’t because the softbox without the diffusion material is still a bigger (softer) light source than a bare bulb one. My first question is why don’t you just remove the softbox from your light source? The next thing would be to revisit these chapters if you haven’t seen it recently –
https://visualeducation.com/class/introduction-and-understanding-light/
https://visualeducation.com/class/lighting-modifiers-and-their-effects/
Clever stuff!
Outstanding video. Thank you
Hi Karl,
If I have a couple of models where should I put my focus on?
Hi Karl,
you mentioned about black curtains and I’ve got a question about it. We’re now preparing to build and equip a studio with 3 rectangular photo plans side by side, each around 6x10m (1 for packshots and 2 for ecommerce sessions with lively kids/models etc.), no windows on walls, only on the roof. And we want to separate each plan with curtains – what colour of the curtains do you suggest – black or white?
We are of course working with flash lights, movable and lively models etc (you can see examples of our sessions in here https://shop.partydeco.pl/lang/en). I’m aware that with black curtains it would be easier to freeze motion and control flash, are there other things we have to think about?
Thanks for your answer.
Hi Karolina, if you use white curtains then you will need to be careful that they are solid so that the light from one area doesn’t affect or annoy the photographer in the next booth. White acts a big reflector which is sometimes useful and sometimes not depending on the lighting look. If it was me I’d’ create it with two rails so the photographers can choose black or white or have white as the base and plenty of black you can pin up when you need it.
Two rails seem like the best solution. Thanks for your help and great lessons too!
Wow. This is a great eye opener. Thank you
Thank you. Urs has got some good tips.
Hi Karl, could this have been accomplished with barn doors in lieu of a “light box”?
Hi Charlie, in a word No. The main reason is the distance needed from the light source to the opening.
Hi Karl,
is it necessary to focus always on the eyes of the model?
Hi, Usually yes as it is natural for humans to make eye contact so we expect to see that part sharp
Ok,thanks Karl.
Why is the scene before a shot different from the resulting picture? At least, this is the way it is shown in this video. So, I can’t tell by the scene what the picture is going to be.
Ah, got it. Because of the flash. I have a continuous light soft-box, so haven’t got used to the the flash light.
Hopefully, a continuous light will give the same result. It is light, after all.
Hi, Karl,
Sure will, I was just having a nose around 🙂
Matt
Just joined the party today. What a great video, beautifully explained and well articulated. Excellent job guys.
Thank you Matthew. Although if possible try to watch from Chapter 1 in this section as I think there will still be interesting concepts that you will see along the way and I’ve designed most of the modules to work in sequence. All the best Karl.
One last question on this:
Url explained it but I didn’t understand what he said for the reasoning:
He added something to the front of the strobe, what was it and why?
Because thinking of recessed Profoto heads, I can either use the default recessed head OR I can add the Dome diffuser … But Urs added something hand made to the dome of the Siros..What was he trying to achieve there?
Thanks.
Hi Babak, was it the little piece of diffusion he added you are referring to? if so he added it just to diffuse the light a little to make it a tiny bit more even, the flash tube before any diffusion is a circular tube around the modelling light so would have been patchy but very minimally because no modifiers were being used
yep that was it. Thank you.
OMG! Will try it this weekend…
But one question: How did he decide on the “relative height” of the aperture flags around the light?
Hi Babak, just how we do for most stuff like this, hold a card there and look at the result! 🙂
Brilliant demonstration. Can you tell me, what are the gray color floor brackets you use to support the boards and other larger styrofoam light blocking panels I’ve seen in your other videos?
Hi Jonathan, I had these made at my local metal workshop to hold polyboards
Brilliant!
Your understanding of light and light/shadow control is impeccable. Thank you so much.
Hi Karl,
could this be achieved by using a Farnell Light and the use of the barn doors if I had a white walls/Floor studio like in the video? thank you
luciana
Hi Luciana, no it would need to be done in an enclosed box to stop the light bouncing around the studio.
do NASA call you when they have some issues with light physics :). thats totally mesmerising and honour to learn from you. thanks for cutting down the prices.
🙂
Yes, this is absolutely brilliant, I could actually see the light being shaped and controlled as if it were a liquid………. very exciting.
Thanks Gerry
The light is from below and it is still looking great.
Why is this case working ?
In this case it is a full length shot and not a close up portrait, she is also mostly in profile and the camera is also shooting from low. I wouldn’t recommend this lighting position for a conventional portrait for reasons explained in the ’emotion of light’ chapter.
This is absolutely brilliant.
What is the difference in effect between the 2 blackboards (Aperture) and a barn door??
Hi Ashraf, too much light spills out of the sides of the barn doors and due to the physics of light and casting a shadow the light needs to emanate from a point light source. With barn doors they would need to be attached to a standard reflector which stops it being a point light source. Also the further away the point light source is away from the aperture then the better the shadow will be. See chapter 17 of ‘Light Source’ for a further example.
Crazy..