
Diamond Rings Jewellery Photography
Reflections ruining your ring shots? Discover this tried-and-tested technique.
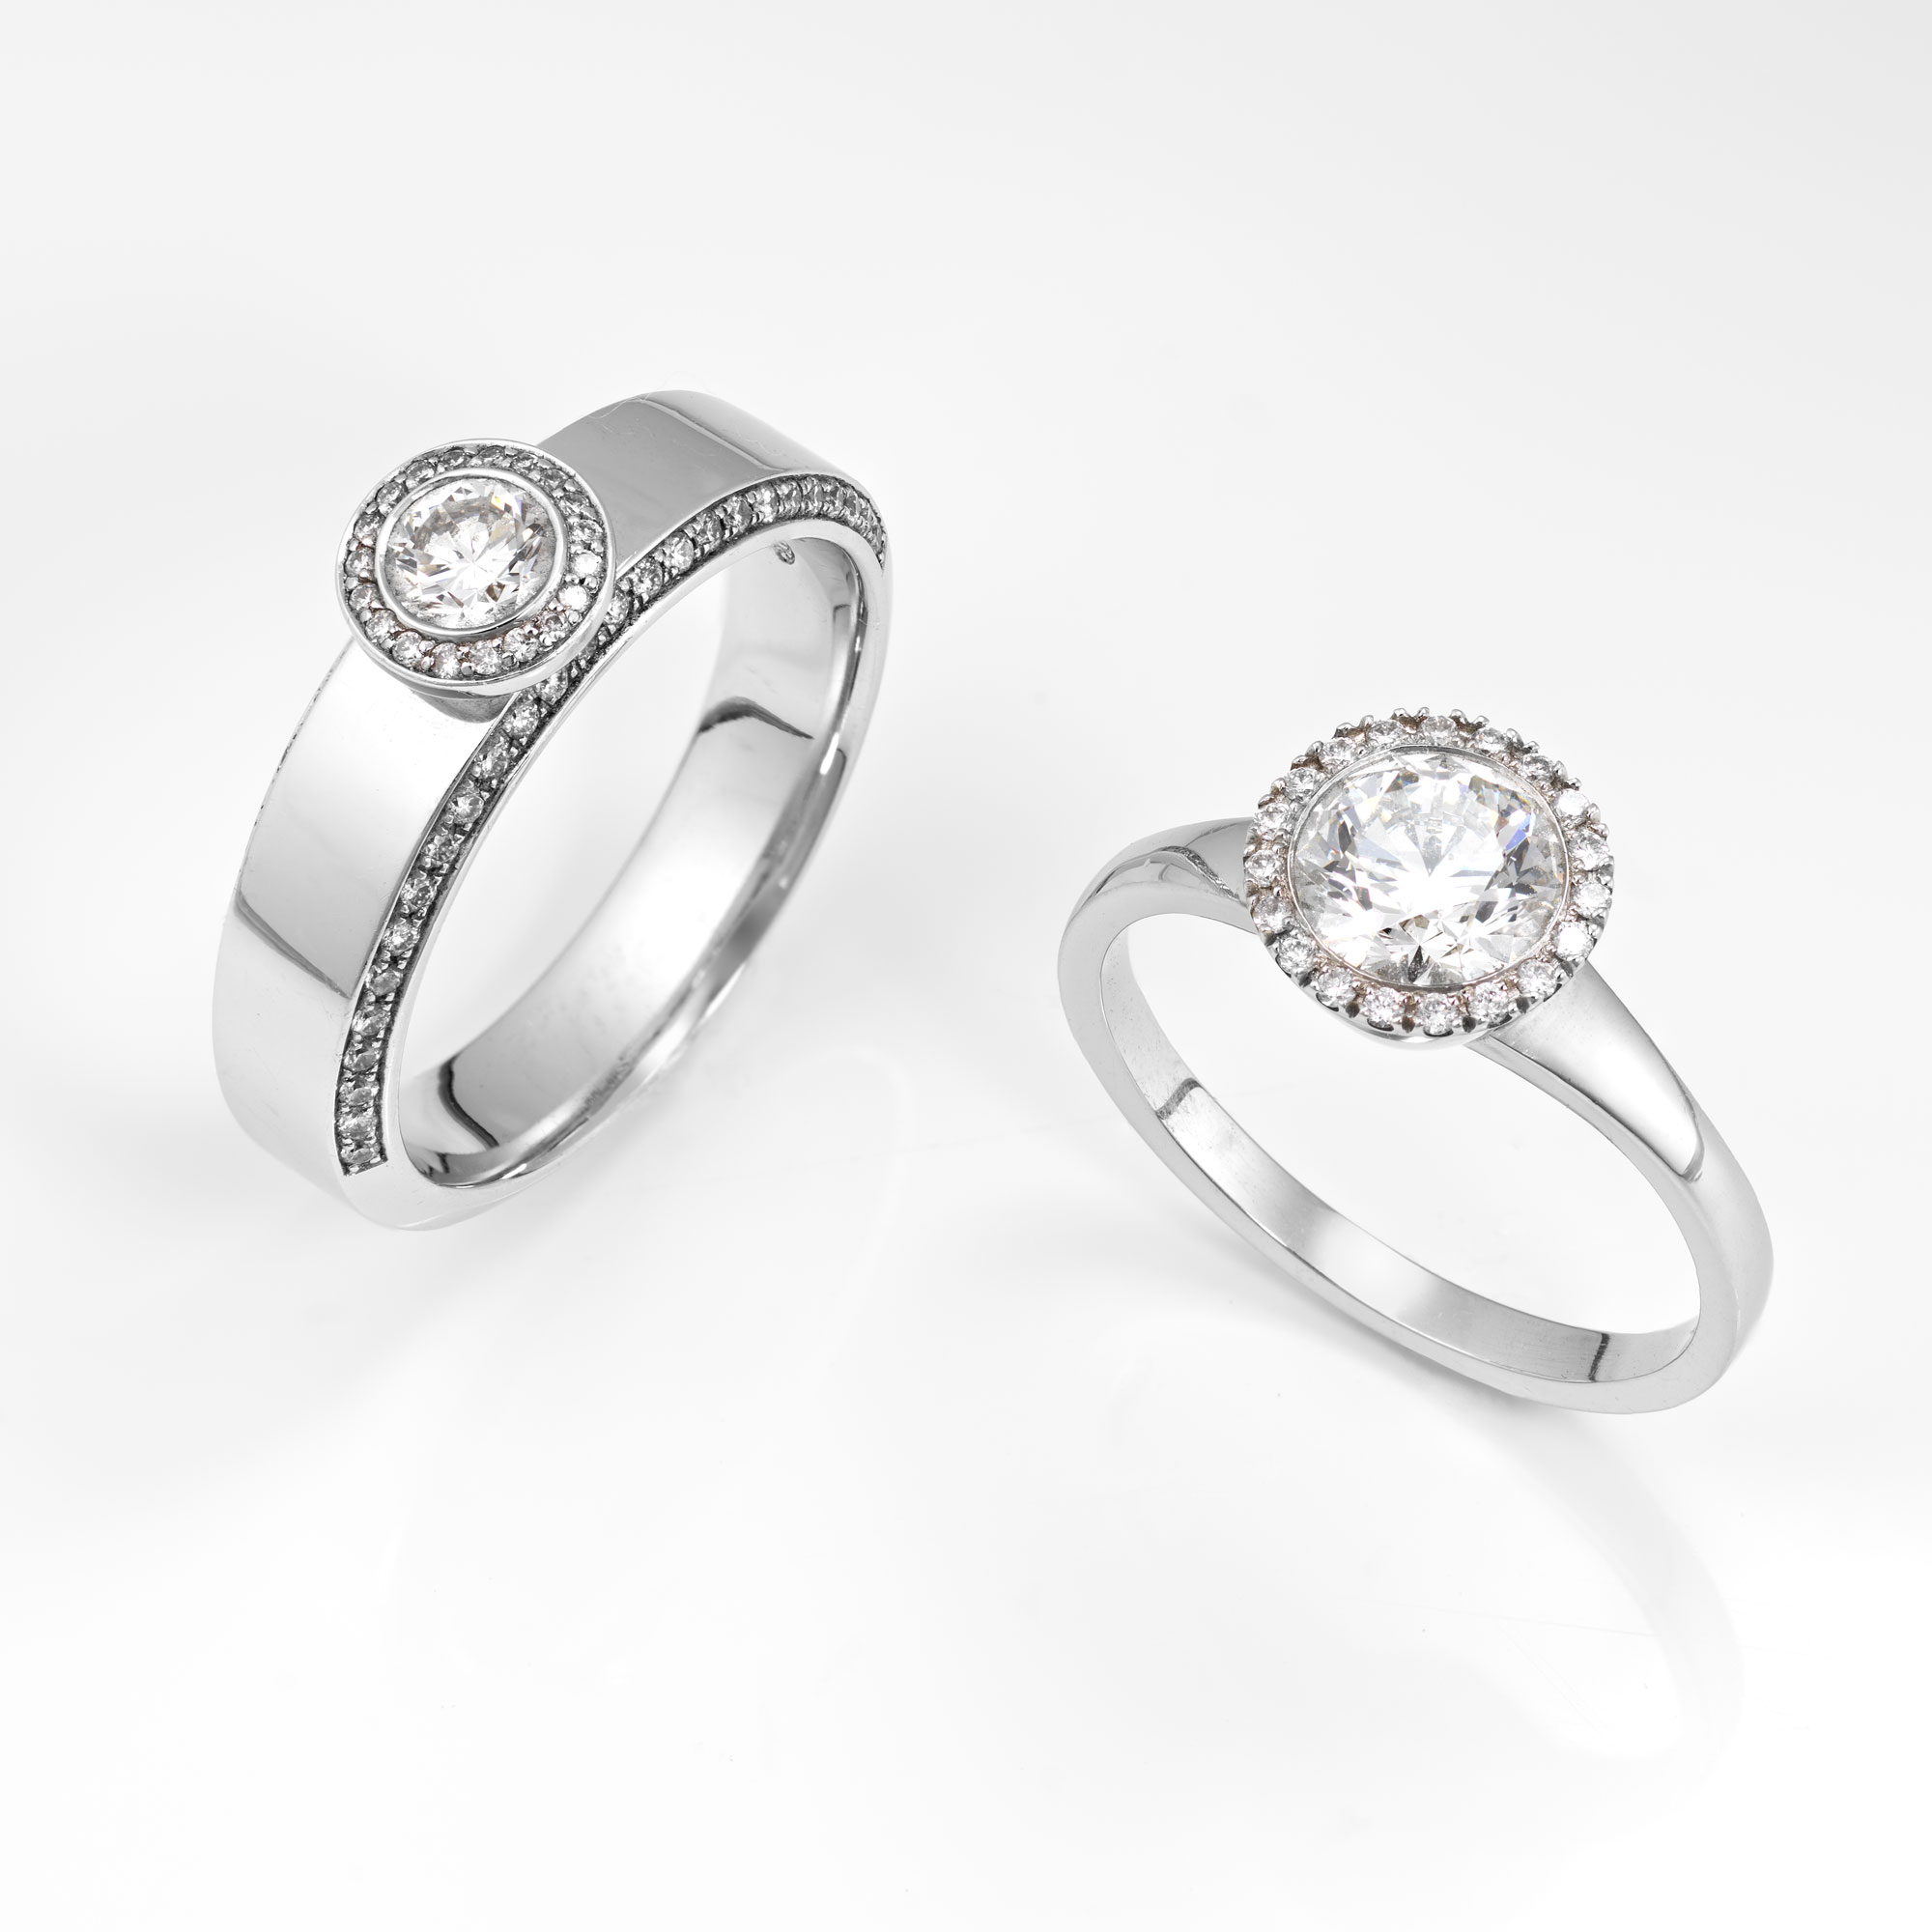
Whether you’re looking to photograph a $50 dollar pair of handcrafted earrings or a $15,000 diamond ring for an advertising campaign, knowing how to photograph jewellery is a valuable skill for any photographer. And in this class, you can learn how to do it like a pro!
You’ll find solutions to some of the most common challenges associated with jewellery photography, including controlling reflections on shiny surfaces and working at close magnification.
Challenges:
- Controlling reflection on shiny surfaces
- How to light small objects on a white background
- Getting sufficient depth of field at high magnification
- Best camera settings for product photography
Solutions:
- Create a light cone to remove reflections
- Gradient light with pockets of light to highlight key areas
- Use focus stacking to get the whole image sharp
- Select a small aperture for maximum depth of field, low ISO and highest sync speed
To watch the retouching and focus stacking process, check out Diamond Rings | Post-Production (Focus Stacking).
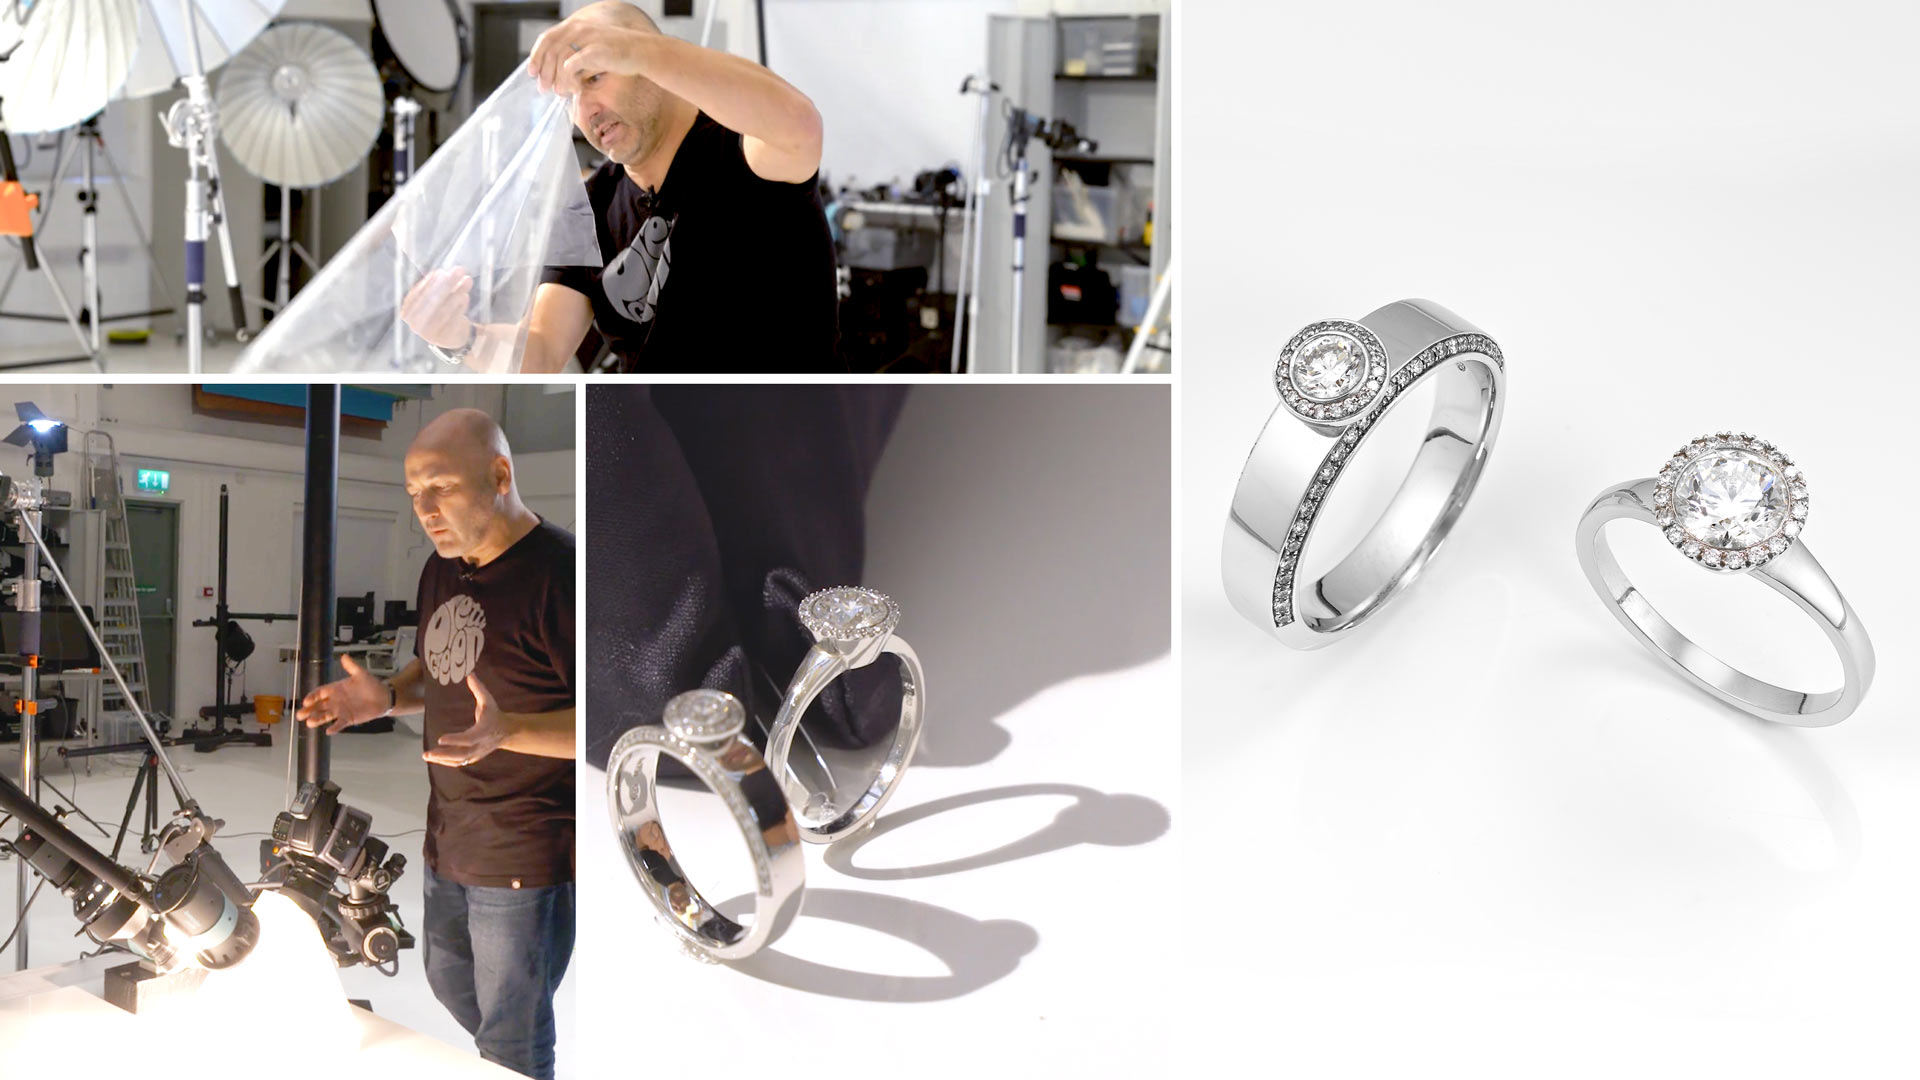
To overcome the problem of unwanted reflections, I created a light cone, which I placed over the rings. This blocked out any reflections and allowed me to create that graduated lighting that is so great for jewellery photography.
Need to use a light cone on a regular basis? We’ve partnered up with V-Flats and developed a significantly more durable heat-resistant Light Cone modifier. Learn more about Light Cone here.

Creating a light cone to reduce reflections on the rings.
The next step was to light the rings. I started with my fill light (a bare bulb point light source), before gradually adding a few more to highlight key elements and add some extra sparkle. Although I used picolites with projection attachments for this shoot, you could achieve the same effect with a tight snoot.
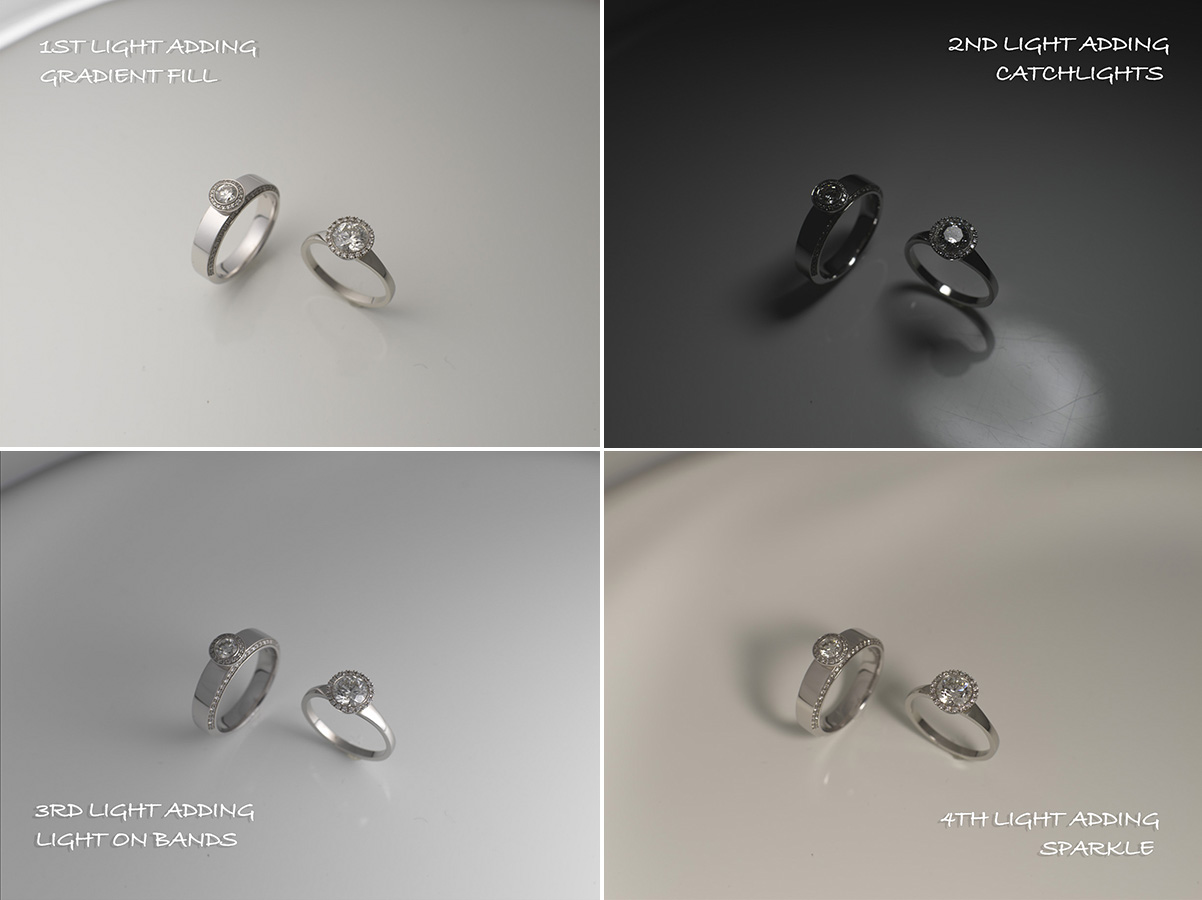
The effect of each individual light.
The final stage of the shoot was the focus stack. Even though I was shooting at a small aperture, I couldn’t get sufficient depth of field due to the high magnification. Before I could start my focus stack, I had to finalise my lighting and ensure my camera was locked down (I use my Manfrotto Super Salon, but any sturdy tripod will work). Working in manual focus, I then took a series of images shifting the focus from the front (the diamond) to the back (my background surface).
Here you can see the first image of the focus stack, with the focus on the front of the diamond ring:
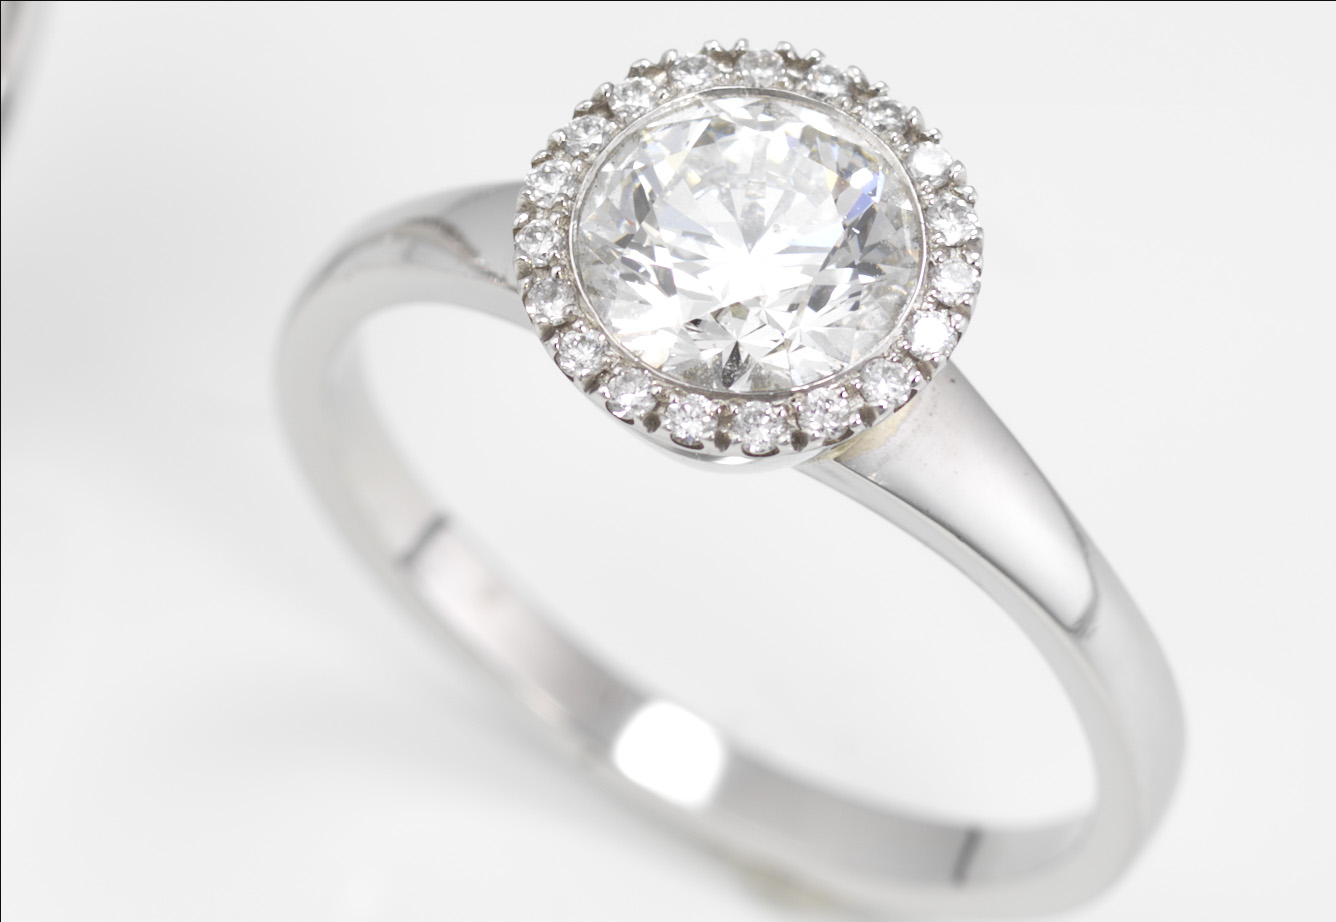
The first image in the rings focus stack.
And here is the final image of the focus stack:
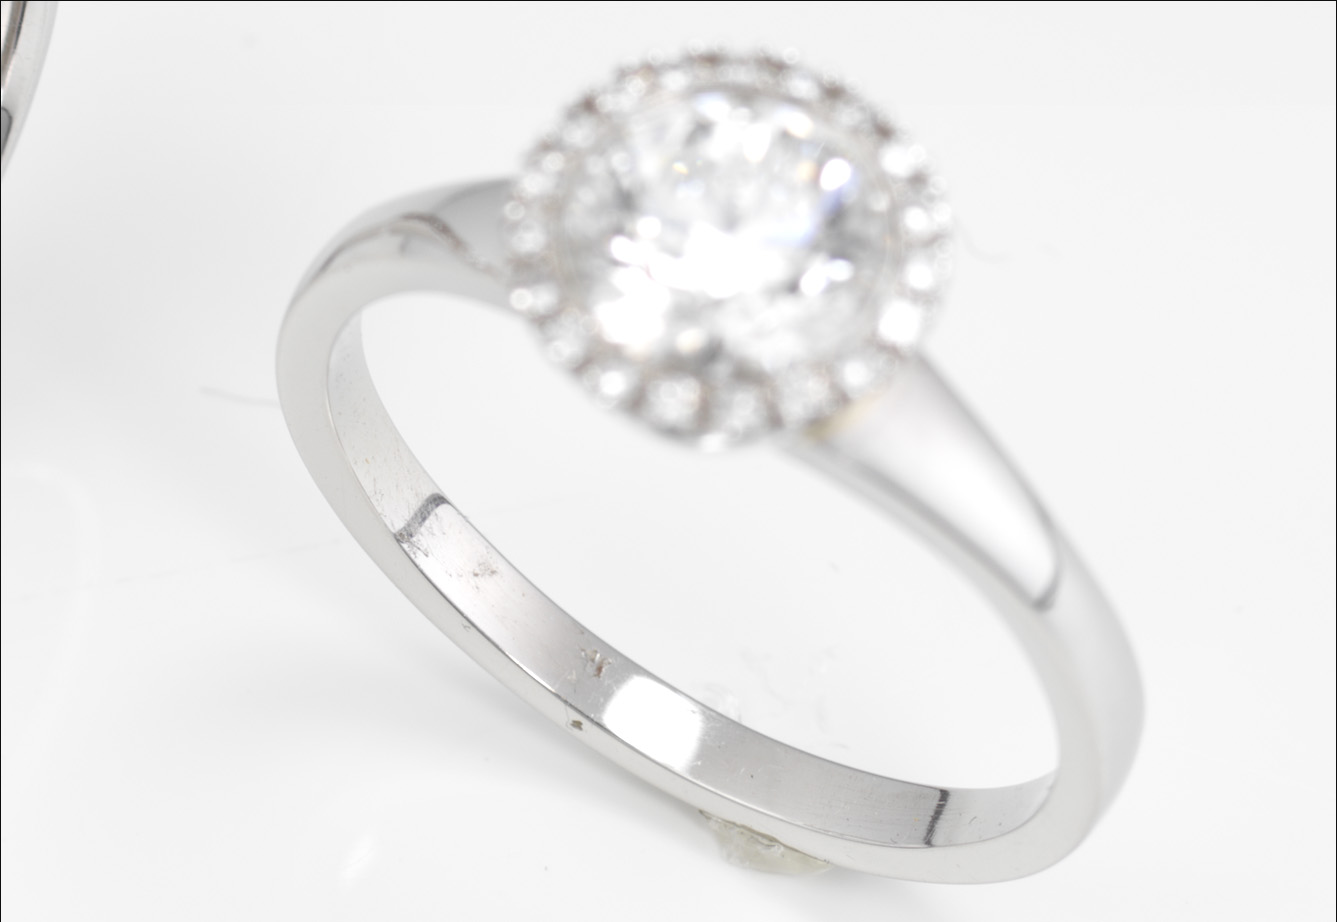
The last image in the rings focus stack.
In the above image, the last of the focus stack, the focus point is at the base of the ring. I took a total of 12 images to ensure my whole image would be sharp.
Once I’d completed the focus stack, the next step was to put it all together in Photoshop. You can learn how I did that here.
The final image:
The final image of the rings jewellery shoot.
If you enjoy this class, check out Gemstone Necklace Photoshoot, Diamond Necklace Photoshoot, and Zenith Watch Product Shoot.
Questions? Please post them in the comments section below.
Comments
Hi Karl
Great tutorial. I’m stuck with the cone. I’ve tried making one myself with no success at all. I’ve looked at Foba.com for one but can’t find one. So I’m wondering if you might be able to produce an outline drawing of the flat shape with measurements so I can get it printed out and use as a template to cut out the expensive diffusion material and clear acetate.
Hi Jason, roll a small piece of paper (letter size) into a cone with sellotape, experiment with a few sheets and then cut the necessary hole. Once you’ve got one that looks pretty good, unstick it, lay it out flat and measure it and then scale the measurements up for your final version.
Hello,
Thank you for all the wonderful videos
question
how much not owning a Hasselblad camera affect the quality of photos…
will I ever to do high end project without it? or is it a must once you’ve reached a high level of knowledge and client base to get it?
Hi, many photographers shoot product images with high resolution 35mm cameras and use very good lenses on them, but the more clients you win and the bigger your clients get you will often find photographers moving towards medium format but this isn’t something that should stop you doing product photography initially.
I have secured a very expensive ring for a shoot. I will be attempting this very soon based on this lesson. Looking forward to the challenges from the lighting to the focus stacking and composing the final image. Should be a great learning experience!
Best of luck with it Geoff
Hi Karl
1. Is the small aperture the reason you are not getting more hot spots on the metal? i would imagine with 4 lights in such close proximity would have burn out the metal.
2. If you know that you will be doing focus stacking, then aperture as it relates to depth of field matter? or in such scenarios one should use the aperture to control the light coming in, specially when your strobe cannot go any lower.
3. When photographing jewelry with gemstone and diamonds (like the Aquamarine necklace you did), will it be better to first light up the stones and then introduce the broader fill light?
Thanks
Amit
Hi Amit,
1. I’m not getting hot spots on the metal because I have the power of my lights low and/or the aperture small
2. It is still better to have as much depth of field as possible as this will help the focus stacking process
3. I can’t see that the order will matter, but it’s always best to try and do them all together as one shot if that works.
Hello Karl,
Thanks for your great modules!
As am specializing more in jewelry and loose gemstone photography, some clients are asking me for resolution as high as 600 ppi in order to have for example a 4mm diamond printed as big as an A4 size. I am currently using a canon 6D with 100 micro lens and the maximum am having is 300 ppi. how can I overcome this challenge? what new equipment do you recommend I invest in ?
Thanks!!
M
Hi Marya, the only way you can increase the ppi for a given size is to shoot with a higher megapixel camera. The Canon 6D is 20mp so you would need to consider a 40mp or more camera.
I Karl,
Can we know the size of the cone, height and width? Or do you make them in different sizes for example if it’s only one ring?
By the way great results, I’am amazed about the simpliciti of the setup and never thinked on using a bare bulb!
Thank you!
Hi, I’d just make them to size based on the size of the lens you are using and the size of the object you are shooting. Foba make some ready made ones out of acrylic too. You can do lots with bare bulb and diffusion scrims and acrylic as you will learn in many sections on Karl Taylor Education.
Hi Karl,
Can I use a simple paperboard to create the light cone or do you recommend some specific material? What can I use to don’t change the color and have a good result?
Thank you ! 😉
Hi Thomas, you could use tracing paper or the diffusion material that we sell in our shop.
Hi Karl, you use changing focal points to stack the images,
What about a micrometric sliding plate? when and how to use it?
Thank you in advance
Andrea
Hi Andrea, I’ve never used one but I know some photographers that do. I’m afraid I’m not familiar with it myself.
Hello Karl,
how do you ensure in this case without exposure meter for an identical exposure of the white background in the event that different rings should be photographed, but the surface should be identical – because the photos should appear side by side?
Many thanks from Germany
Gert Lapoehn
Hi Gert, in the software that I’m using to shoot the pictures I can measure the RGB values very precisely from any specific point and then I can compare those values with any new image, so there is no need for a light meter, the tethered shooting software is far more accurate.
Hi Karl,
as you mention it seems to get really challenging to achieve specularity with this small light cone.
Would you build it like this again or would you create a bigger one – or would you maybe try a different solution?
Thanks a lot!
Jens
Hi Jens, I’d build it again like this as the control on the smooth lighting is so easy for the metal. I’d consider taking the cone away though and then lighting the diamonds separately or making a hole and inserting a fibreoptic light (like used on the live cheese shoot) to find some specularity.
Hi Karl,
Great tutorial!
What is the purpose of that plastic you put under the Lee diffusion material? Tnx
Hi Chaim, to stop the diffusion material collapsing.
Hi Karl,
Great tutorial as always. I am aware that you are not to keen on continuous LED lights, but if one was doing only jewelry photography then would you consider using continuous light like the Broncolor F160? Would you also considering fashioning some sort of a flexible acrylic paneling system to make it more of a table top setup?
Barry, i find orthodontics wax to be the best when it comes to mounting jewelry. It is easy to come off and will not damage the polishing. Nice effort with the continuous lights, may I know what type of lights are you using?
Amit
Hi Amit, I really like the new F160’s because of the way the light is dome shaped and they have a very high CRI so in that respect I’d have no problems using them for jewellery.
Thanks for the glue tip Amit.
The lights are various:
Some are high intensity, high CRI LED strip lights (not the cheap ones) that I’ve fashioned into shapes to mimic soft boxes. Then using LED drivers and variable transformers I can control the intensity. All rather DIY, but I thought I’d be able to shape the lights this way rather than use off-the-shelf LED panels.
The rest of the lights are high CRI LED bulbs, again with DIY electronics to control light levels. I’ve been careful to match the colour temperatures.
It’s early days for me, but with the latest LEDs the options seem to opening up (for static objects). It’s been way cheaper too to set up, which is nice.
Another very useful video Karl. One question: what did you use to glue the rings without damaging them ? I assume it is some sort of rubberised glue that rubs off – it will be essential that it comes off cleanly.
So far I’m repeating variants of your course shots with only continuous LED lights (examples are up on my website barryedge.co.uk). I mention this as by using long exposures I can also light paint some shots, which adds options to some compositions – in case anyone is reading this …
Many thanks, again …
Hi Barry, thank you. The glue is a standard glue stick for a heat glue gun. It sets hard but peels of easily from most surfaces.
I’ve never used a glue gun. I’ll investigate. Thank you.
Hello,Karl I have a question, why you do not use a tilt-shift lens, do not get the same result as the focus stack? I’m thinking if I should buy a tilt-shift lens or continue doing focus stack, thanks a lot!
Hi Mauricio, a tilt and shift lens wouldn’t be of value in this instance as the plane of DOF was already similar to the camera. When you use a tilt and shift lens it is usually to correct a plane of DOF that is different to the standard line of DOF – see this chapter to see this https://visualeducation.com/class/tilt-and-shift-product-shoot/ you will see that the products are laying in a plane that is different to the angle of the camera, also in many macro cases even with a tilt and shift it won’t cover DOF enough and only in one direction as per the video link. For example it would work on a watch face but not so much the whole watch but you can also use stacking with tilt and shift.
ok, Karl thank a lot!
Hi Karl … I recently shot 28 wedding rings (sets of two LADY and GENT) and I initially struggled to eliminate reflections. I literally had to cover every surface in my small studio with white sheets. Your method is a very simple solution and time saver. Maybe the complexity of it is if the client needs various angles or positioning of the rings. For my case, it was easy to change positions and orientations of the rings without having to move anything around. I used a frosted acrylic on top with bare bulb which gave me amazing gradation on the rings, bottom I place a white which filled the shadows pretty well. I did not glue my rings since the client wanted the various orientations. I am learning alot from you. Keep up the good work. I am based in Kenya … visit us during your next holiday. Come enjoy the Safari experience, wildlife and beautiful beaches.